Foreword:
Although every care has been taken to remove mistakes and insert the correct information, mistakes and mix ups do occur. If you find one of these mistakes, please forgive me.
At times, I found the experience of learning, documenting and transferring information to the blog very complex. And as I am only human I did get mixed up and made mistakes.
The website links, images, tasks and information were what I studied at the time of writing the blog.
Websites and learning resources are constantly improving and updating so I wish to let you know that they may have changed over time. What I studied and the links and images I have included may no longer be available.
I hope you find the blog entries useful.
Many thanks
LTCAF
December 2021
Making a mad dash for the line
 HTML & CSS
Wednesday 1st December 2021 / *
Continuing from where I left off last month (yesterday)
Straight into a warm up/ review of list style type property, which was the last exercise from last night. (The last day of November):
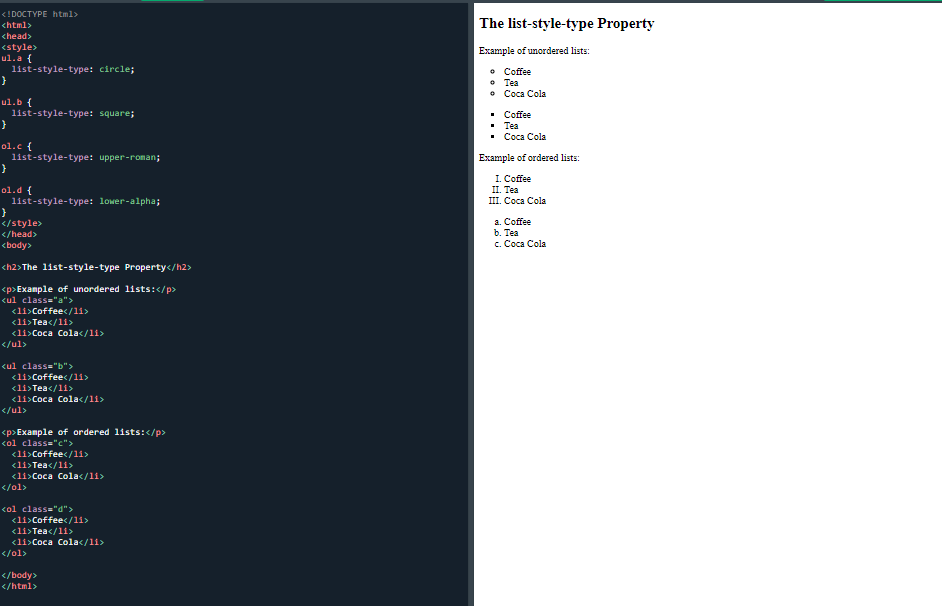 A few examples of list-type properties
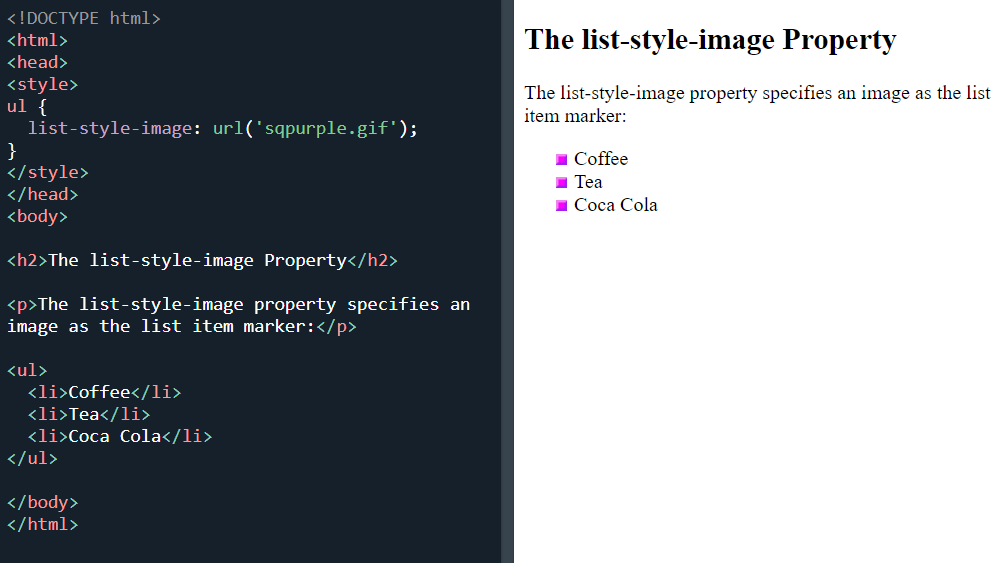 The list style image property
No problems with this one as it is straightforward. The only issue is the image url which I know doesn’t work from previous material.
Like before, I changed it for my purpleimg.jpg which I have used previously. It worked but instead of small purple squares, I got huge partial squares:
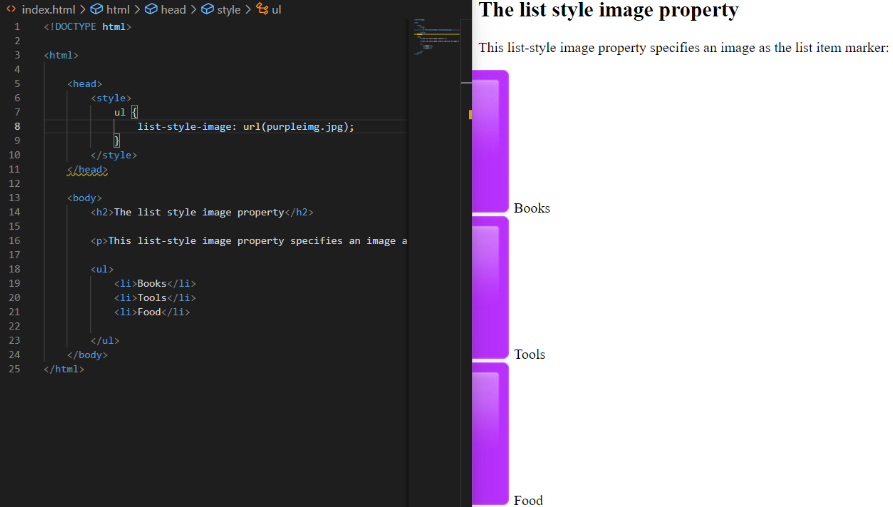 I used my jpg image which were too large
So, I tried to write something to reduce the size but my two efforts didn’t work:
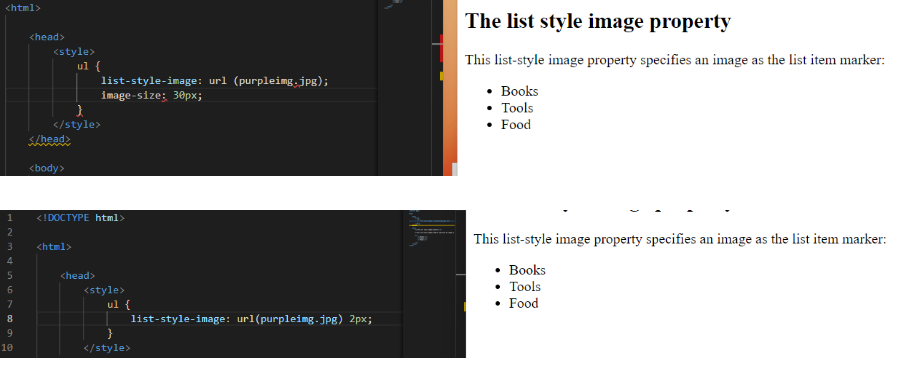 My two failed attempts
As you can see from the bottom image, the purple squares went back to the default bullet circles.
Next it was onto the 'position the list marker items':
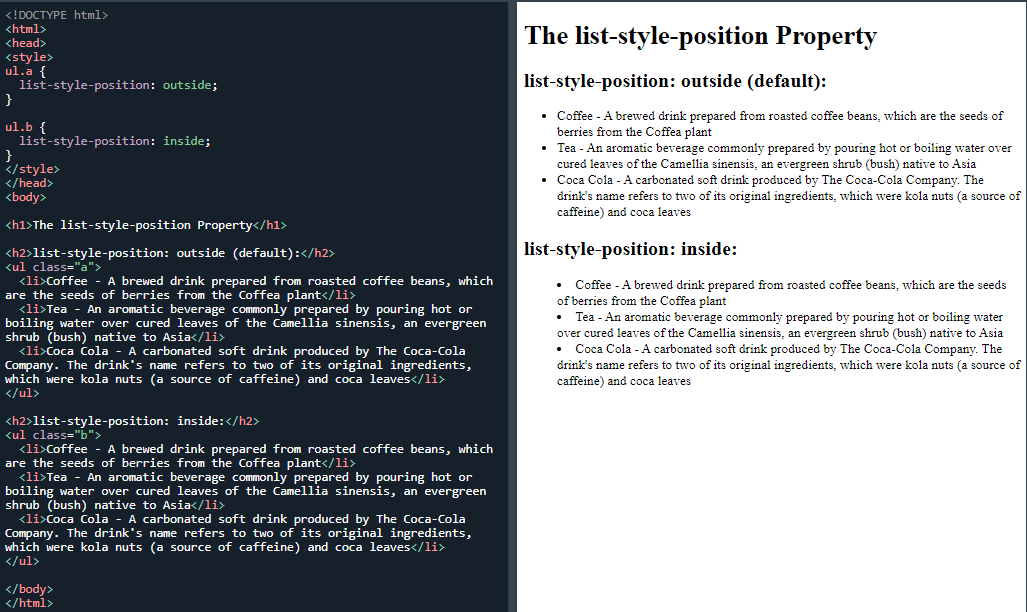 List-style-position property
And I finished off with the 'remove default settings':
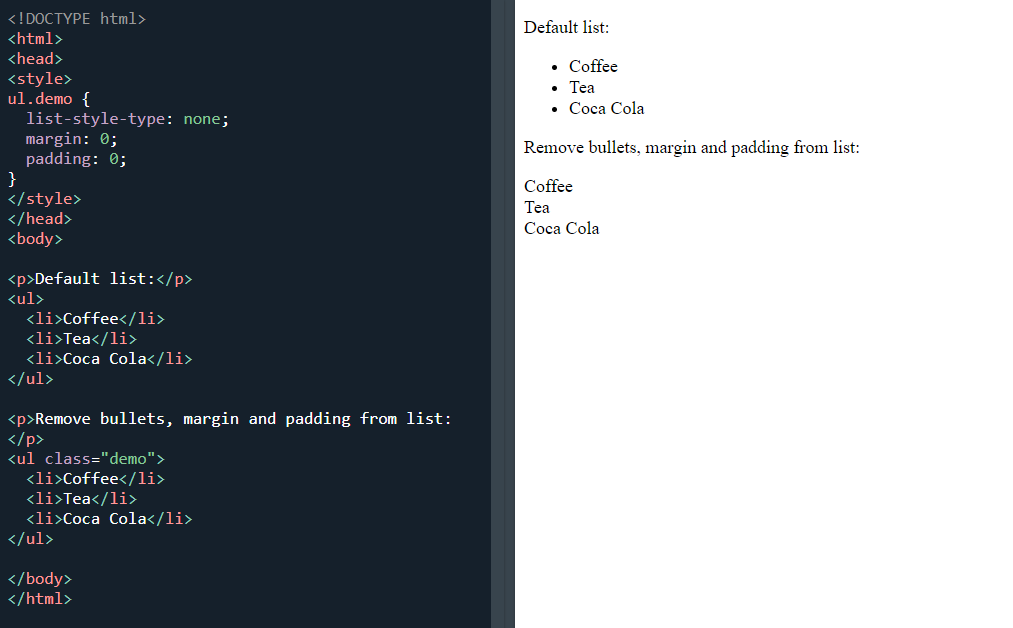 Remove the default list markers, margin and padding
I was going to start on the next exercise but decided against it, even though it was short and straightforward.
Day total: 0 hours 55 minutes
Thursday 2nd December 2021 / *
More list-styles
Warmed up by reviewing last night's last exercise which was the 'remove the default setting' task. Then it was straight into the learning with the 'list shorthand':
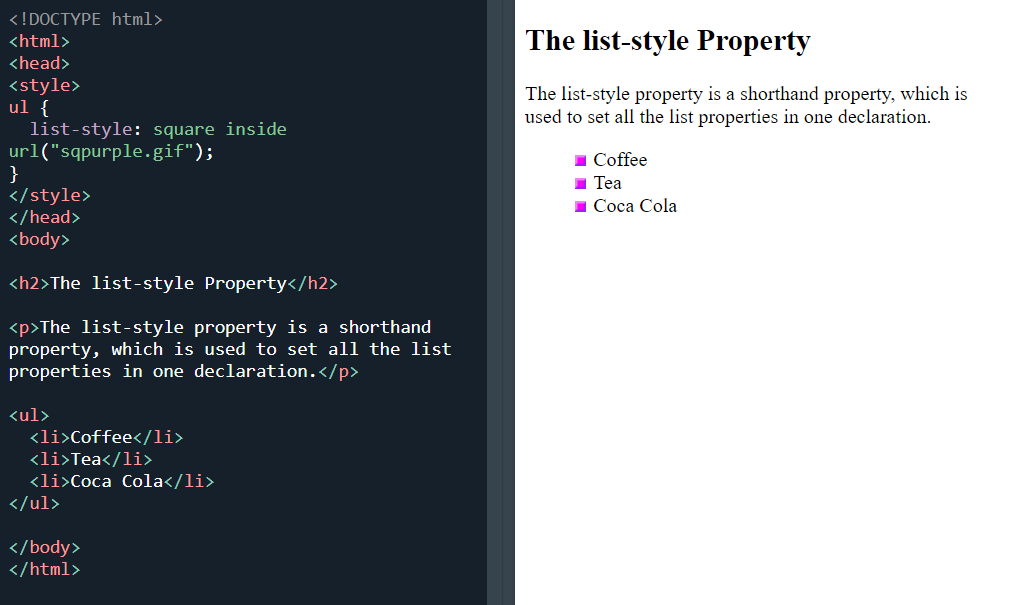 List-style shorthand
I knew that the ("sqpurple.gif") wouldn't work so I replaced it with my purpleimg.jpg and I and got this:
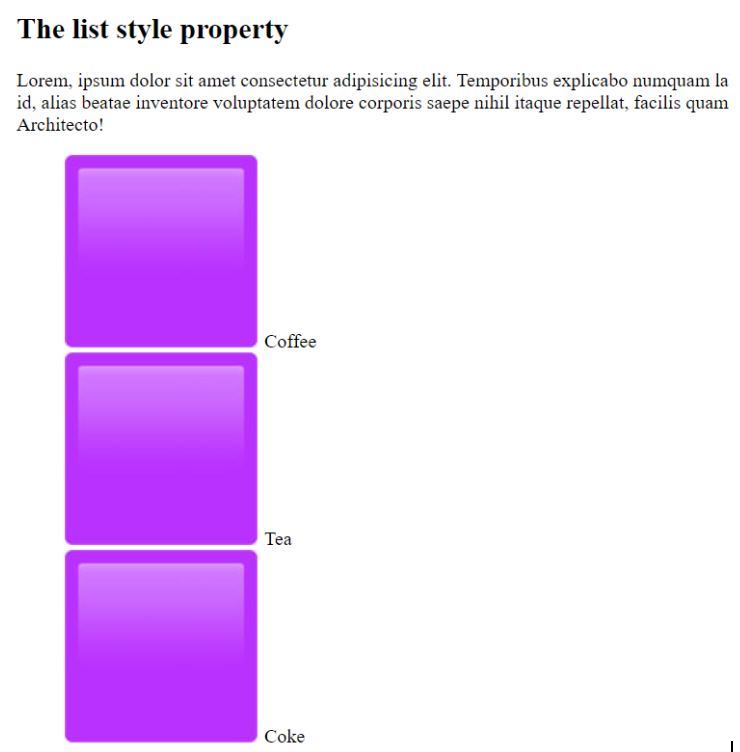 I replaced the purple boxes with my purple jpg boxes
The large purple squares are back and I left it at that.
Then moved onto ‘styling lists with colors’:
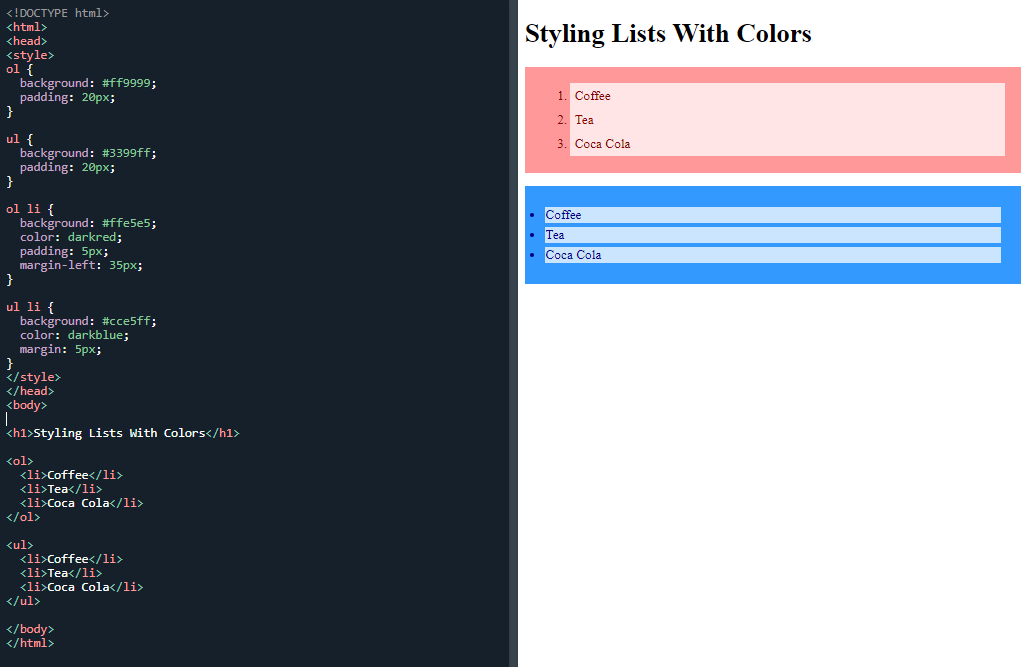 Styling lists with colours
This got the old memory working and was very pleasing and satisfying once I memorised it all. I did have a peak and the code as I couldn’t remember all the numbers of the colours.
It was also awesome to be able to change the colours and styling of a list. I took some time to have a good look at the language and to fully understand what each line did.
Finally, I ended the day with the ‘test yourself with exercise’. I got one wrong and went back to find the answer rather than taking the easy option and hitting the answer button.
I didn’t start the next section on tables as I wasn’t really up for concentrating on some new material this time of night. I will start it tomorrow.
Day total: 0 hours 56 minutes
Friday 3rd December 2021 *
Concentrating and debugging were not my strong points today
No review or warm up today. I went straight into the learning. This was because I really didn’t feel like spending much time studying tonight and especially having to focus and concentrate on something. This was due to minimal sleep, an early start and long hours at work.
So, I placed the stopwatch on the table, opened up the VS code, opened W3Schools and cracked on with the CSS tables, making a start on this fancy table:
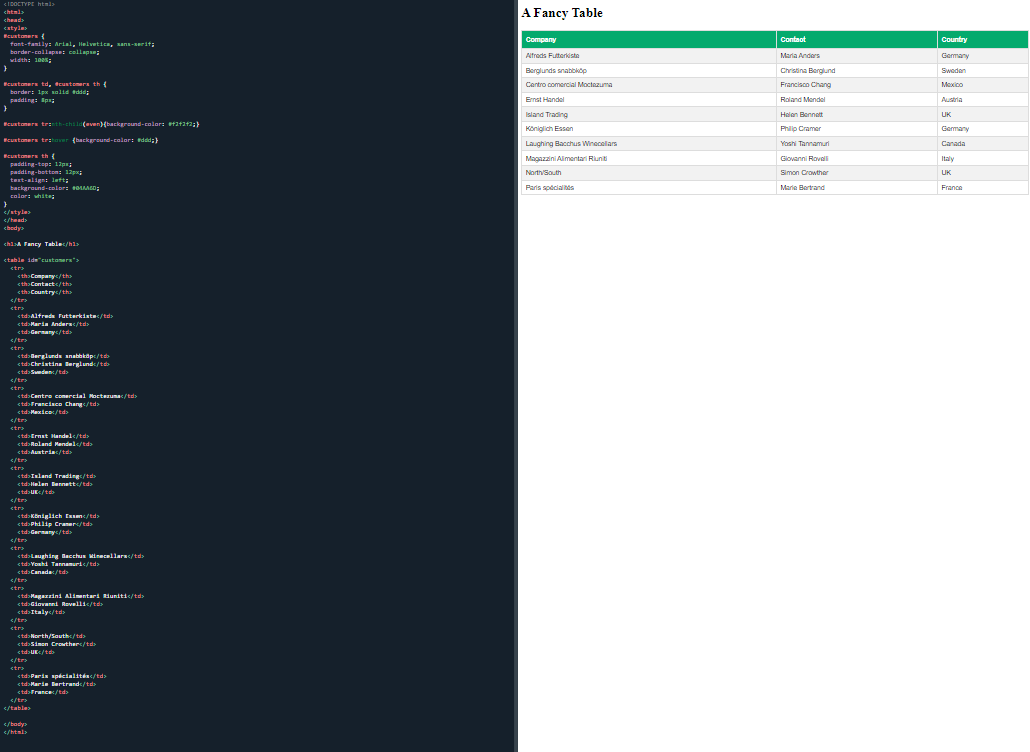 A fancy table
It was a real test for my drifting concentration and I struggled, especially with some of the details in the middle section. Firstly, I set out to remember this section:
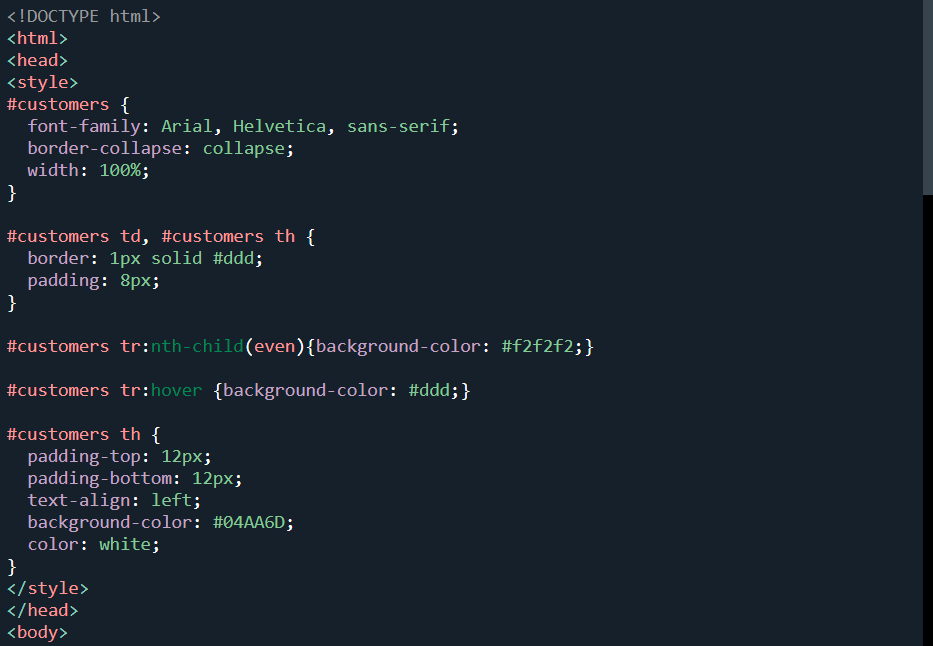 The CSS is between the style tags
It seemed to take a lot of effort to get these lines under my belt. And as I went through the lines, I really looked at them to identify what they were instructing and their purpose.
Then, next I was onto the lower section:
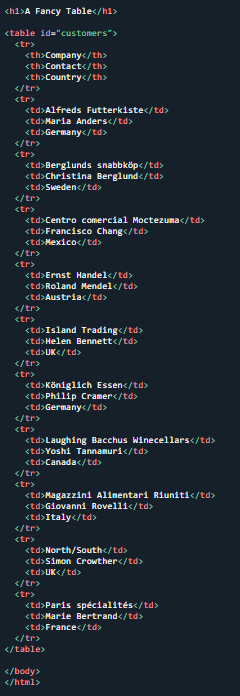 The lower section between the body tags which contains the HTML
I made a mistake here as I took a shortcut but I didn't realise the mistake until later.
Anyway, I completed the lines and refreshed my browser and all I got was the table data without the lines of the table border.
I spent ten minutes looking through the lines to see what I had done wrong. This is when I realised that I had made the mistake in the lower section.
I saw the whole of the above section as a continuation of the same lines, just repeated. This was true for this section:
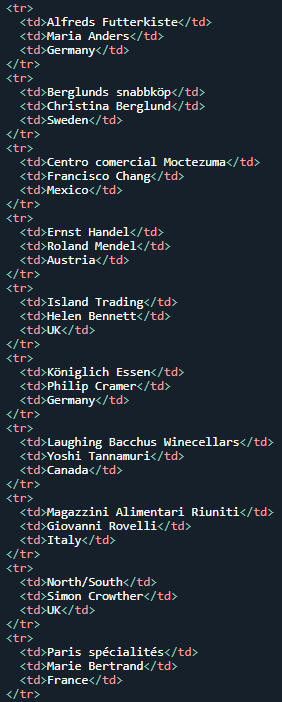 This section contains a repeat of table rows and table data
The mistake I made was to copy and paste this section, thinking it was the same repeated lines all the way through:
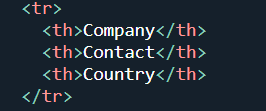 The table header
The table head < th > and the table data < td > were not the same.
So, with the debug completed, I refreshed the browser and still nothing. I went through it line by line, comparing my lines to the lines on the webpage. They were all identical. I had made no other mistakes that I could see.
I deleted all my lines and copied and pasted the W3Schools lines and, hey presto-they worked. What had I done wrong?
Time to delete the top section code that was copied and pasted:
The CSS between the style tags
I typed in my lines and pressed refresh and it worked. This type of issue happens quite often and I don’t know what I was doing wrong. I know there must be some typing mistake but I am not so great at finding them. I will this opportunity to improve and practise my debugging skills.
I moved on and completed the next two sections which were simple and just a variation of each other.
Table border:
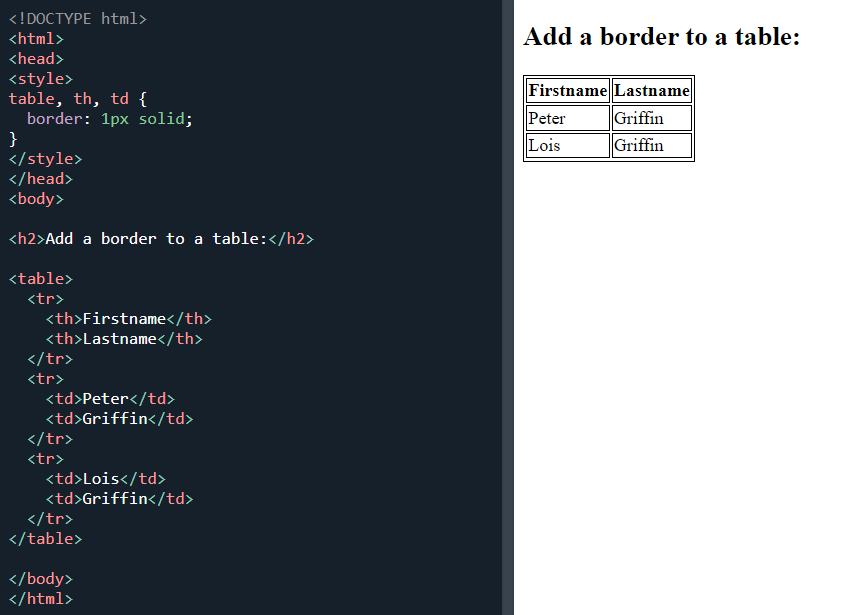 A border around a table
A full-width table:
 A full-width table
I called it a night after this table.
Day total: 0 hours 59 minutes
Sunday 5th December 2021 / *
Times many tables
Started with a quick few attempts at the full-width table to warm up which was the last task from last night.
I then made a start on the 'collapse table borders':
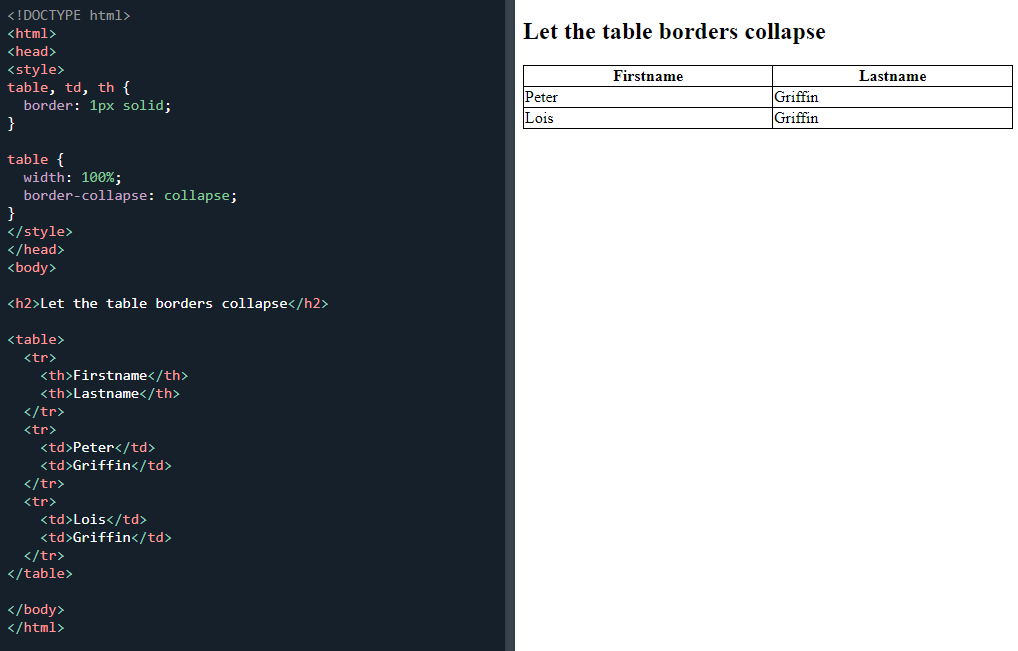 A table border collapse
And the single border around the table:
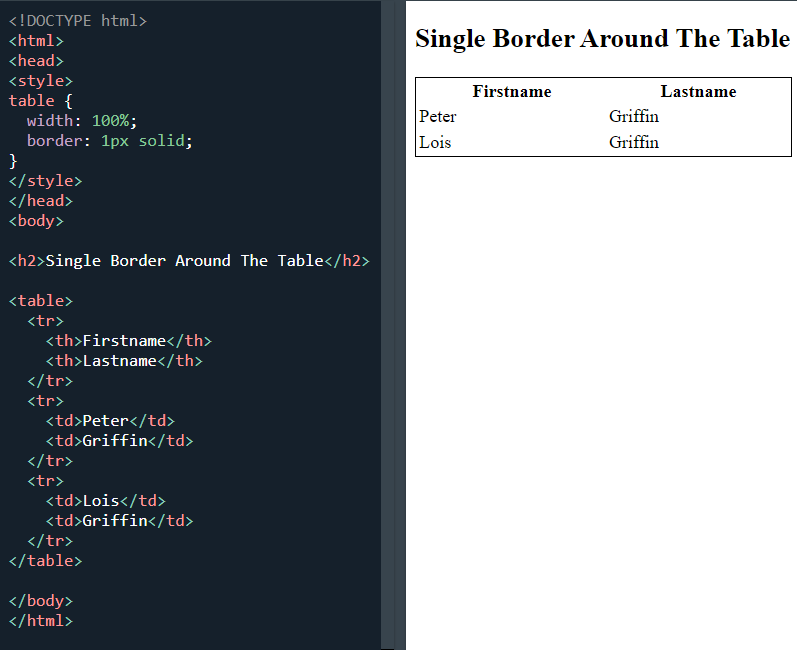 A table with a border
These are all very similar with only a few differences in the lines. This is the same for the CSS table size page:
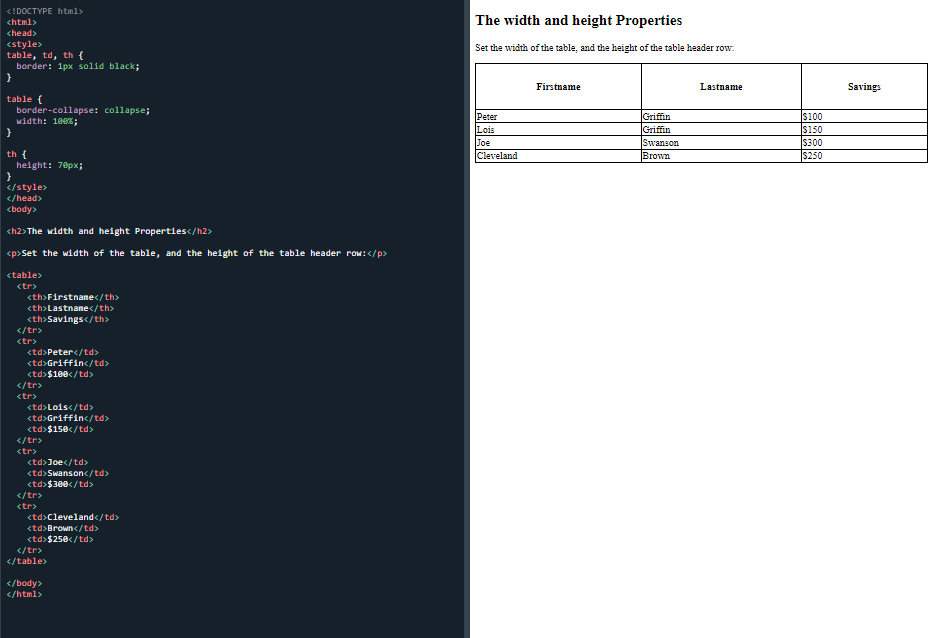 Set the width and height of the table
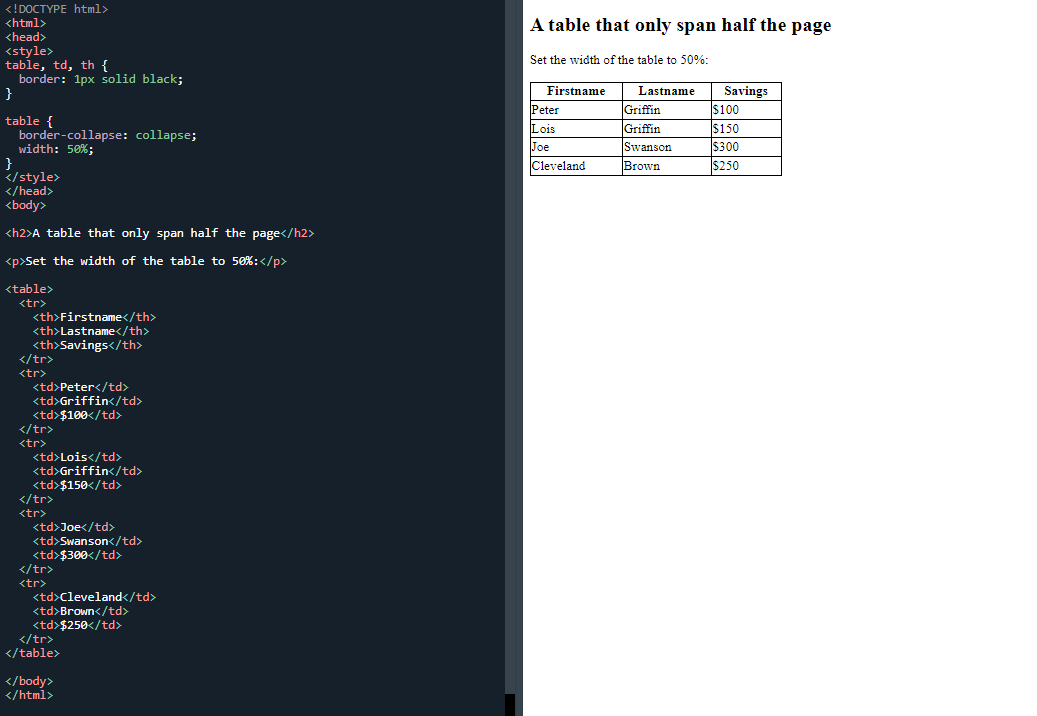 A table that only spans half a page
The next page which is CSS table alignment is very similar too. I wanted to complete this page and it make a start on the horizontal alignment:
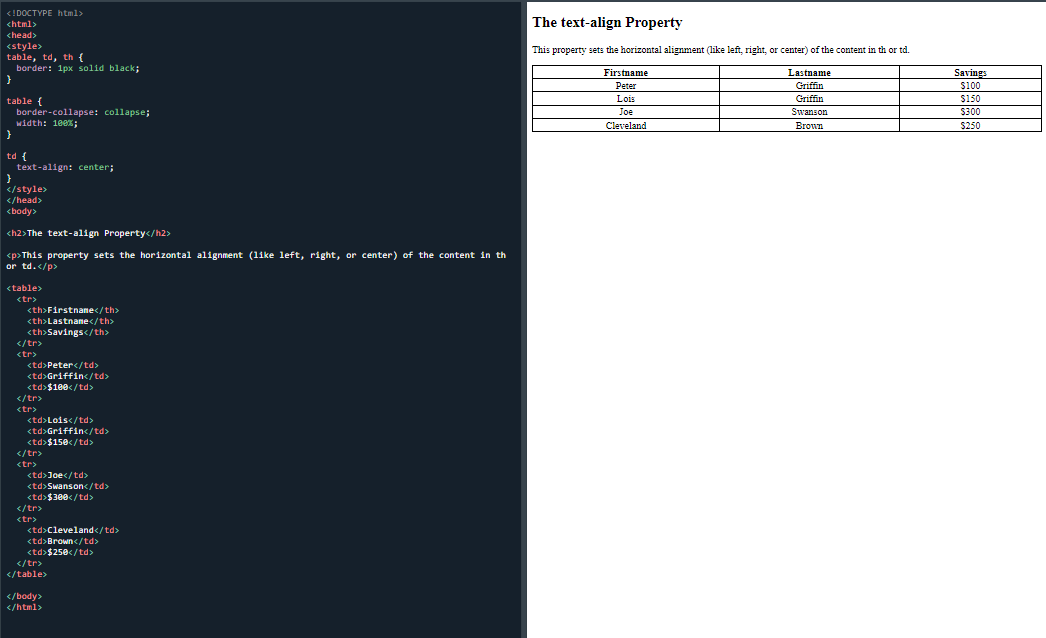 A table using the text-align property
Which uses the text-align property to centre the text:
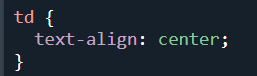 The text-align property used to center the text horizontally
 The text-align property left
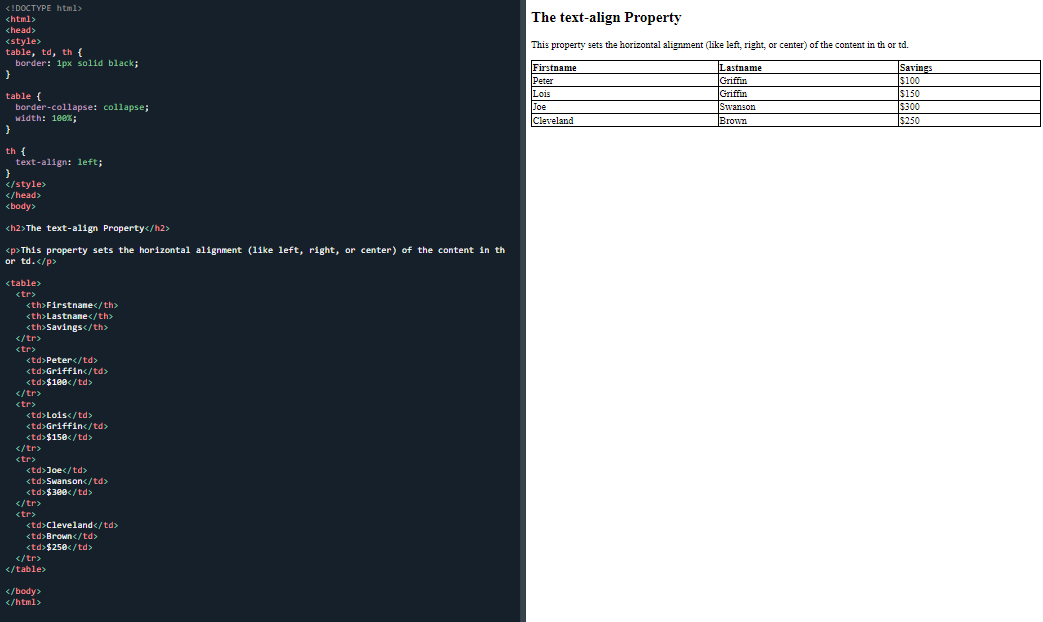
And finishing with the vertical alignment:
 The vertical-align property
All today’s material was useful with just a few changes needed to achieve different results.
I messed around with all the tables by making changes to the selectors, properties and values in order to use some of the skills I have learned to change things to my liking.
I’m really happy that I now have the ability to do it with ease and without having to look it up all the time as I had to do before. It's a sign that I’m progressing and I know that I am not going to change the world with these skills. I'm fully aware that at some point I will look back to this moment and realise that my skills are basic, but, at at the moment I'm pretty chuffed with what I can do.
What is important and encouraging is that I am visibly making progress, along with the fact that I am still enjoying learning this stuff.
Day total: 1 hour 23 minutes
Monday 6th December 2021 / *
Tables and tables
Started with a warm up of the vertical align property. These warm ups always help me because they gently help me transition from busy work life to a slower and more concentration/ study mode.
I started and completed the CSS table style page today.
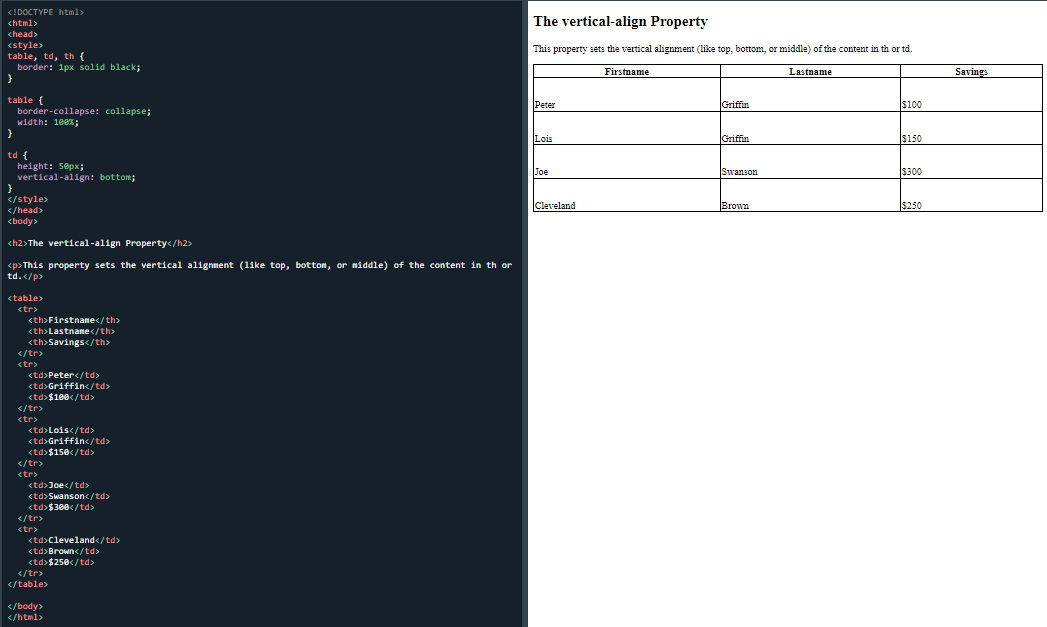
Started with the 'table padding':
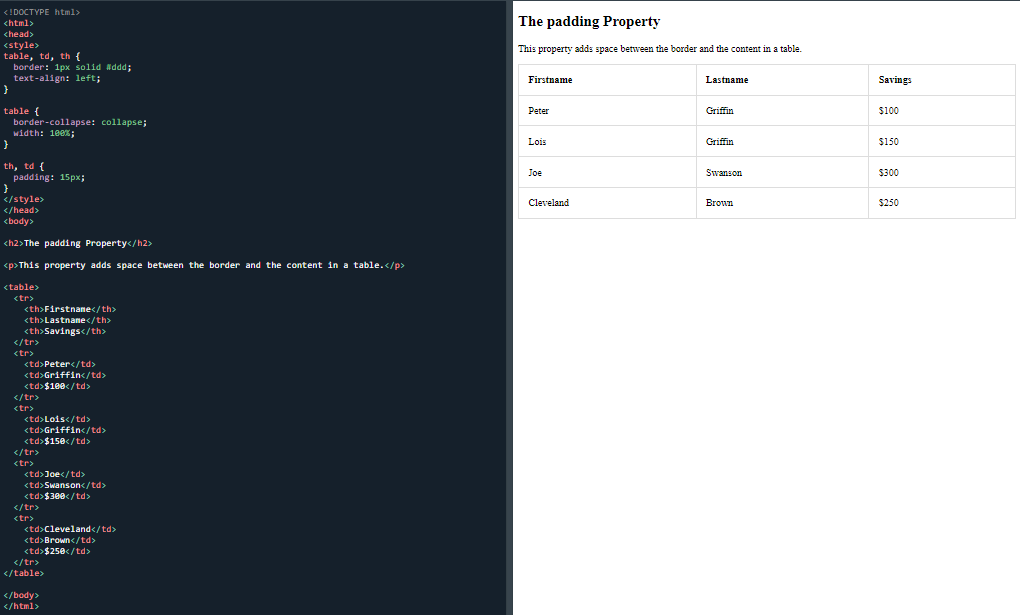 The padding property
And then on to the 'horizontal divider':
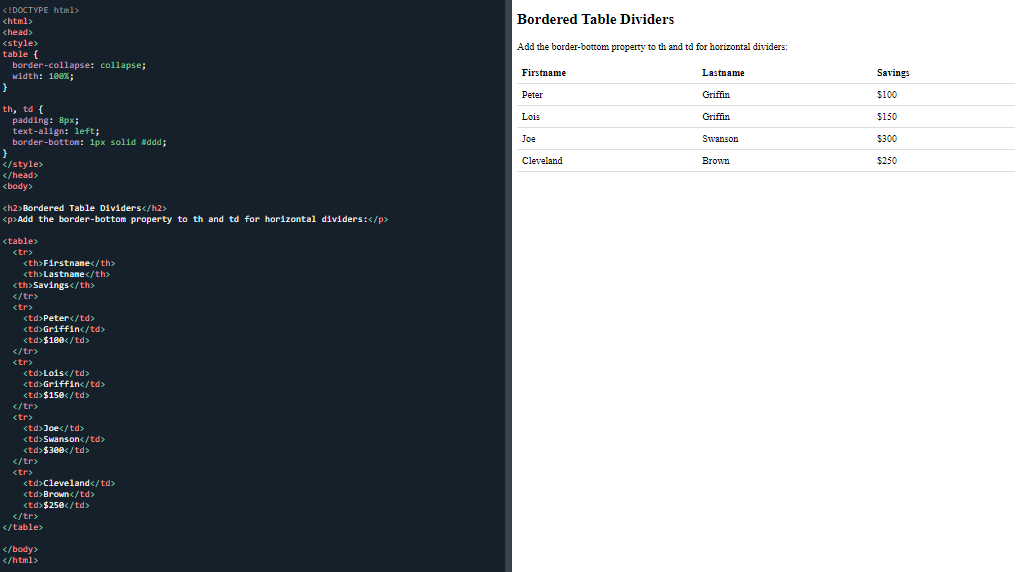 A Bordered table divider
Next was the 'hoverable table'
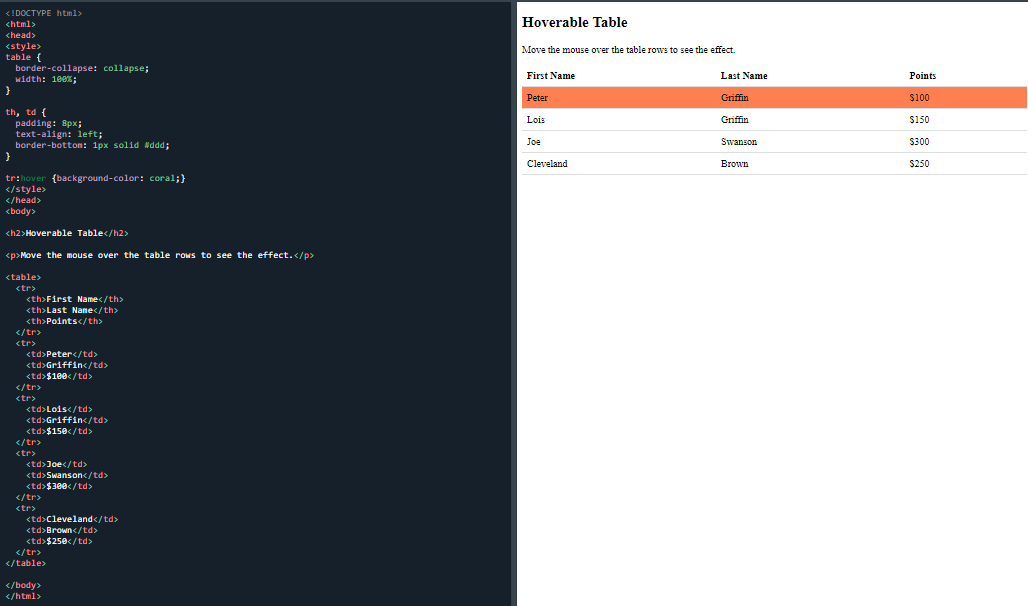 A hoverable table
And then the 'striped tables':
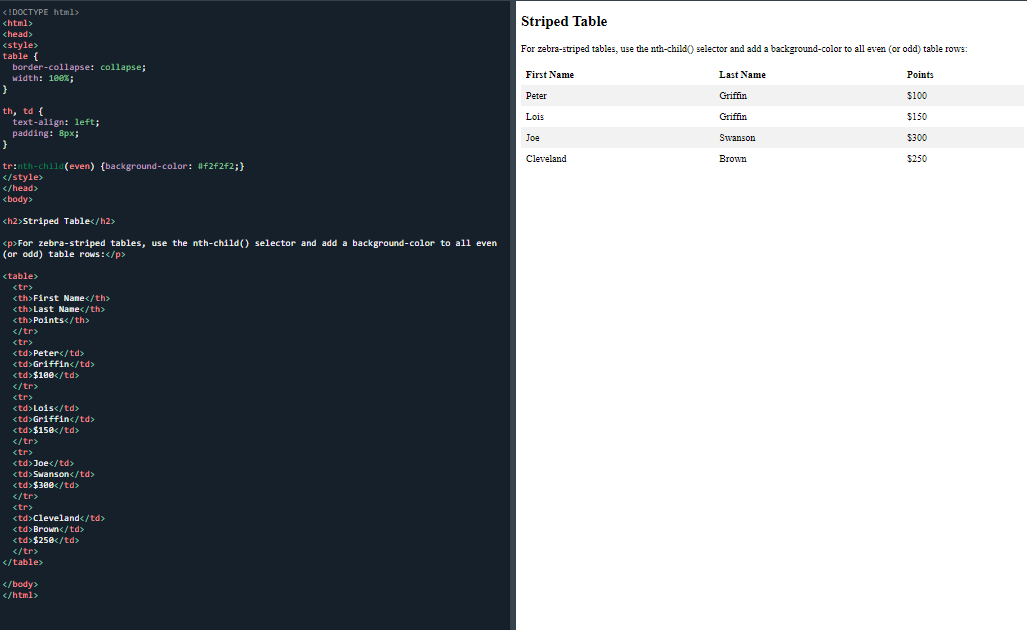 A stripped table
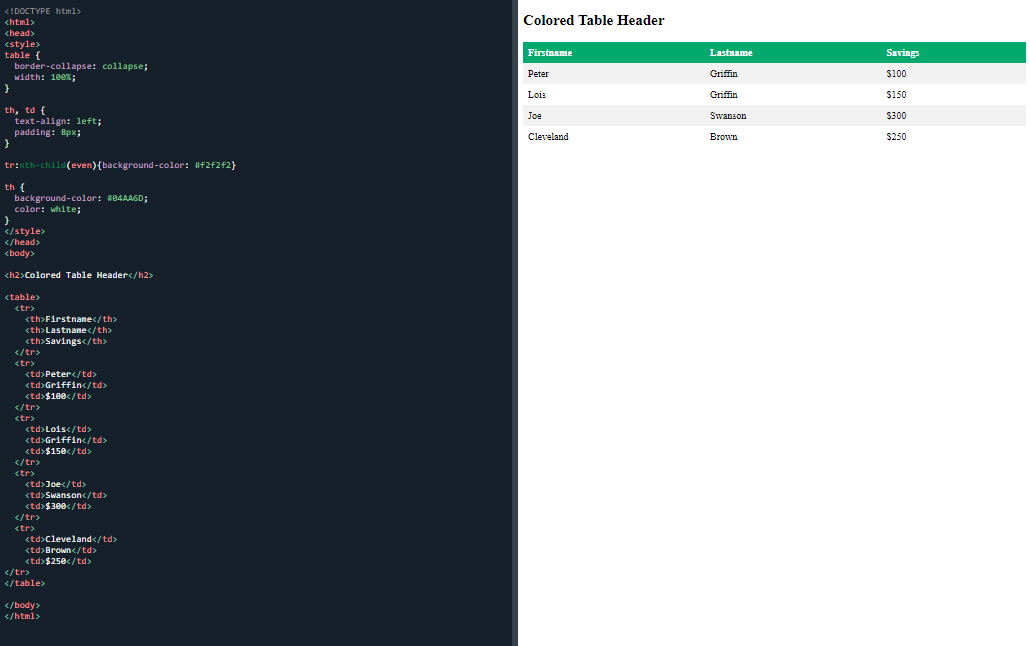 A coloured table header
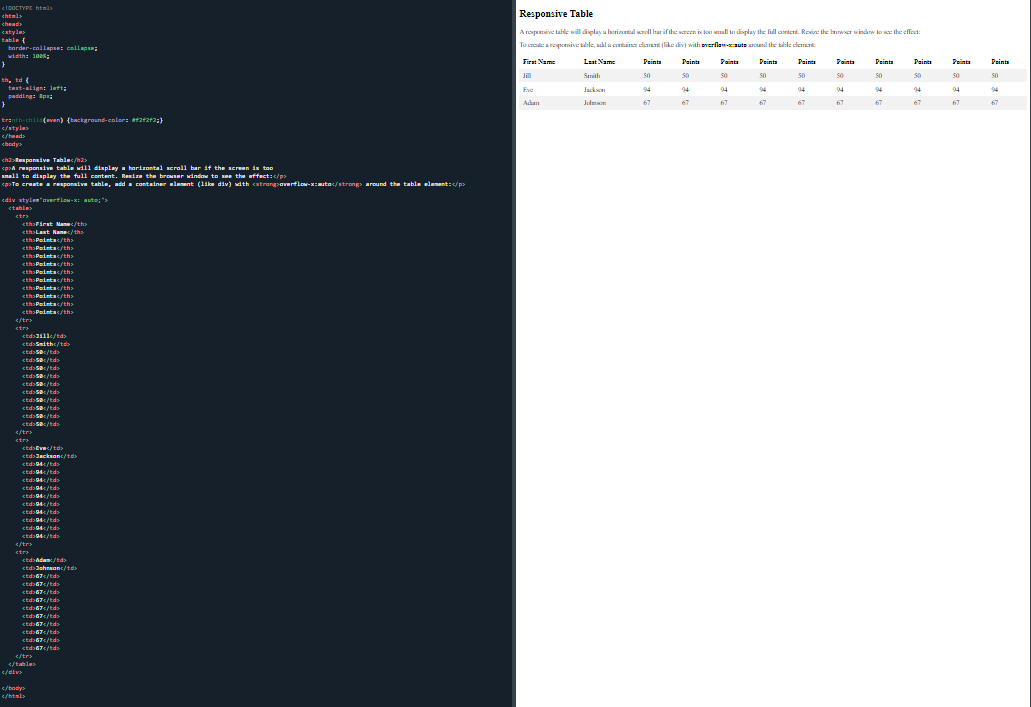 A responsive table
I got through a lot tonight because apart from the responsive task, the code in the body was the same and the only changes were to the CSS between < style > tag.
I finished off the evening with the 'test yourself questions'.
I couldn't answer one question about inline and I couldn't even find the answer when I looked for it.
Tonight, I felt that repeating the lines again and again has been of benefit in allowing me to get more familiar with the lines and the syntax.
Day total: 1 hour 07 minutes
Tuesday 7th December 2021 / *
A good hour
Warmed up with 11 minutes of the responsive table which got me focused and into study mode.
Made a start on the display property.
This section felt different tonight because it didn’t go straight in with a task but instead started off with a slightly larger reading section than normal.
Began with the default display with the links as horizontal links:
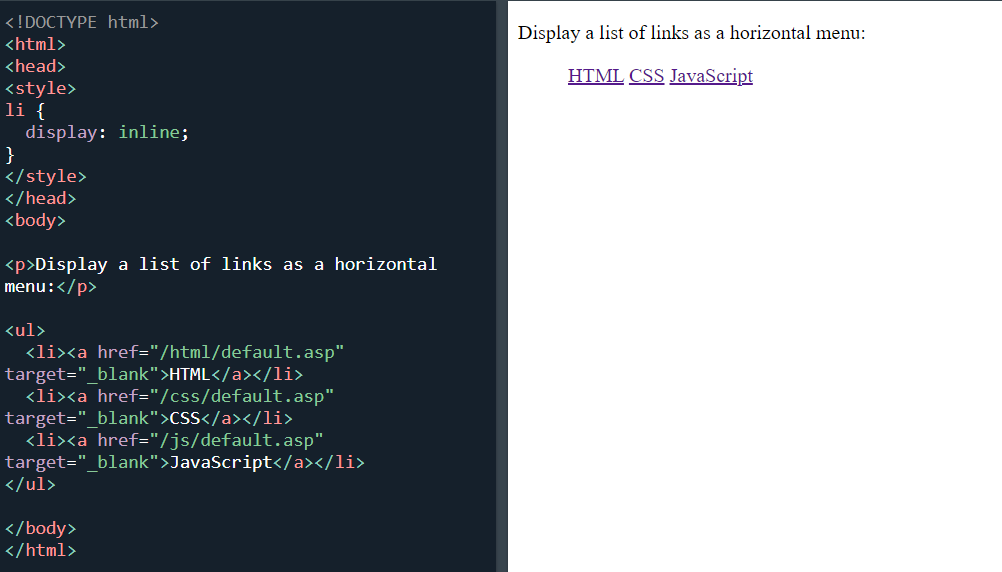 Horizontal menu
< span > elements as block elements:
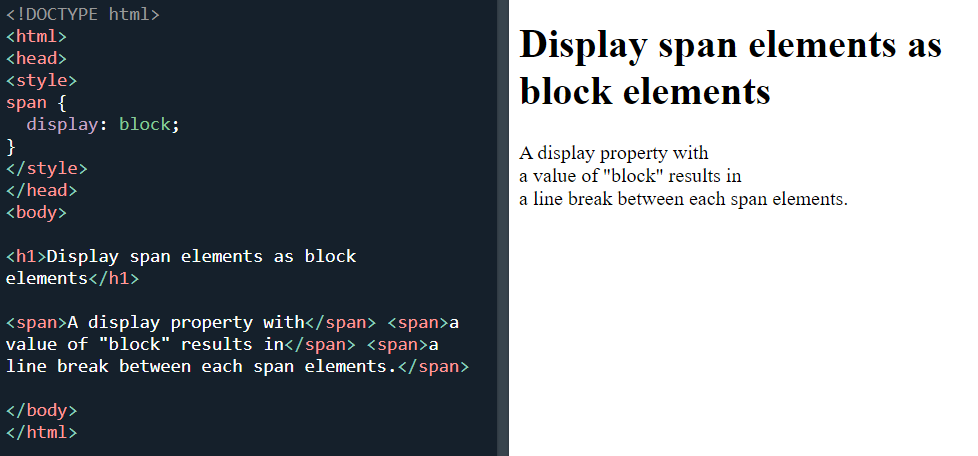 < span > as block element
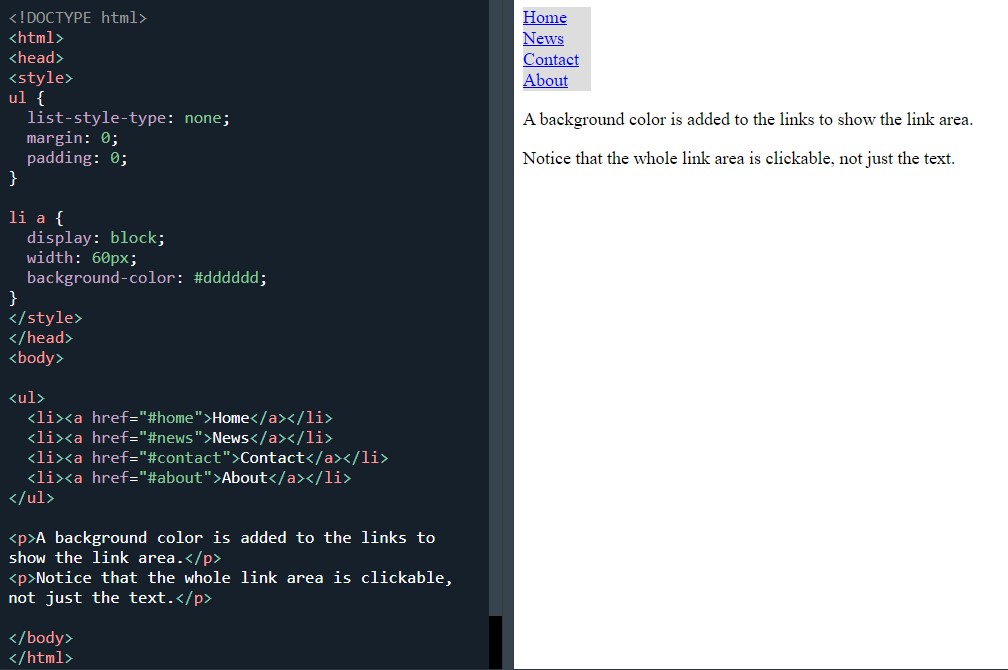
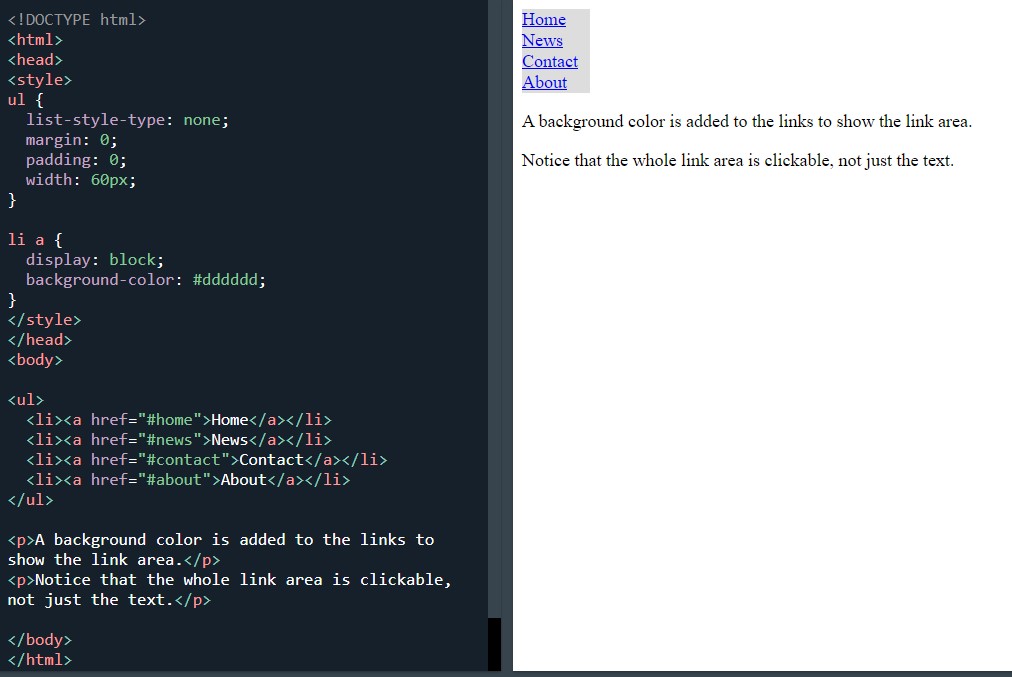
< a > elements a block elements:
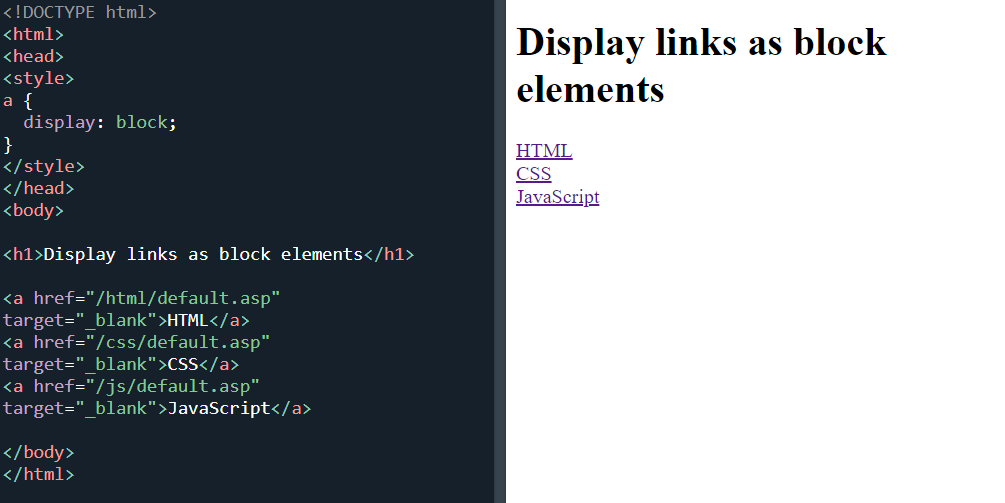 Display links as a block element
Display: none:
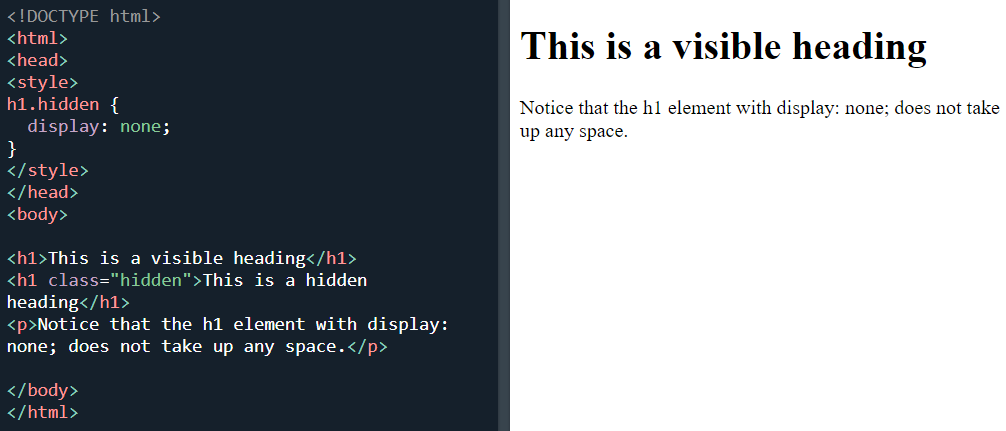 Display:none
Visibility:hidden:
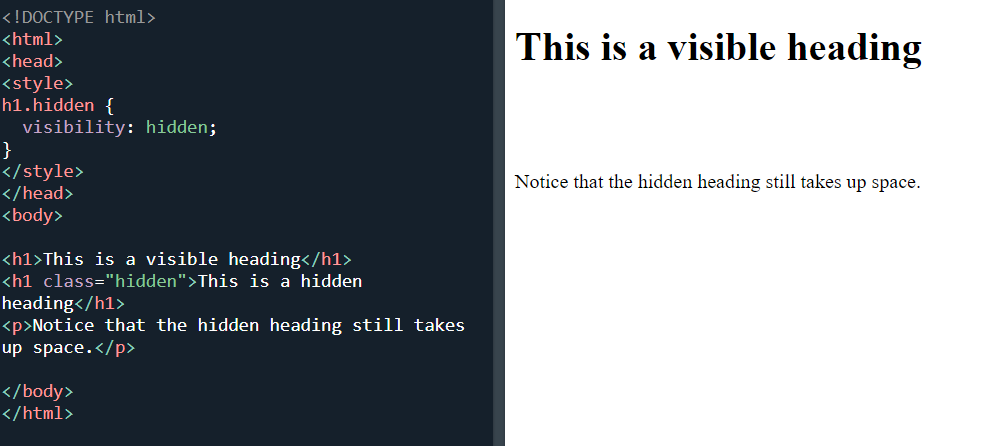 Visability:hidden
I ended with the ‘test yourself with exercise’ which was no problem as all the exercises were still fresh in my head as I had literally completed them within the last hour.
Day total: 1 hour 01 minute
Wednesday 8th December 2021 / *
Taking my time
Began with a warm up of the final task from last which was visibility hidden task, and then onto a fresh new page and section which is width and max-width.
Started with the max-width property:
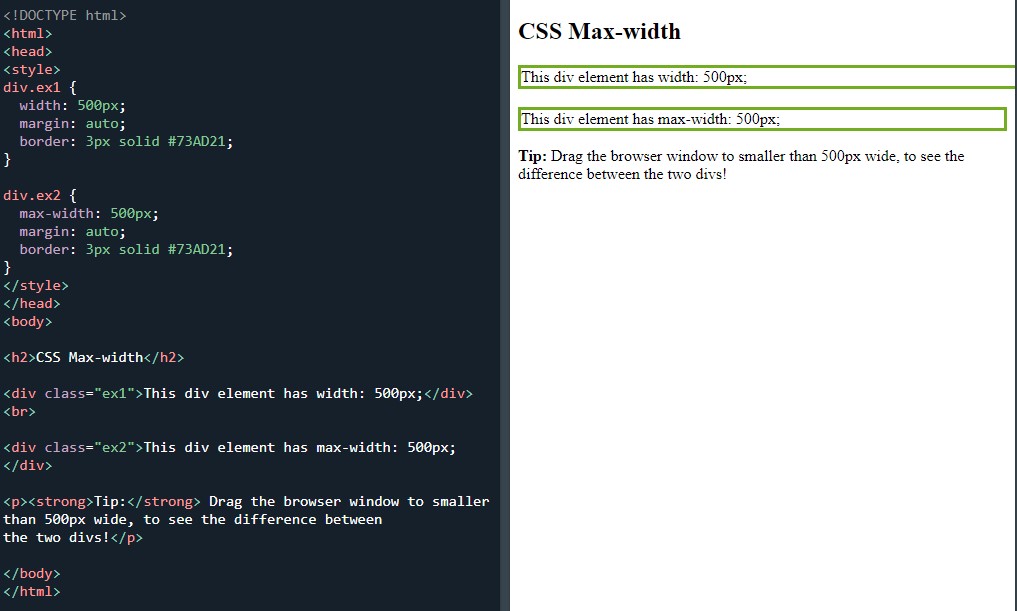 Max-width
Position:static:
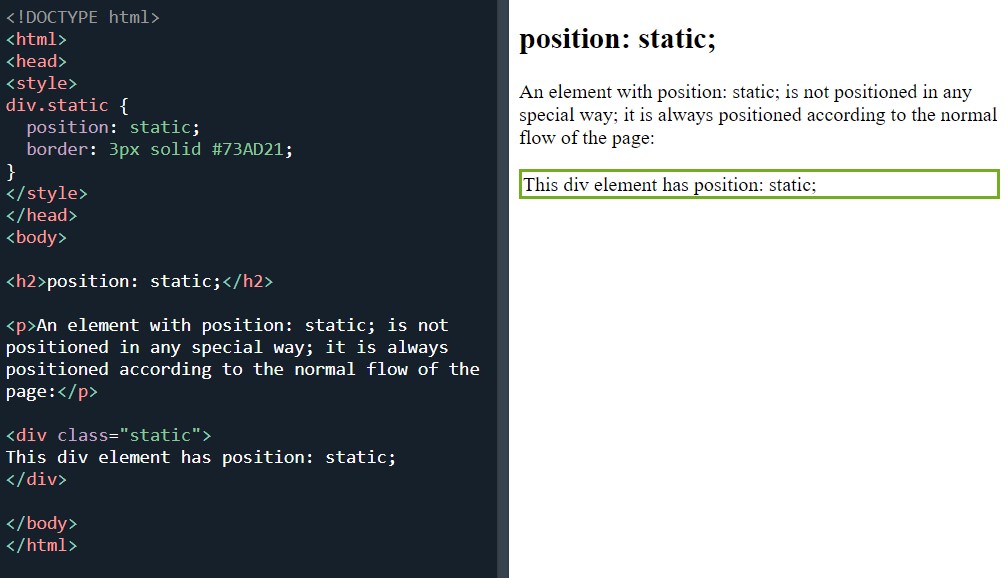 Position:static
Position:relative:
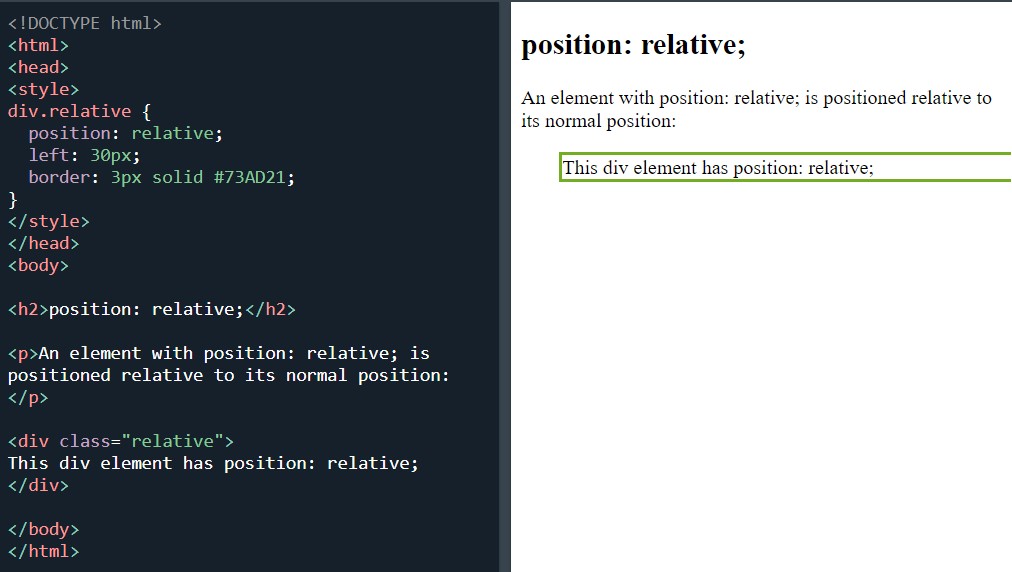 Position:relative
And the last task tonight was position:fixed:
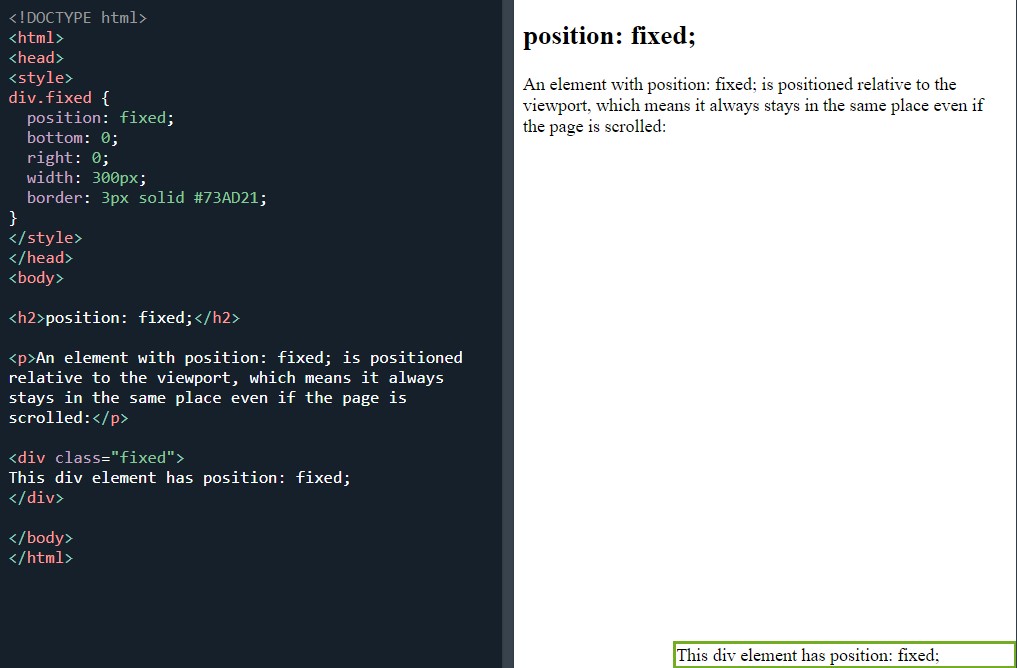 Position:fixed
At first, I didn’t notice anything different with the position fixed. I thought it was one of my usual mistakes and so I went in search of the issue.
I then noticed the green box in the bottom right corner. I reread what should happen and it said that its position will remain the same, even if the page is scrolled.
I wanted to test this out and see for myself. As the page was not full, it did not scroll. I put in some < p > tags with a few Lorem Ipsom paragraphs separated with some
< br > tags and copied and pasted them until the page was full.
It was then time for the big test. I couldn’t believe it- it works. The green box remains in position when the page is scrolled.
I went back over the four tasks from last night and repeated them a few times. The last couple of nights, I’ve felt as though I have been zooming through the tasks at speed and I’ve felt a bit guilty because, it was as though I haven’t been taking the time to really digest the material.
So tonight I slowed down and repeated the tasks.
Day total: 1 hour 05 minutes
Thursday 9th December / *
Full of stops and starts
Today I lingered on the material and didn’t really do too much else.
But what I did was to get some experience with the method.
I kicked off with a warm up and review of last night’s position fixed task and then straight into position: absolute:
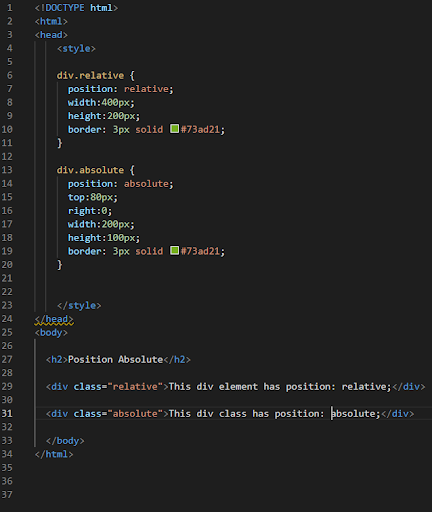
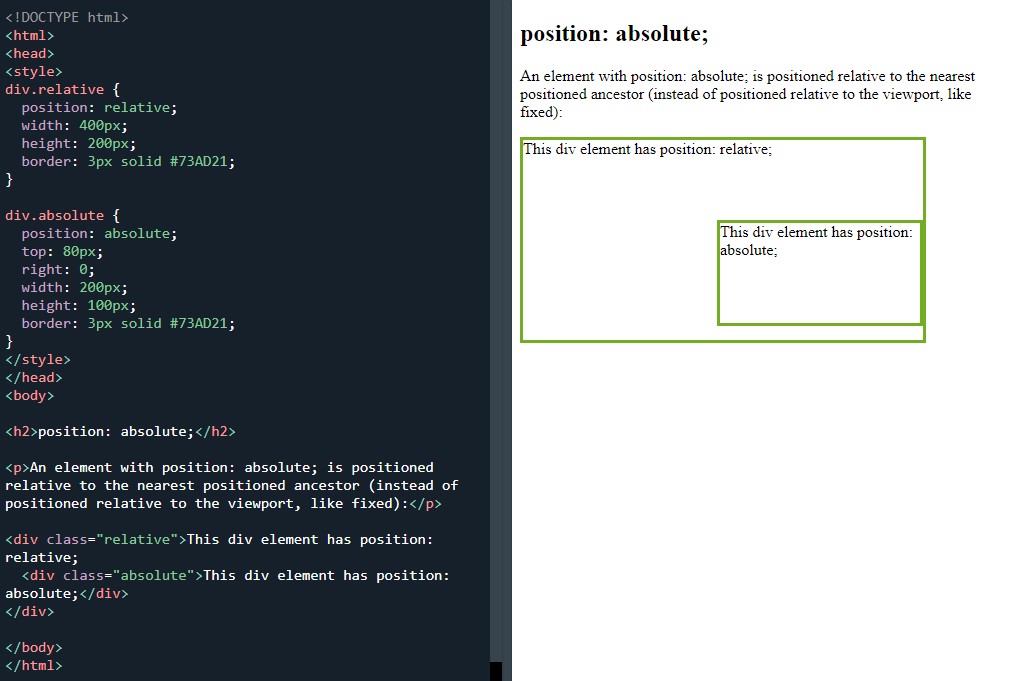 Position:absolute
I was slow to get everything memorised and it was far from plain sailing at the beginning.
My position:absolute didn’t come out right. The first of these screenshots is from a small screen/mobile view and the second is a full screen view.
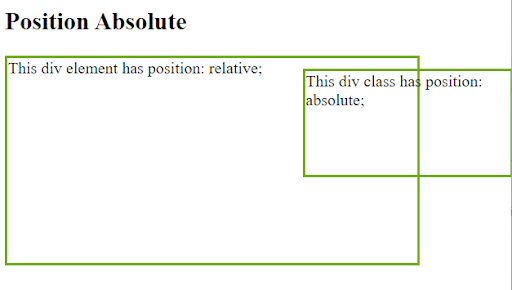 A mobile view screenshot
 A desktop view screenshot
I can’t find the problem. These are my lines:
 My lines for the position:absolute exercise
Where did I go wrong? Please leave a comment if you know what I was doing wrong.
Position:sticky:
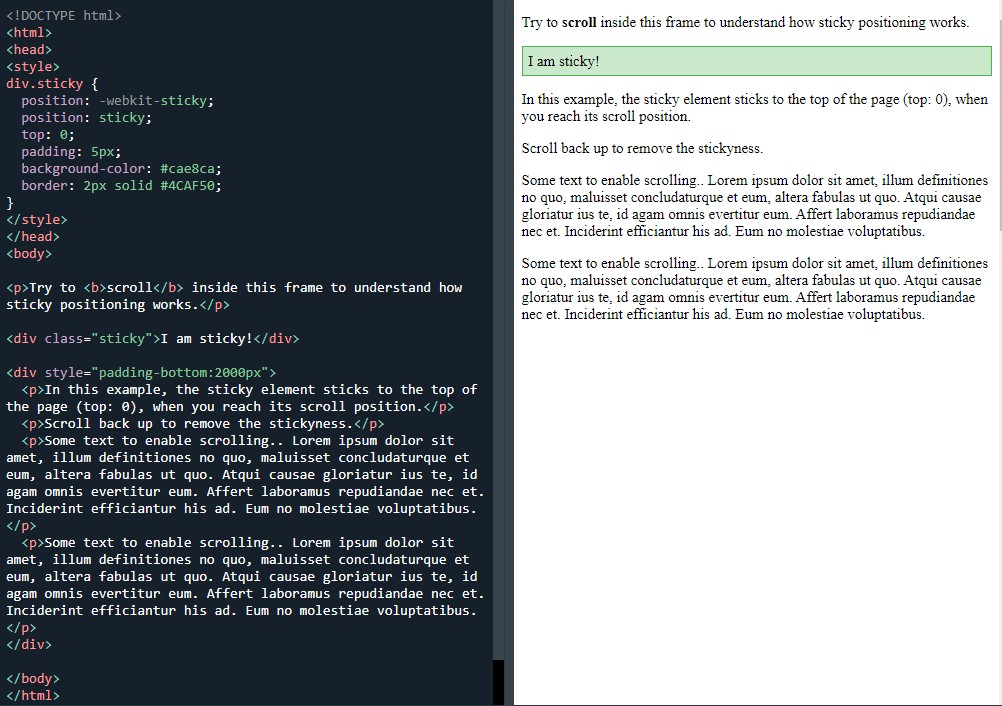 Position:sticky
I enjoyed doing this one and I made sure to add plenty of < p > tags and Lorem Ipsom to get some good practise.
I left out the ‘position: webkit-sticky’ as I knew I didn’t need it. It still worked fine without it.
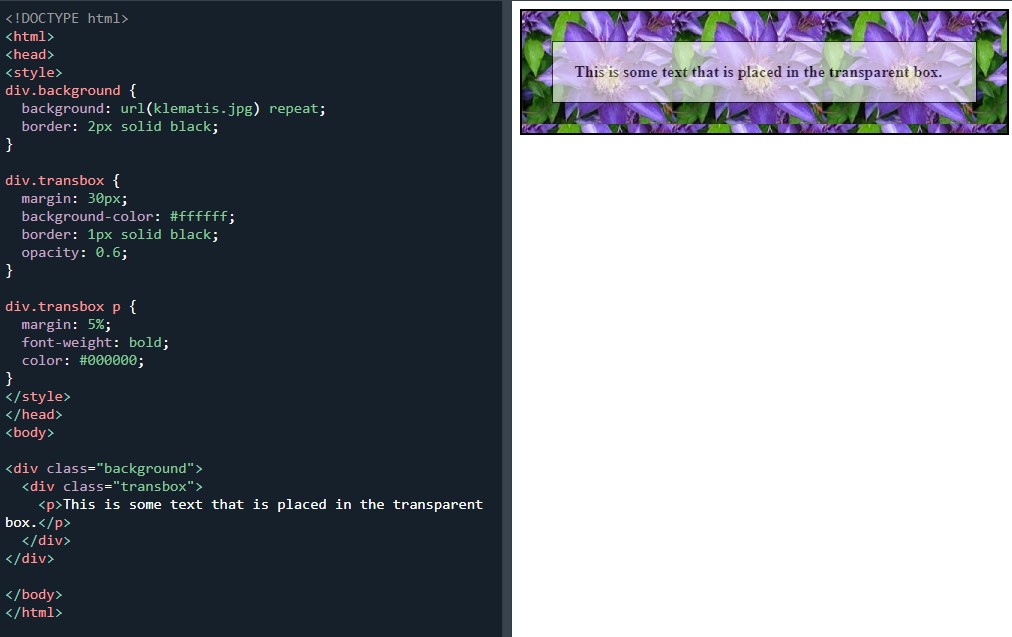
Positioning text in an image:
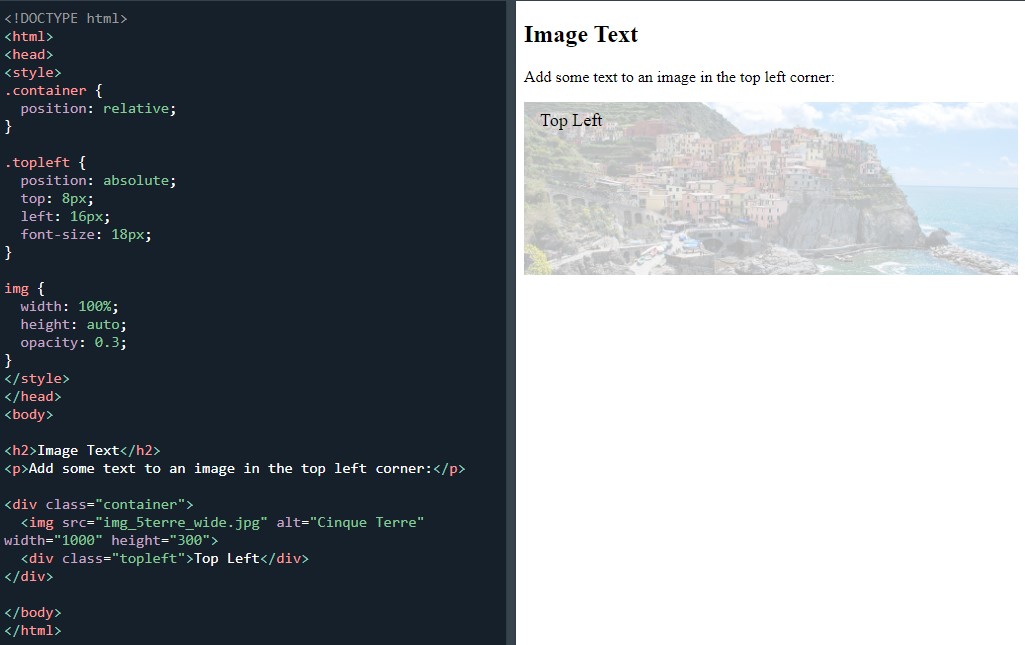 Image text
I used my pictures from my library and I enjoyed changing the lines and practised moving the text around the screen. Had a few bugs and mistakes but managed to sort them out and do all of the example positioning.
I even made attempts to guess the lines from the previous positioning instructions for the ‘centered’ (‘centred’) text.
Guessed right on my third go with text-align: center but I didn’t get all of the values and properties correct.
I finished up today’s learning with the ‘test yourself exercises’. I had to go back and look up the answer to one of the questions and I was fine with the other.
Day total: 1 hour 27 minutes
Friday 10th December 2021 / *
The grind is back
I really struggled with a few things today. From the moment I sat down to the almost immediate admission of defeat.
Recent weeks have been relentless and I have stuck to a strict timetable of mixing work and homelife tasks with some study.
Well, today I couldn’t keep that up. I sat down and quickly reviewed the ‘positioning text in an image’ and then my attention was needed elsewhere for a while.
When I managed to get back in front of the laptop, I started on the ‘test yourself with exercises’. Did the four questions with no issues but I did have to go back and reread a section for one of the questions. Then came another interruption in the study.
When I returned, I made a start on the z-index property. The first z-index property task:
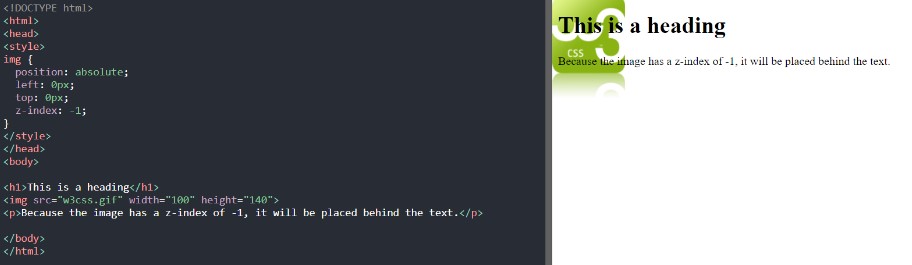 Using positioning and z-index
I again used my own saved pictures so I could practise adding an image but this was as far as I got this evening.
After being dragged away again I called it a night. I didn’t have the focus and the drive tonight to keep breaking away from the studies then returning later to the laptop and having to ready myself and refocus.
I felt slightly annoyed with myself for throwing in the towel so easily but I did feel a bit drained. Along with all the interruptions, I was fighting a losing battle. So to call it quits was the right thing to do. I live to fight another day.
Day total: 0 hours 21 minutes
Saturday 11th December / *
Unfocused again today
I made the effort to sit down and start studying early this morning and I was able to knock an hour of good study out before the day started to get hectic.
Took ages to get focused. Started with an easy review of the ‘z-index’ property task from yesterday which took all of five minutes to memorise
Yesterday I didn’t feel like starting on some long, heavy lines in a new section. That was part of the reason I didn’t go any further.
Well, today I was ready and I started on the task labelled, ‘another z-index example’:
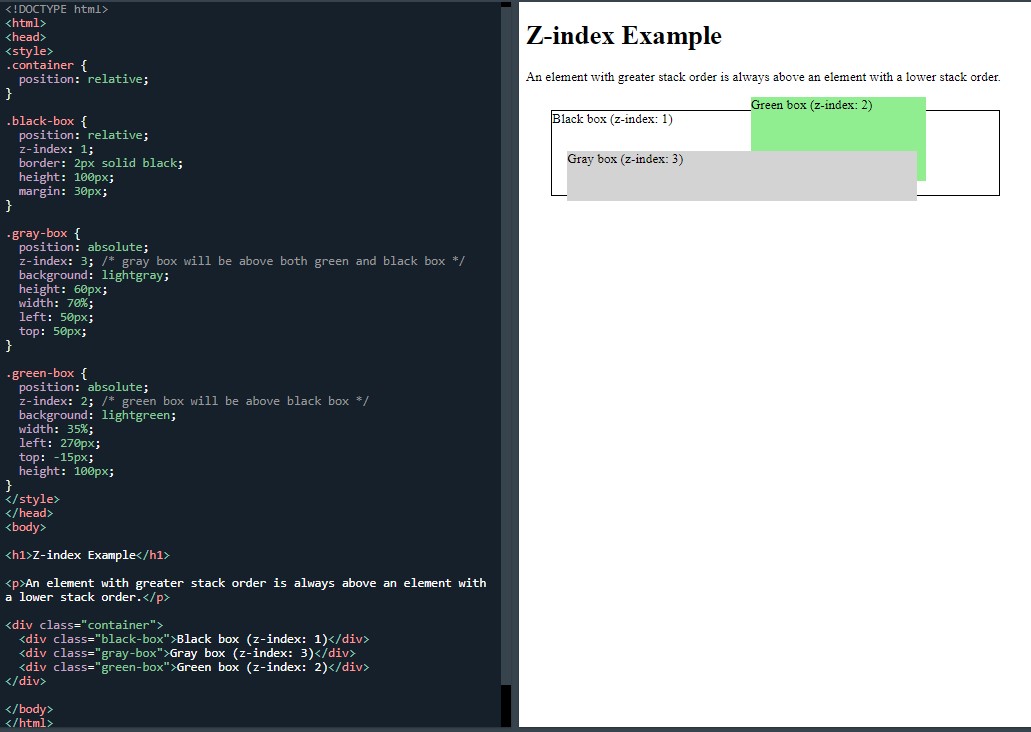 Using positioning and z-index
Had a few bugs to sort out with this one-namely the green and grey boxes. Got some of the values mixed up with the % and px.
I tried to memorise all of the first section between the < style > tags like I usually do, but found it hard. I did my best and cracked on.
Next it was onto the ‘without z-index':
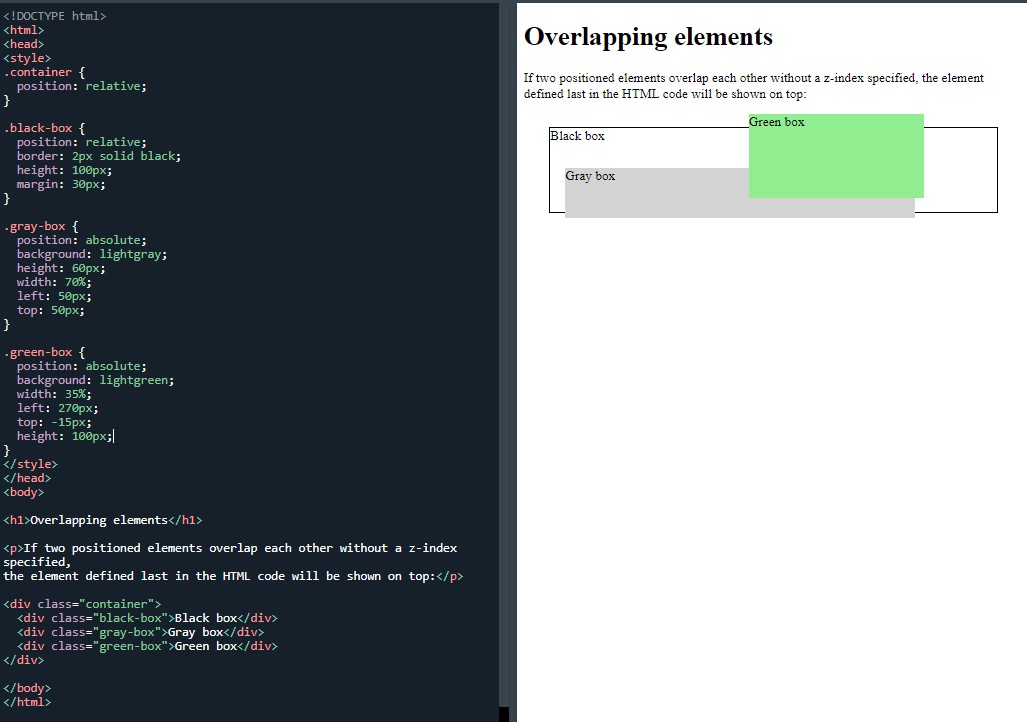 Without z-index
Which is the same as z-index, in that there is an order but without using the z-index to specify that order. This was to see how the rules apply once the z-index doesn’t dictate which box goes in front of which. The one last in the HTML will be on top.
Ended with the, ‘test yourself with exercise’ questions which were easy.
The next page was titled CSS layout- overflow. I ended the day with a useful overflow:
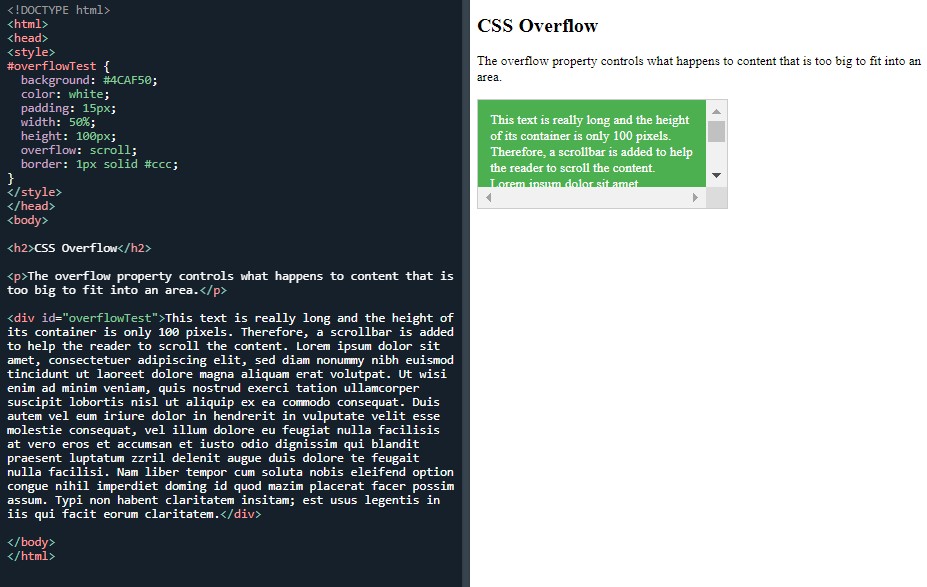 CSS overflow
Day total: 1 hour 21 minutes
Sunday 12th December 2021 / *
Overflowing and floating
Lacked concentration and focus again today. Not the end of the world. I cracked on but just finding it slightly more difficult to give my full 100% attention to the tasks.
Warmed up with the overflow task from last night, then I was on to overflow: visible:
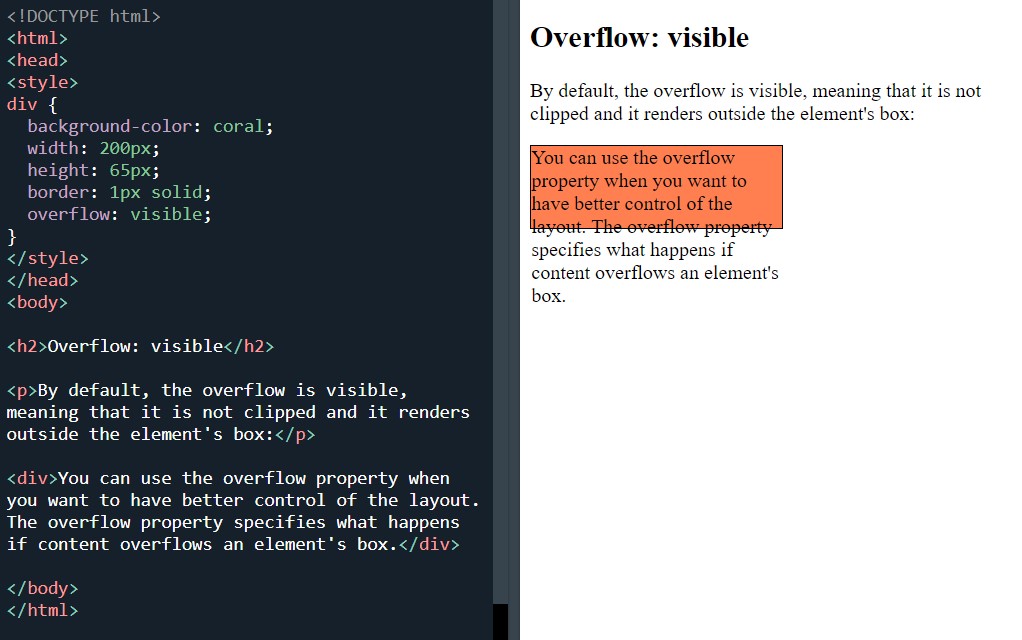 Overflow:visable
Overflow: hidden
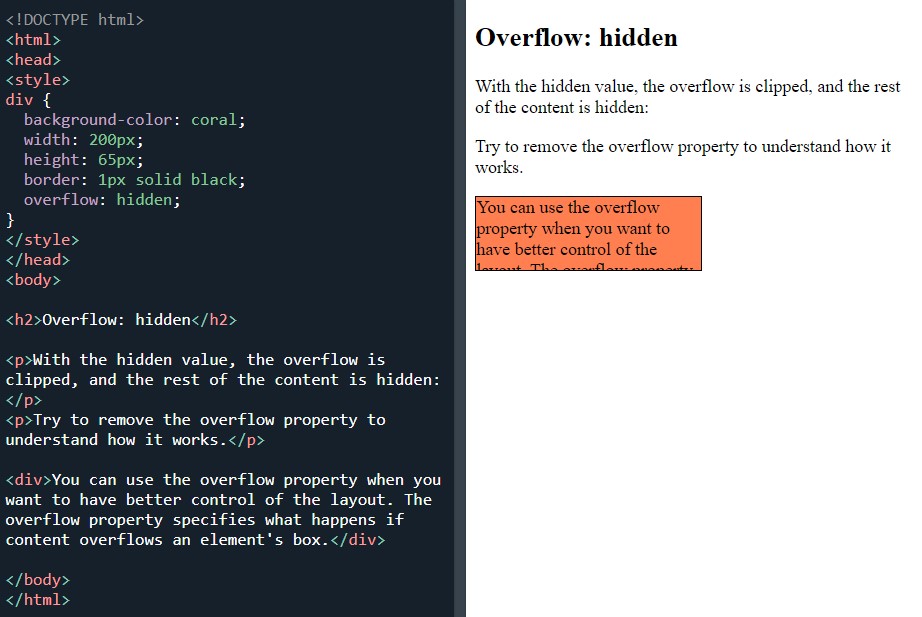 Overflow:hidden
The overflow: visible and hidden are identical apart from the overflow value differences. Overflow:scroll is following the same pattern:
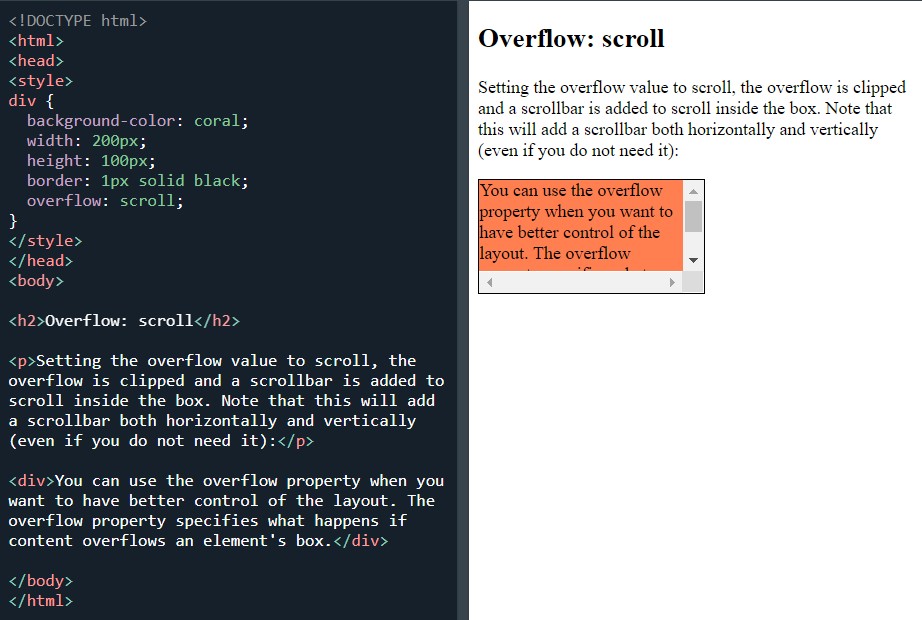 Overflow:scroll
And so is overflow:auto:
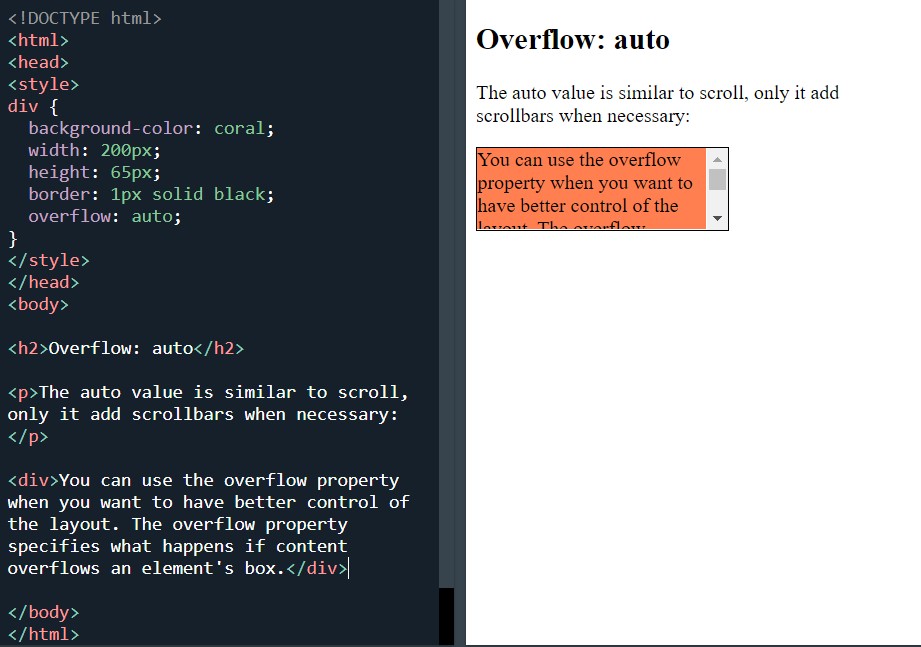 Overflow:auto
Last task on the overflow section was the overflow-x and overflow-y:
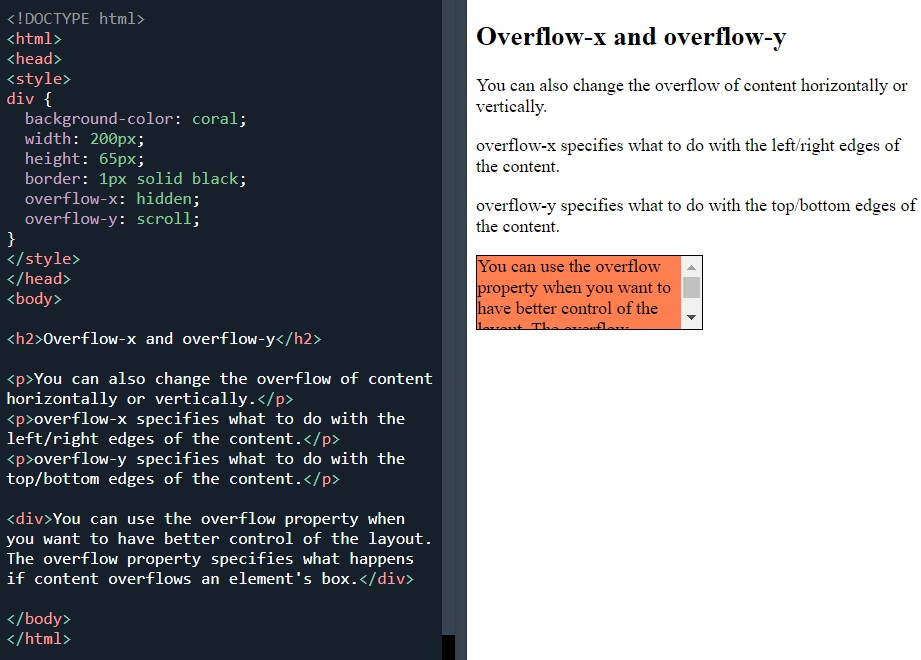 Overflow-x and overflow-y
I messed around with the values here to see how it affected the appearance. I swapped the hidden and scroll values between the overflow-x and overflow-y. I also changed the width and height values to see how that changed things.
Finished with the ’test yourself exercise’. No probs as this stuff was fresh in my head.
Next page/section was the CSS layout-float and clear.
Before I started this section, I had a brief scroll down and it looks like some really good stuff is on the horizon. Man, I'm really getting into some good lessons that help improve the look and functionality of a page.
Started with the float: right:
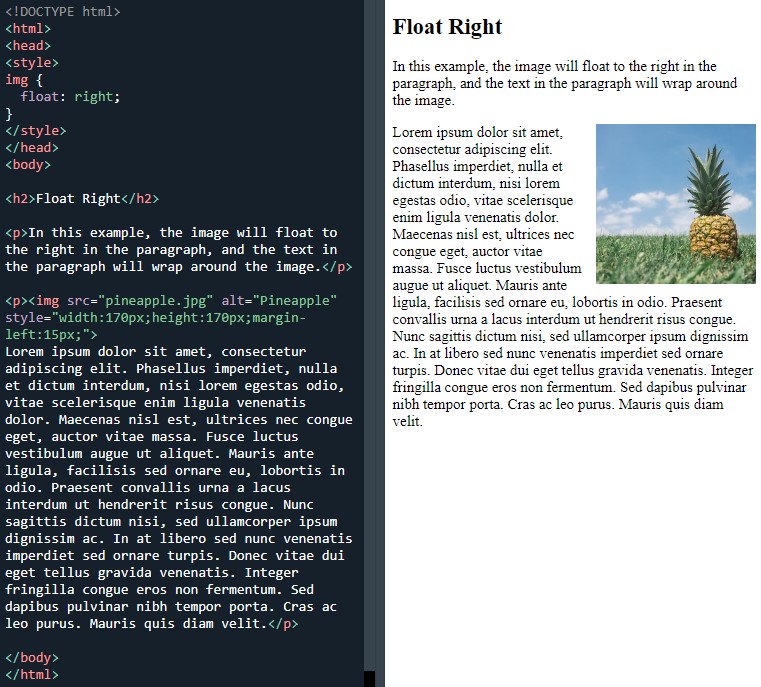 Float:right
And that was obviously followed by float:left:
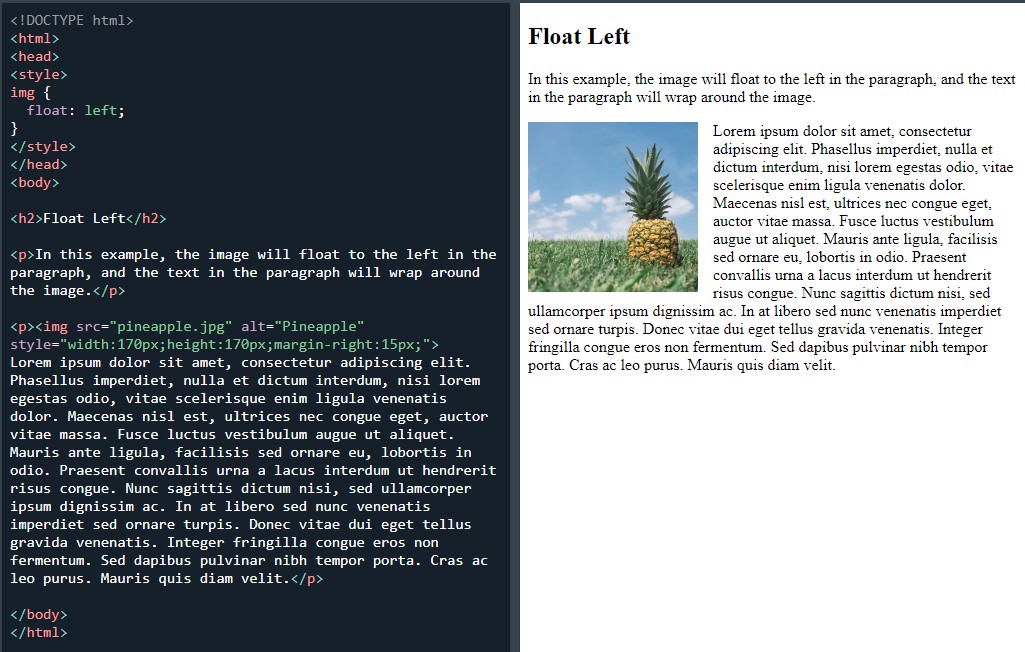 Float:left
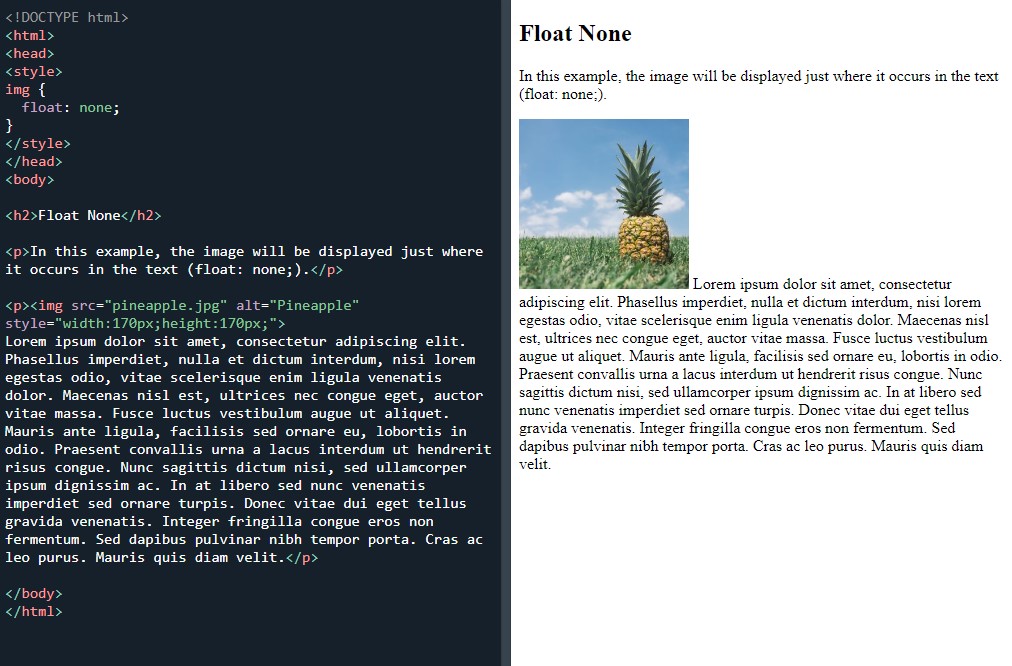 Float:none
Next it was float next to each other:
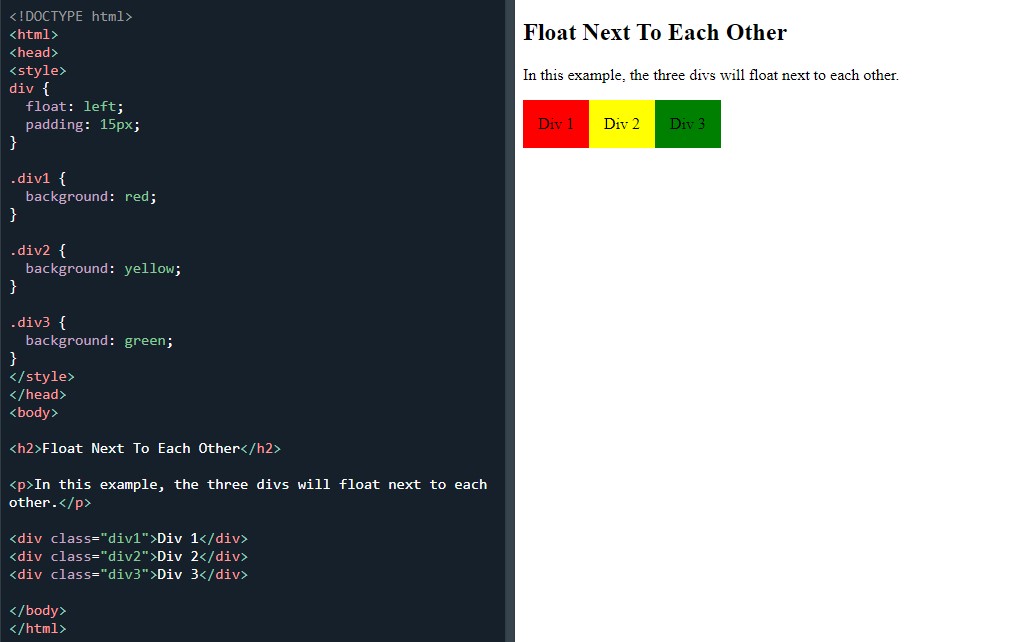 Float next to each other
I messed around with these lines. I moved the blocks around the page to get a better feel for the float property. I did try using align but it didn’t work and I also experimented with the padding and colours.
Next page which was the clear and clearfix.
First task invovled using the clear property:
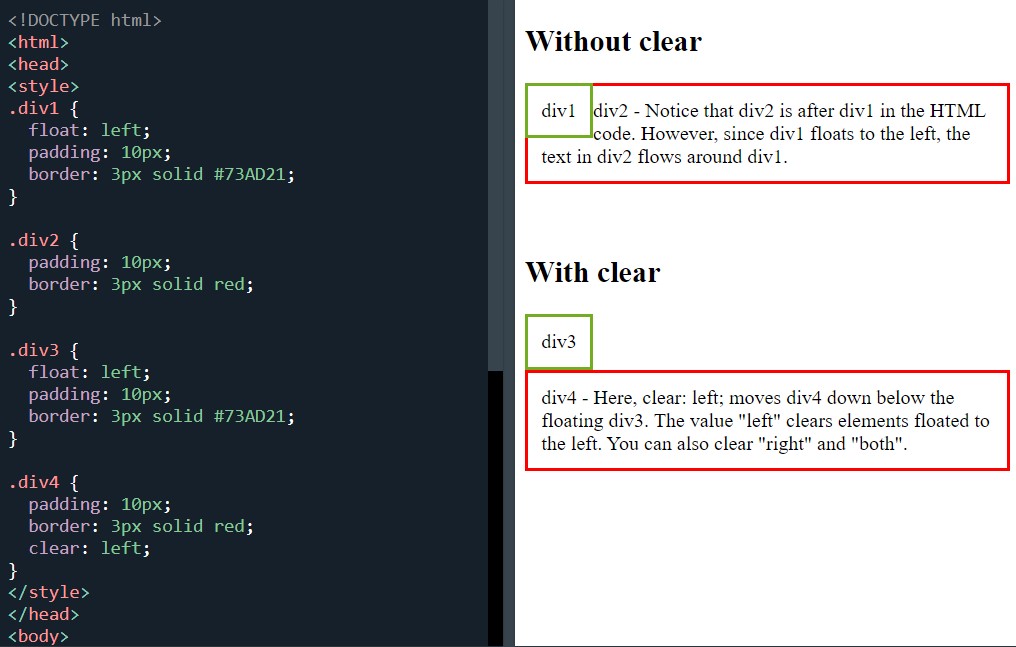 Example of float and clear
I had a few bugs with this one. This was the last task I completed today, even though I did start on the next task which was:
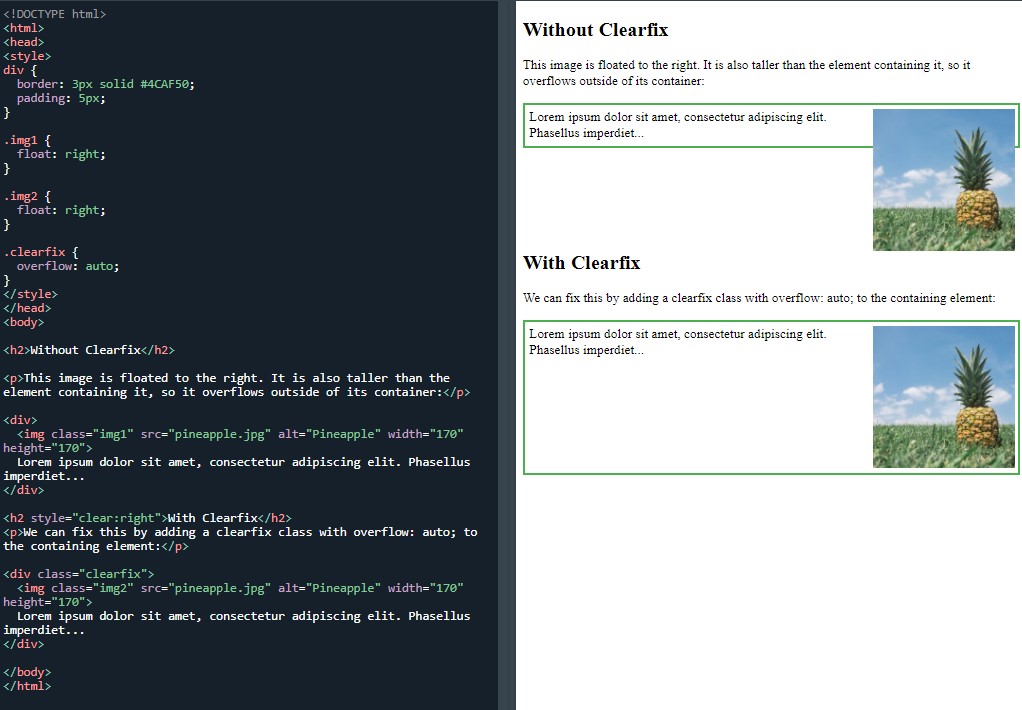 Clearfix hack
I started the clearfix hack but resistance was futile as I was waning and getting mixed up with all the < div > and < img > classes in the bottom section. I called it quits on this and I live to fight another day. I will return tomorrow.
Day total: 1 hour 34 minutes
Monday 13th December 2021 / *
If he can do it that there's hope for me
Last night I made a start on the ‘clearfix hack’ before getting confused with the
< div > and < img > selectors and classes in the bottom section.
Well, I returned tonight for another crack at the whip and got through it at the second time of trying:
Clearfix hack
I still didn’t fully understand how to use the < div > and < img > tags properly but that changed as I moved on to another task.
Moving on to the next page titled CSS layout and float examples.
The first task was titled 'grid of boxes/equal width boxes':
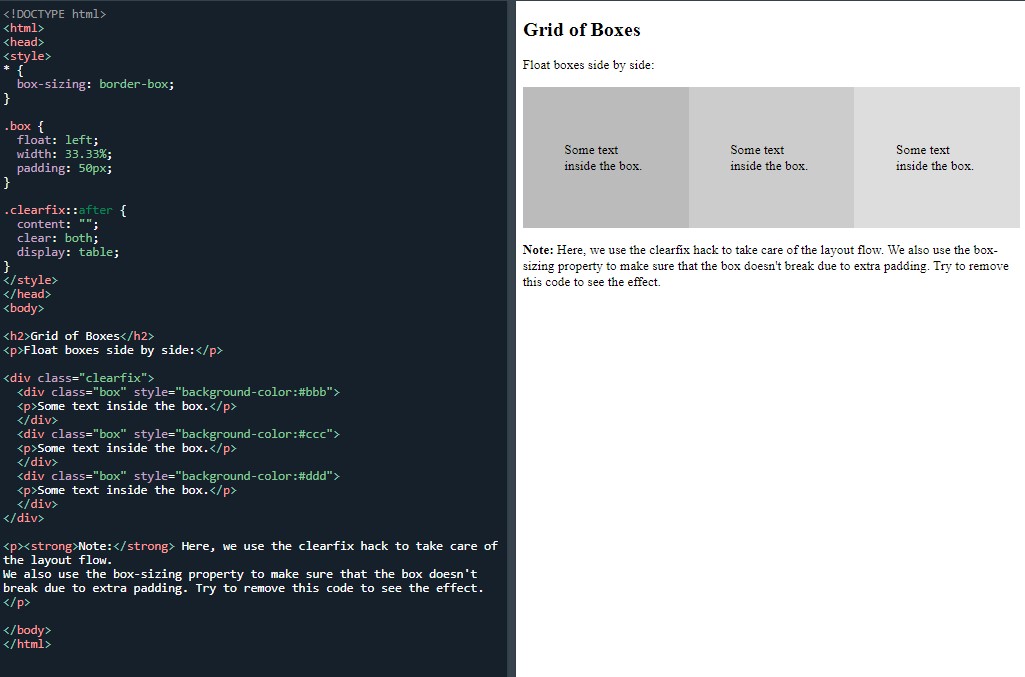 Float boxes side by side
Again the < div > and < img > tags were used and I began to understand them a little more. It took a few tasks and the typing out of the lines quite a few times, but, finally, I got my head around them and got there in the end.
A few days ago on Youtube. A dev by the name of Kenny Gunderman appeared in my suggestions because the title of a vid called ‘How I became a developer at 45| Old Programmer’.
I have watched some of Kenny’s content and he’s mellow. Well, turns out he was interviewing his dad who was the 45 year old in the title.
If he can do it then there is a possibility that I can do it too.
Day total: 1 hour 02 minutes
Tuesday 14th December / *
Meeting flex for the first time
Started with a warm up of ‘grid of boxes/equal width boxes’ to get in to the groove.
Next it was on to the ‘images side by side’:
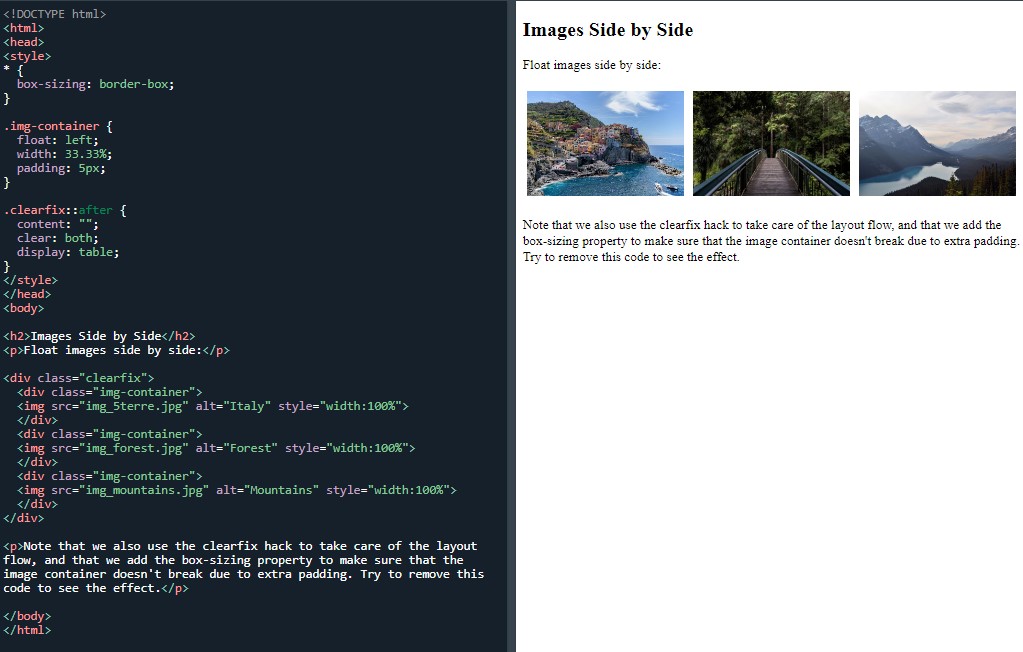 Float boxes side by side
It was short and straightforward. Again I focused on the bottom section with the
< div > and < img > tags to really get my head around the syntax, the order of each line and the tags and selector’s role in each.
I used my own pictures and one was larger than the rest. I tried to shrink it in order to have equal heights of all three images. To do this, I put in a height property and a value in the .img-container selector but it didn’t work.
I moved on in defeat and then I saw the title of the next task which was called ‘equal height boxes’:
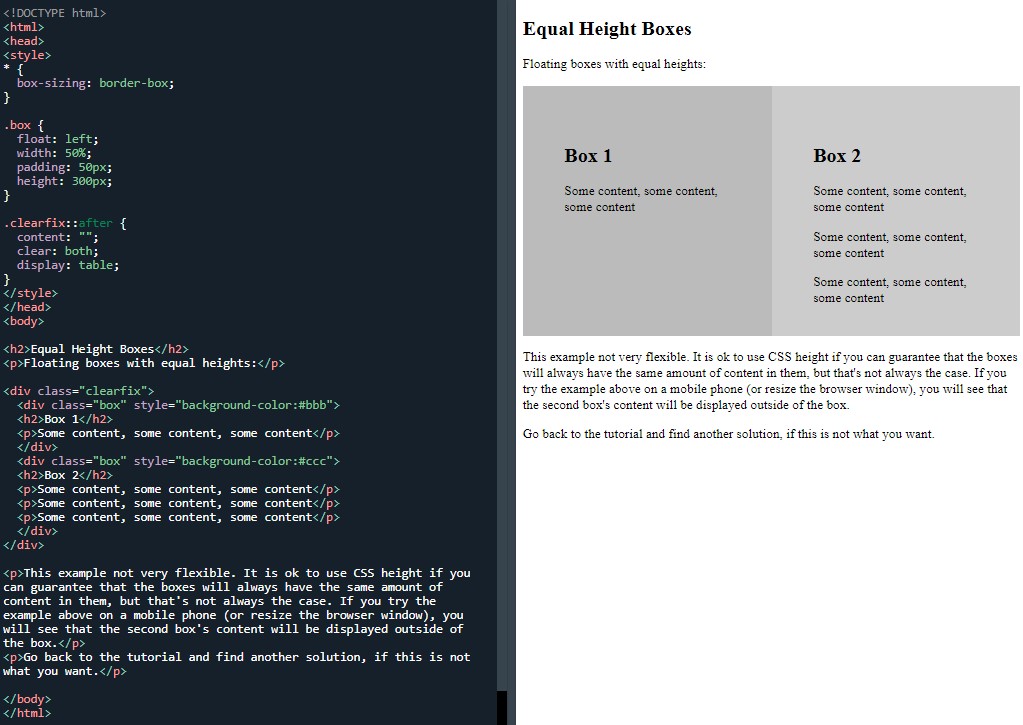 Equal height boxes
I used the height property with its value in the previous task to see if I could get this equal height to work on three boxes. In one attempt, it made them larger and so I had to scroll down to view the pictures.
The next two tasks were awesome to attempt. I’ve heard flexbox and grid mentioned many times, so it was great to finally have a go at flexbox:
Equal height boxes
It wasn’t as complicated as I thought it would be and it’s super useful and handy to know.
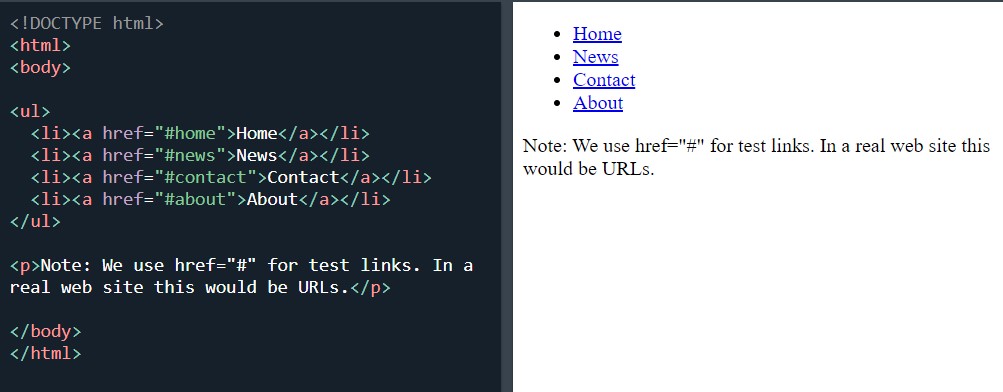
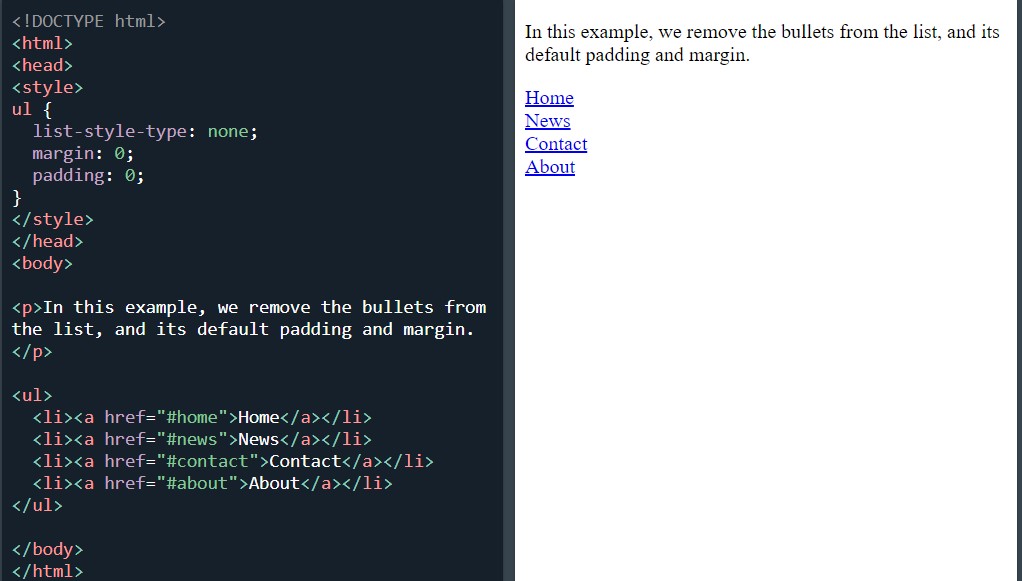
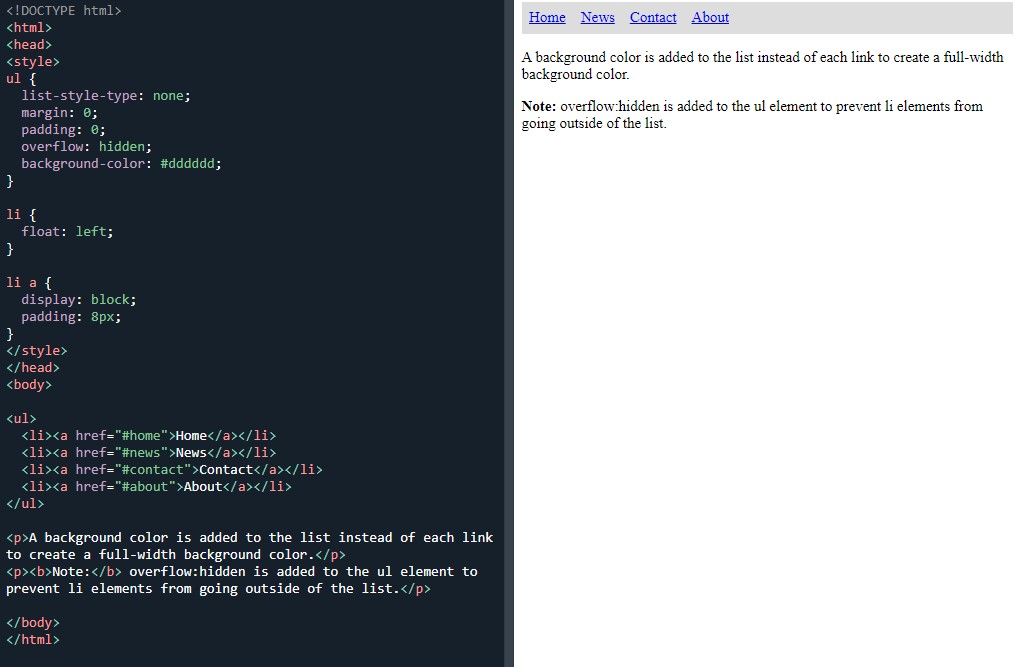
Next was titled ‘navigation menu’:
Using float with a list of links to create a horizontal menu
It was amazing to be able to do this. This week, the tasks have really started to have visible similarities to the stuff you see on websites.
Day total: 1 hour 23 minutes
Wednesday 15th December 2021 / *
Using the skills
Started today with a review and warm up by going over the the navigation menu from last night. The lines on the tasks are too long for me to remember everything and I find it a bit too much to be able to remember it all. So I have stopped.
If there are a few lines then it's no problem but if there are many lines with lots of values then it's too demanding. I’m certainly not one of these people that can remember a pack of playing cards.
I remember the lines in smaller sections now and it is easier.
The warm up took me 16 minutes before I was happy with it. Delightfully moved on to the ‘web layout example’:
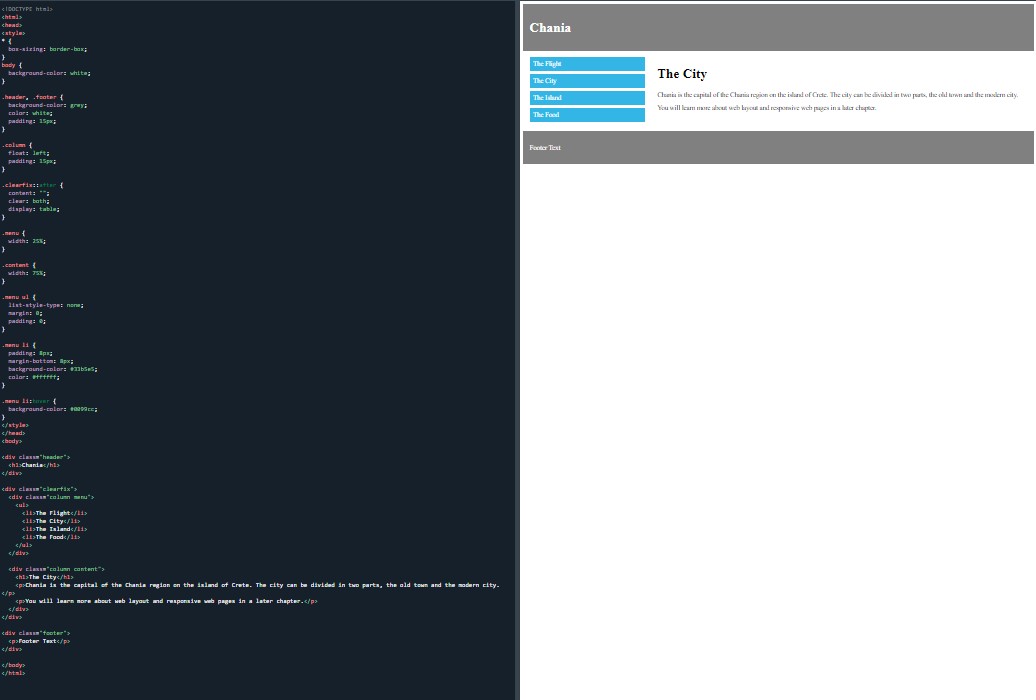 Use float when creating a web page
I am really looking forward to learning this and using it to be able to make stuff that resembles real websites. It was awesome to be able to build this, so I continued to mess around a lot with this and tried to see if I could design something, then go ahead and build it.
I changed it to a gaming tip's website page with help from my son. I changed the navbar links to online gaming names and used different colours for each one. I used
text-align to center the header and footer text. Once done, I sat back and felt good while looking at what I had built.
Day total: 1 hour 01 minutes
Thursday 16th December 2022 / *
Very short and in the end very very sweat
I didn't fancy concentrating on some studies today but I sat down at the laptop and later I was glad I did.
I began with a review of the ‘web layout’ as my warm up. I removed selectors, properties and values and refreshed the browser to see what effect that would have.
Then I spent the remainder of the time I had on one task which was the first task on the display:inline-blockpage:
And the first task was the inline-block value:
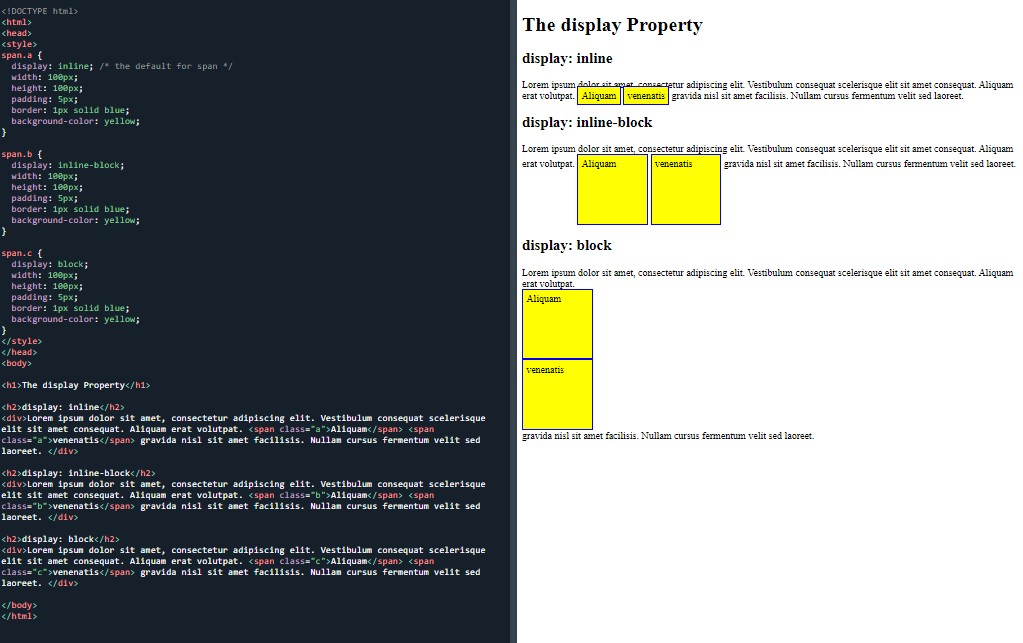 The display property
I especially want to practise the section between the < body > tags and get more used to using the < div > and < span > tags.
Day total: 0 hours and 46 minutes
Friday 17th December 2021 / *
I am glad I made the effort
Some days when you don’t look forward to enjoying something it turns out the opposite way and you have a great time. That was definitely the case today and I had a great time despite the usual few bugs.
I started with a warm up of the ‘inline-block value’ task from last night which I messed around with and changed a few things. That then eased me into the ‘inline-block to create navigation links’:
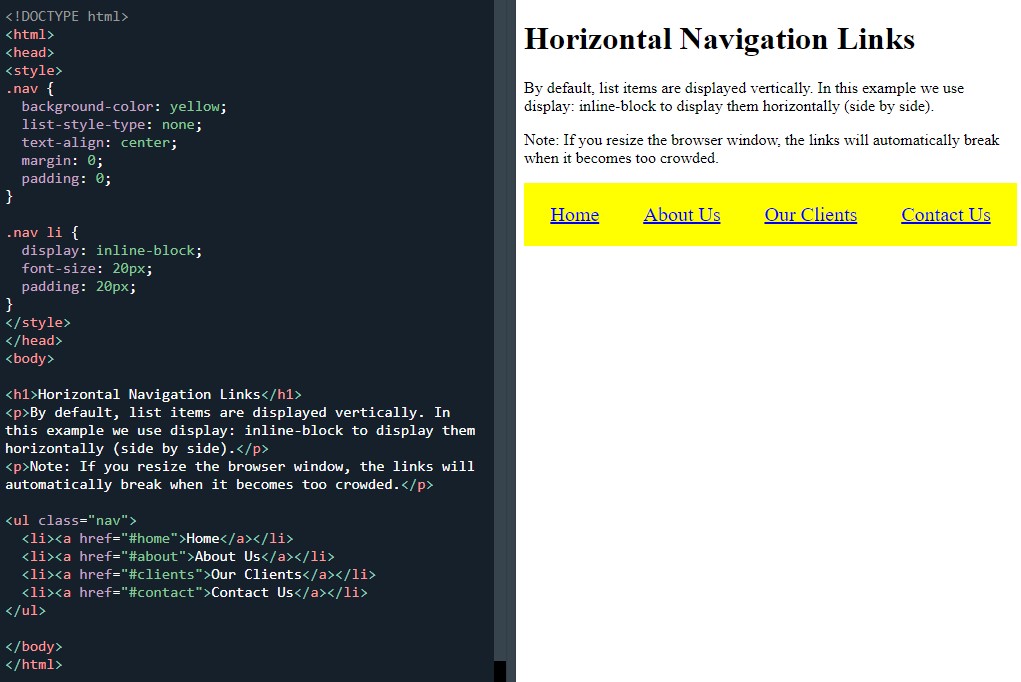 Horizontal navigation links
I again changed a few things and had a mess around before moving on to a new page titled 'align’:
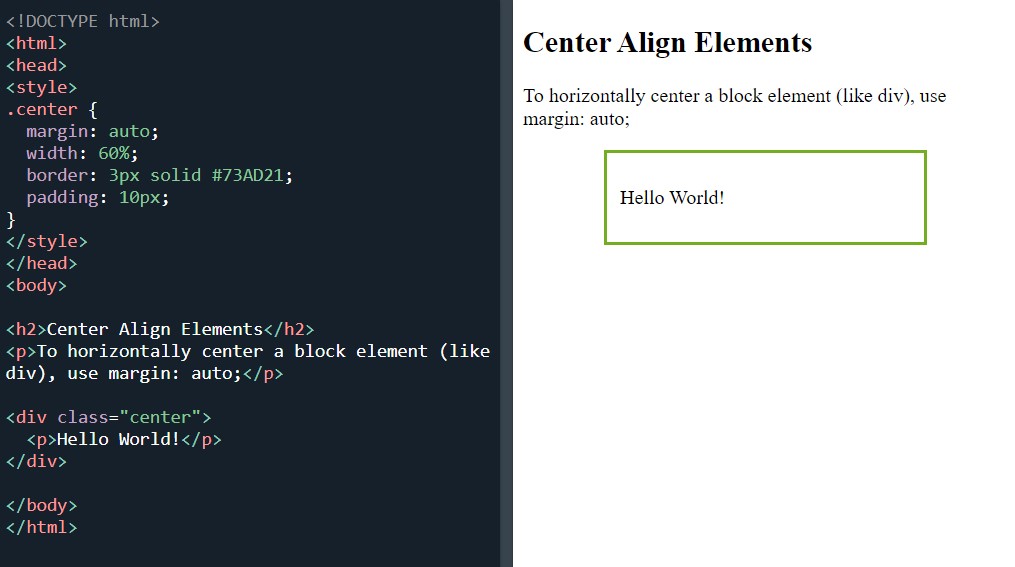
The first exercise was the center-align element:
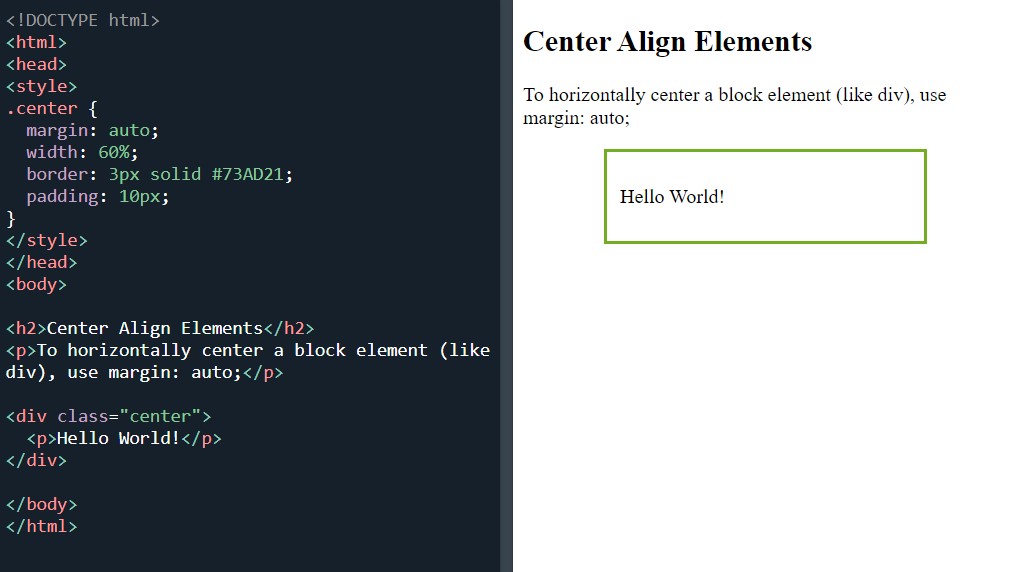 Horizontally centre a block element
The next exercise was the center-align text:
 Centred text
Which I didn’t do as I had already gone ahead and centred the text using the center-align element. I had also changed the border, the background colour, the text colour and added a h2 selector to change a few things about the headline such as the colour and position.
Man, I am really itching to start building something. I am unsure whether to take a day off learning or break my study period up into two smaller chunks where I study for the first section and then build stuff in the second section. But everytime I look at the next exercise- it gets more awesome and I want to learn that too.
Next it was onto 'center an image':
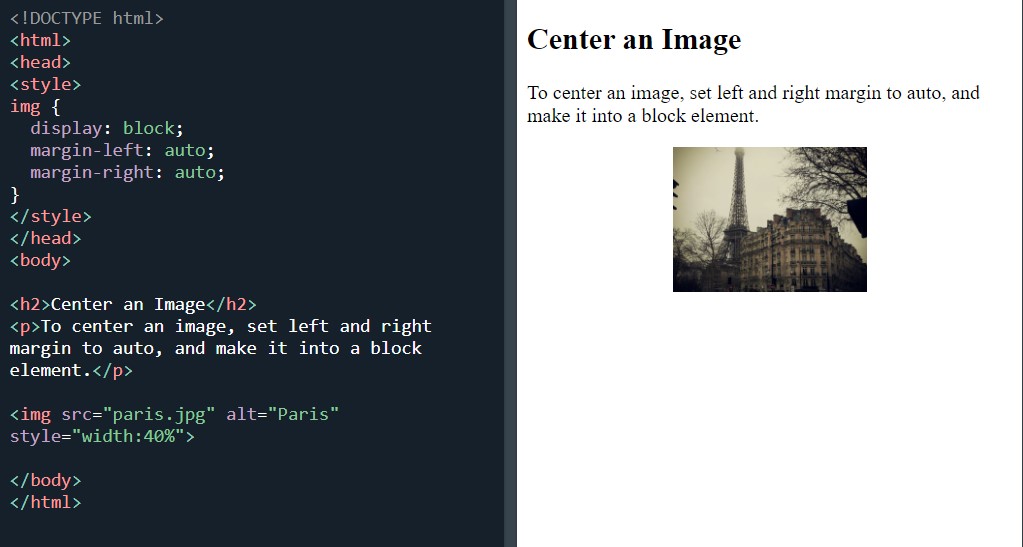 Center align image
For the ‘center an image’, I used my own pics. Moving on to the final two tasks of the evening which did pretty much the same thing but with slight differences in the lines. The first is ‘left and right align - Using position’:
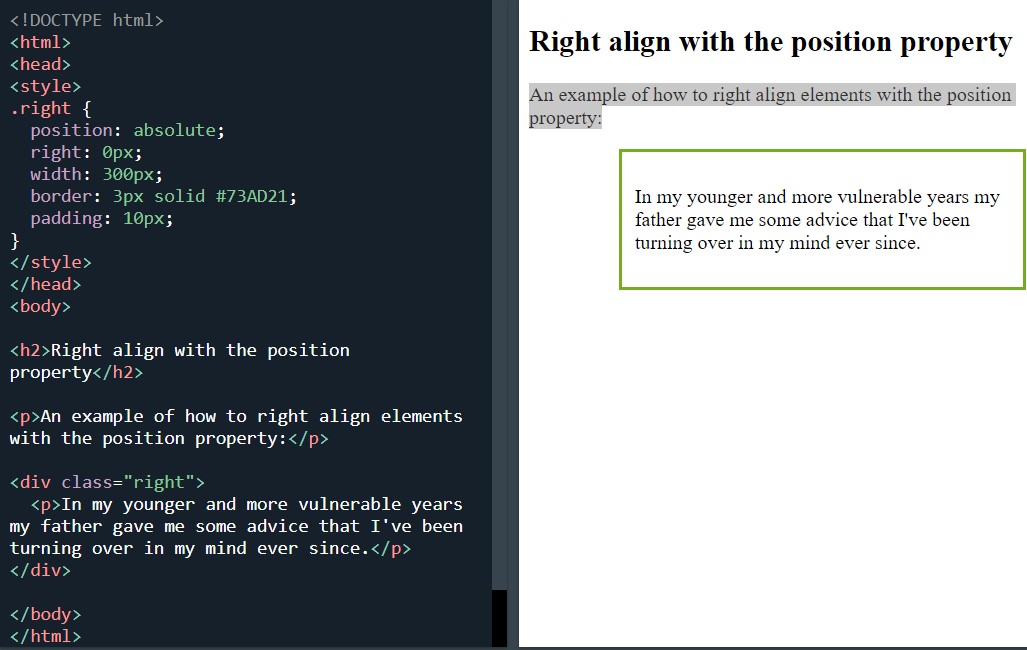 Right align
And the second is ‘Left and Right Align - Using float’:
 Right align with float property
The only difference between these two is that by using float, the green box is slightly more left than by using the properties position and right.
Felt really upbeat and pumped after today’s study. Again, I’m really glad I sat down and made a start on the exercises and I’m looking forward to doing more good stuff in the future.
Day total: 1 hour 05 minutes
Saturday 18th December 2021 / *
Epic today
Managed to start the day with nearly an hour of good study. The rest of the day was quiet so I took full advantage it.
Putting in a good shift was something I really wanted to do as I have been looking to the end of December as the marker which indicates the end of the first 3 months.
In that time, I had hoped to complete the basics of HTML on the HTML site and the CSS basics on the W3Schools site. After, I will make a start on something like Free Code Camp where I hope to reinforce my knowledge and practise my skills through building projects.
But as the end of December looms, it is getting obvious that I may well miss that deadline. I didn’t want to set myself any targets or put any undue pressure on myself, but it seemed perfect to use the end of December and the beginning of January as the obvious time for a change and a shift to building projects for the next 3 months.
Forgive me for not getting too detailed about today’s material. There is a lot to cover but not much to say about it.
Anyway, I started with a warm up of the ‘left and right align - using float’ from last night and then reviewing the ‘clearfix hack’:
Clearfix hack
Straight away I had an issue with this one. I had a bug that I just couldn’t find. I couldn’t get the second image and the clearfix working. The image appeared similar to the first image.
I checked my code and all seemed fine. I then copy and pasted the final < div class=”clearfix” > section and that didn’t work.
I reverted to using a technique that I used before which was to copy and paste the whole thing to see if it all works. Once I know it works, I can then rewrite it, section by section, knowing that I have made a mistake in the code.
It worked perfectly after the copy and paste, so I set to work on erasing it and rewriting it. After the rewrite, it worked. I don’t know what I did wrong but I couldn’t get it working first time.
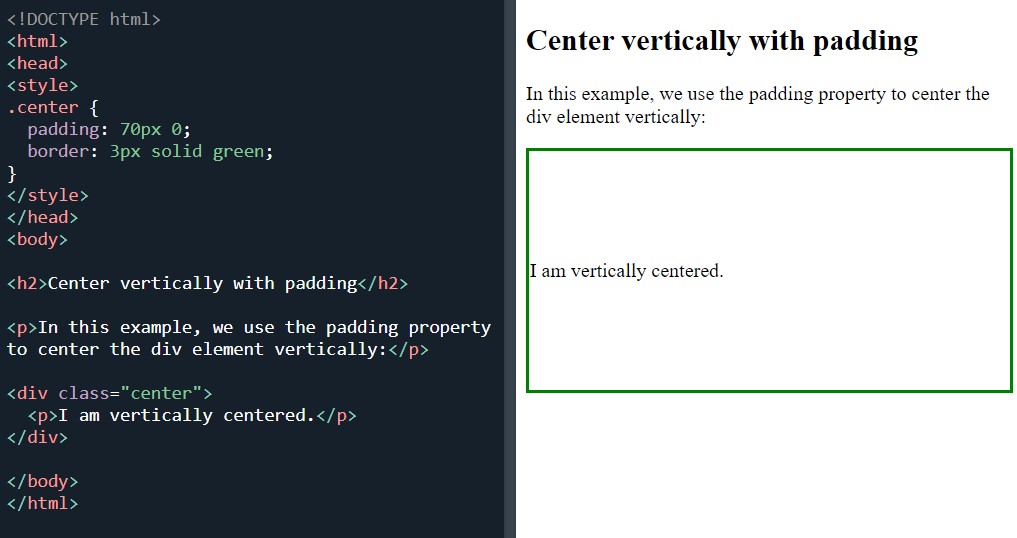
Next task was two methods to ‘center vertically - using padding’:
Center vertically with padding
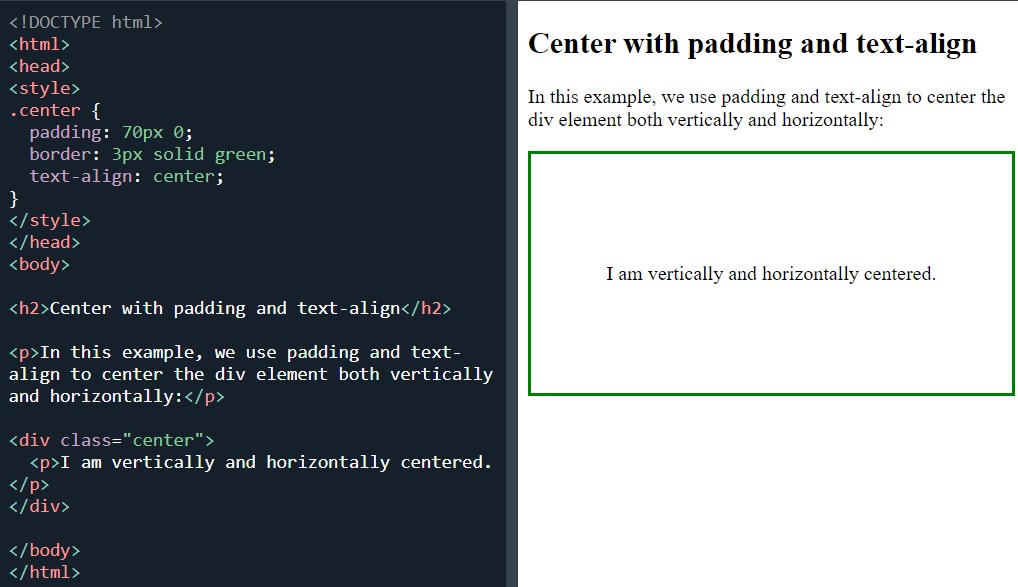 Center with padding and text-align
Followed by ‘center vertically - using line-height:’
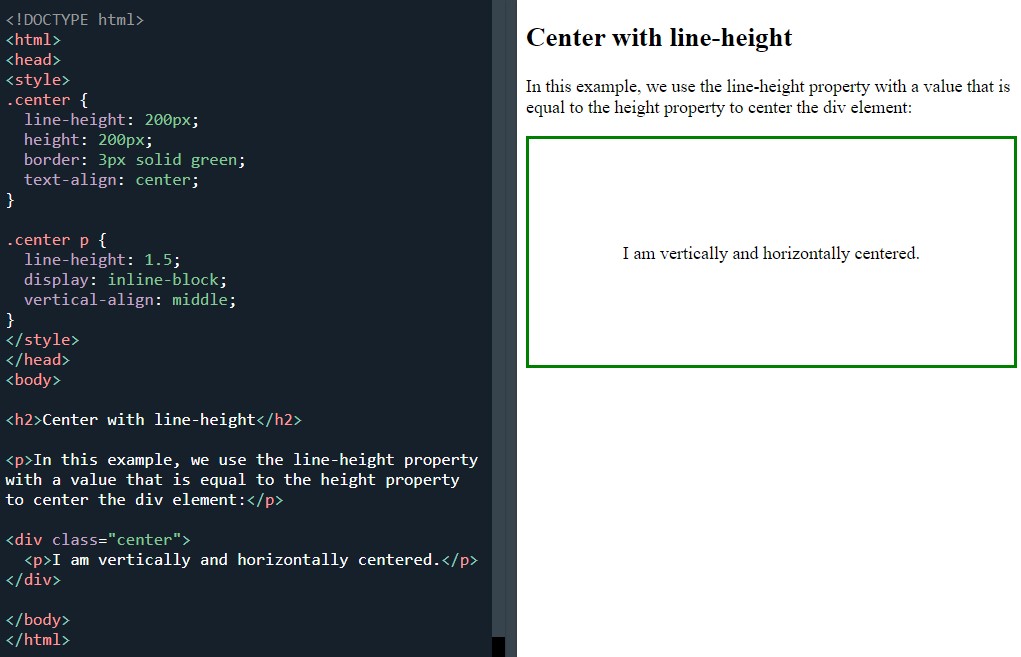 Center with line-height
And ‘center vertically - using position & transform’:
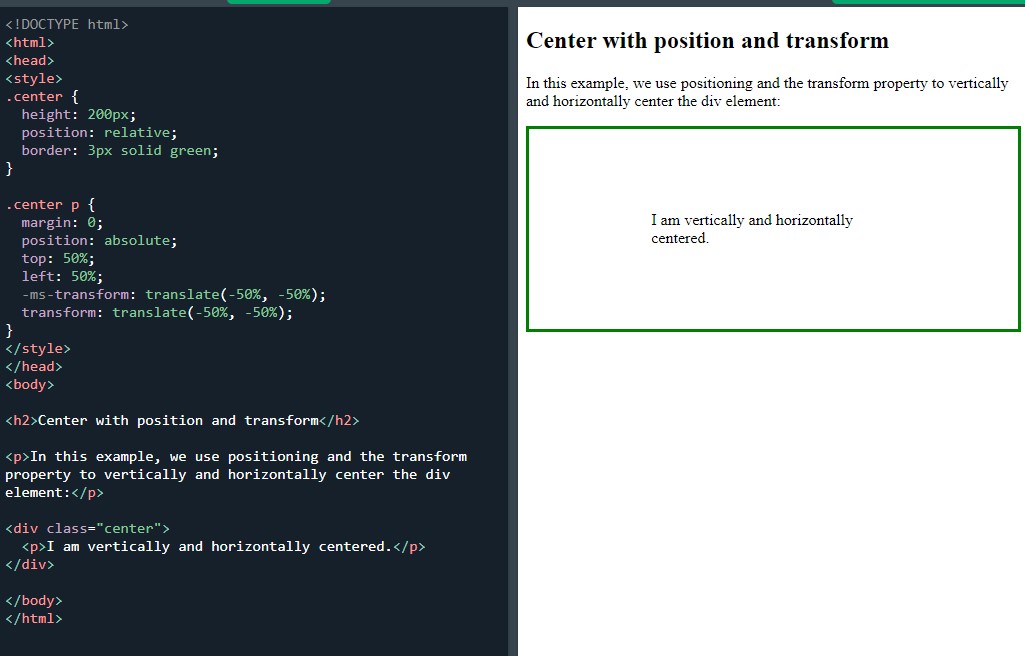 Center with position and transform
Finishing off with 'center vertically - using flexbox':
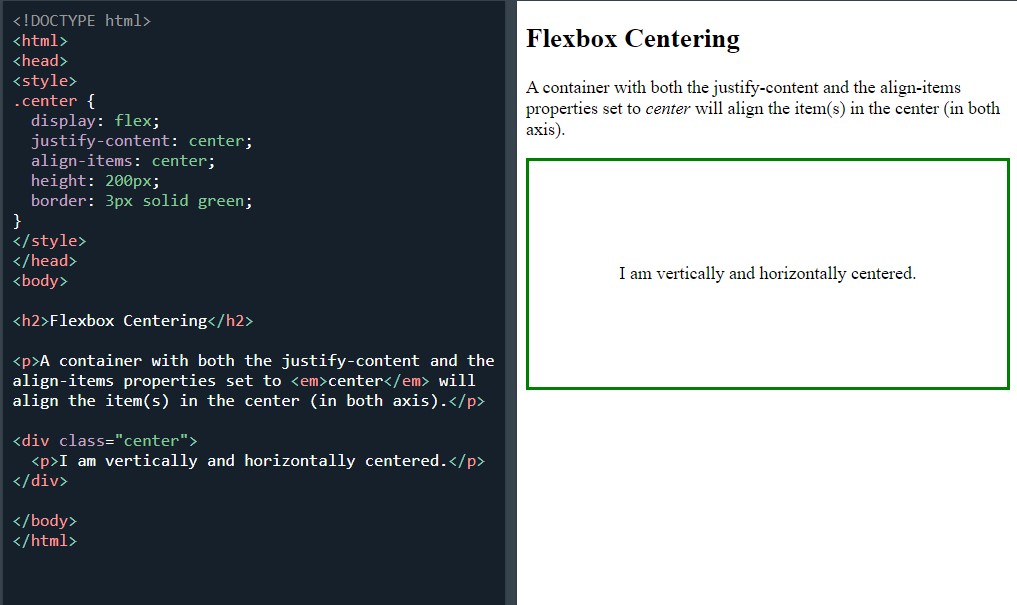 Centre with flexbox
And the ‘test yourself with exercise’.
Later in the day when I was writing this blog entry and saving the screen shots of all the exercises I worked on, I realised that I have missed out a whole section. I jumped the CSS combinators section and I completed the pseudo class instead.
I will have to do the combinators tomorrow.
Once I had completed the pseudo-class section pseudo-class which was interesting becauseI have heard the name pseudo-class mentioned many times on Syntax.
There were plenty of exercises to get through in the pseudo section- so here they are. Starting with anchor pseudo-classes:
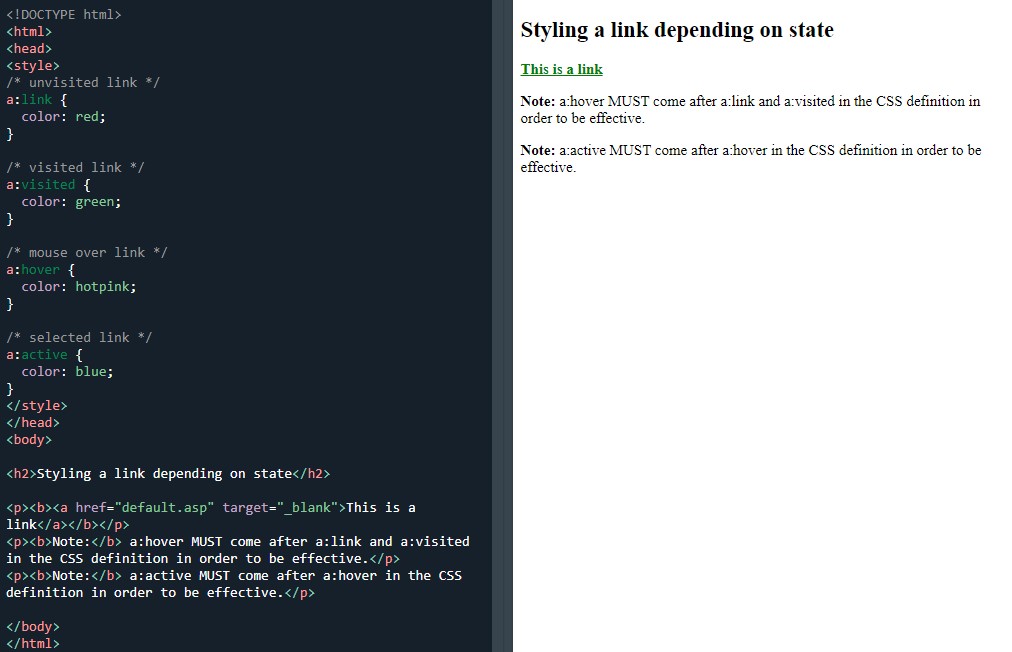 Using pseudo-classes on a link
Pseudo-classes and HTML classes:
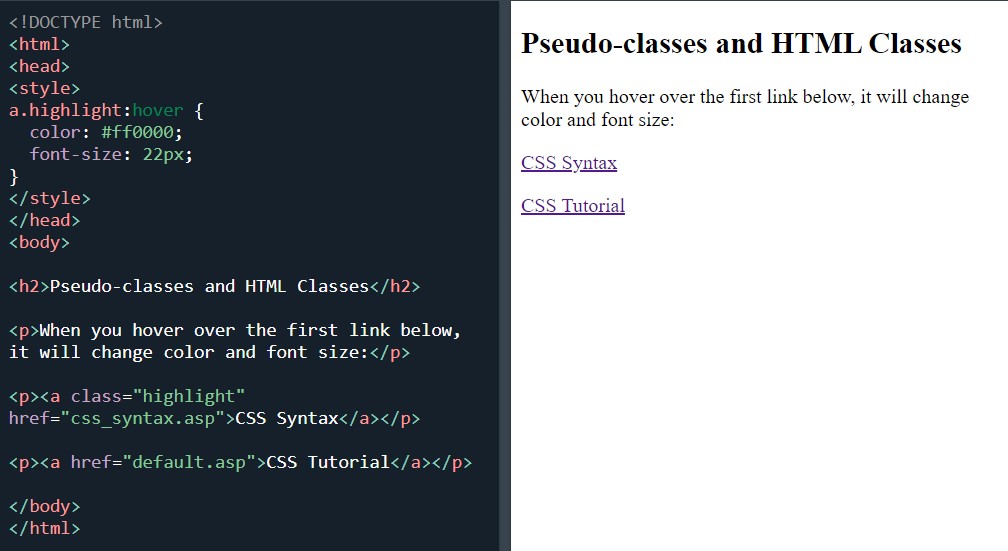 Using pseudo-class on HTML class
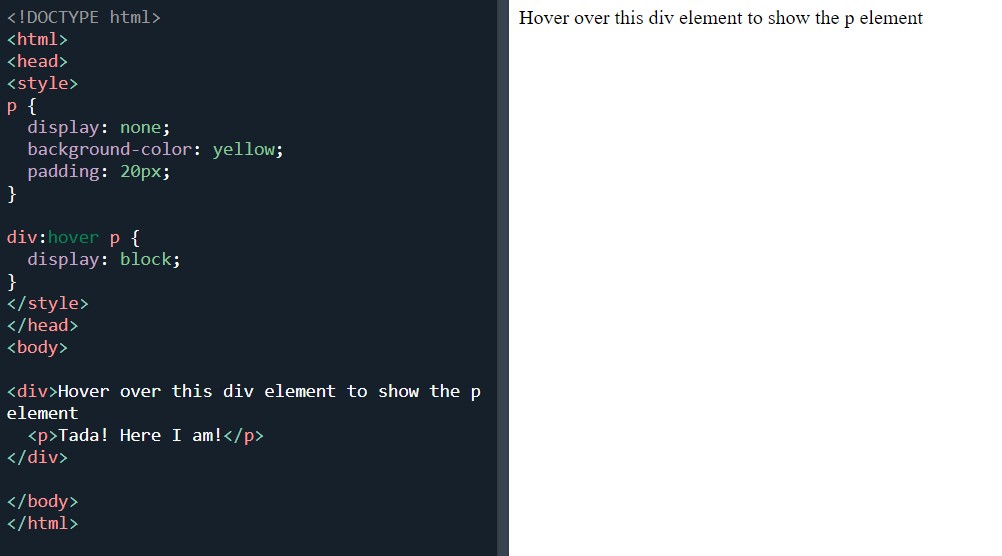
Hover on < div >:
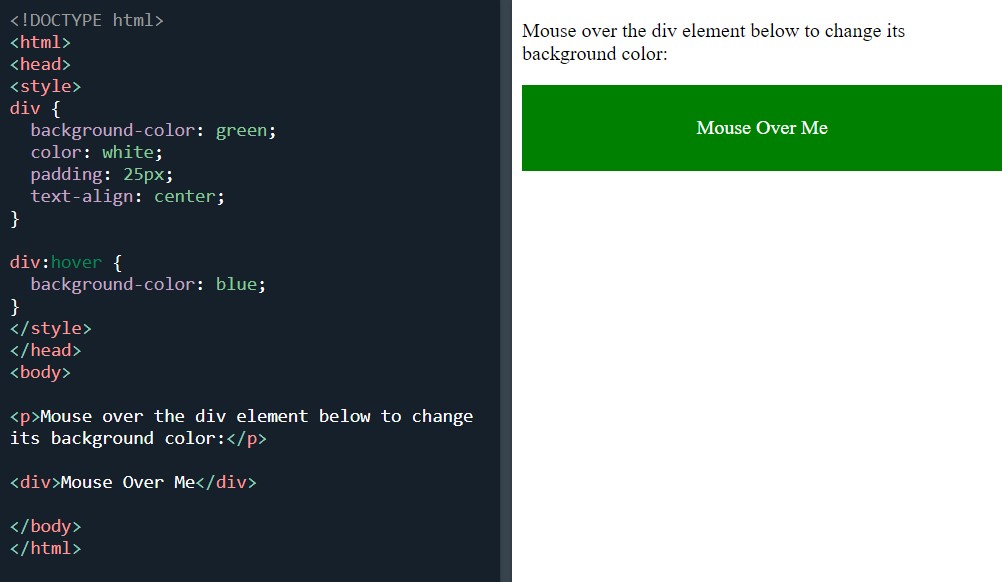 Hover on a div element
Simple tooltip hover:
 Simple tootip hover
The :first-child pseudo-class matches the first < p > element:
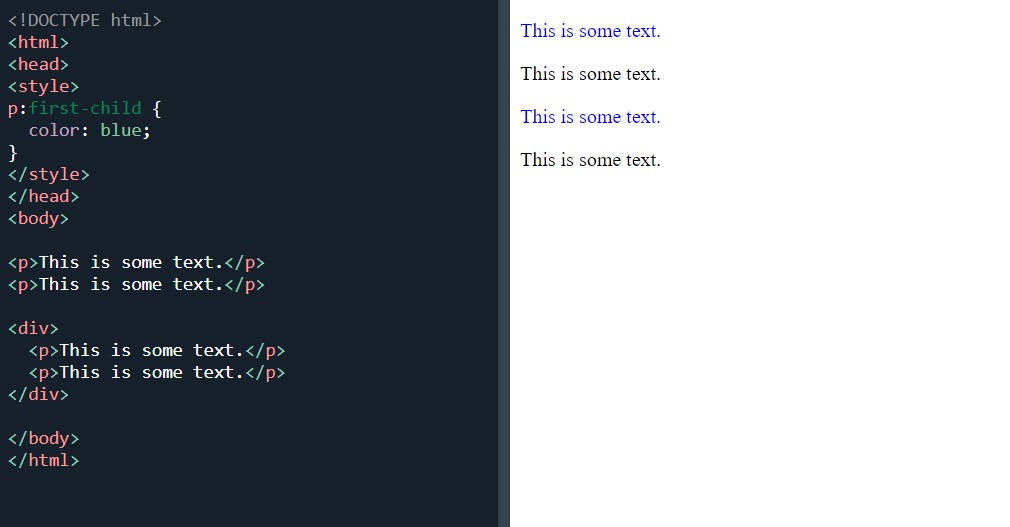 Style first child of an element
Match the first < i > element in all < p > elements:
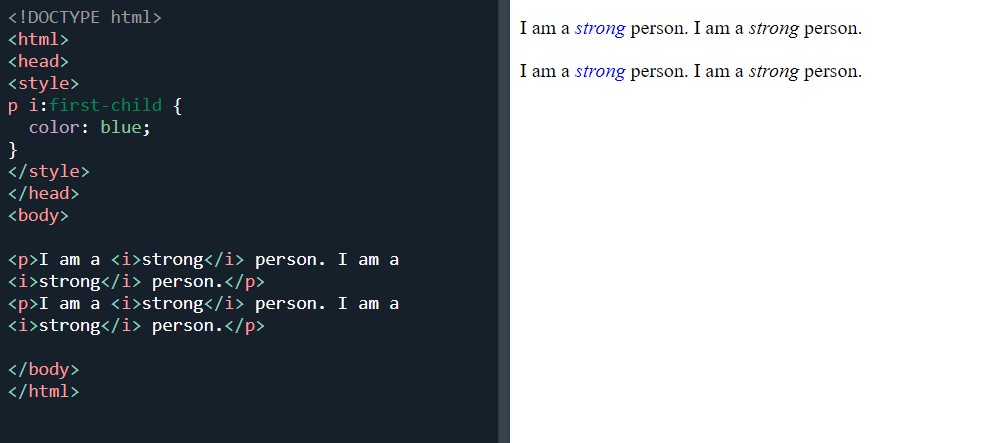 Style any < p > element that is the first child of any element
Match all < i > elements in all first child < p > elements:
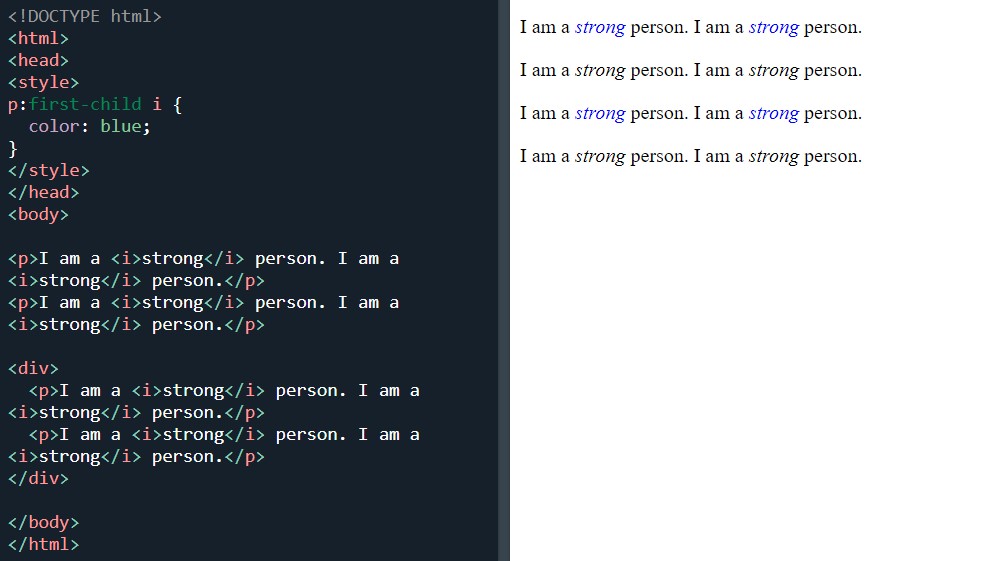 Style all < i > elements in all first child < p > elements
The :lang pseudo-class:
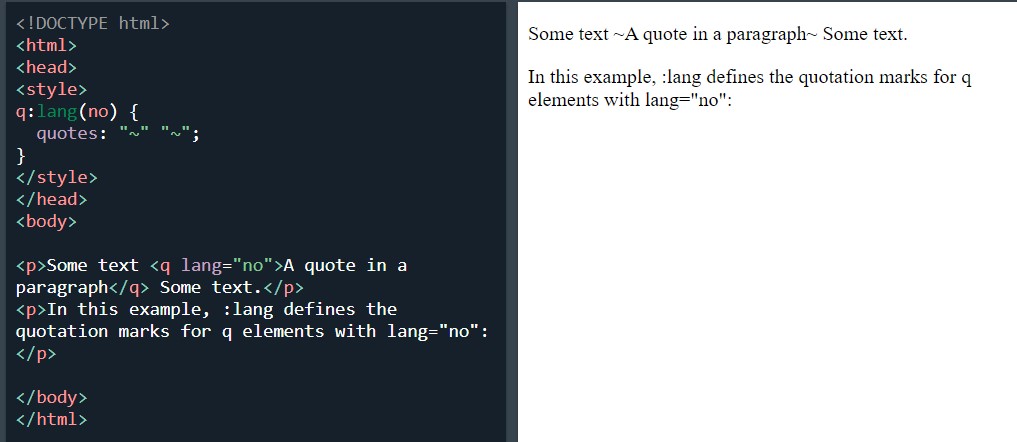 Style the quotation marks for < q >elements with lang="no"
I ended the day and section with the usual ‘test yourself exercise’, in which I only had to go back and find the answer to one question.
Day total: 2 hours 29 minutes
Sunday 19th December / *
A bit of backtracking
Another epic day of study. It's been a while since I’ve been able to find time to do a few hours of study on consecutive days.
I started with a warm up of the :lang pseudo-class. That got me ready to hit the section I mistakenly skipped yesterday which was combinators. All the examples were pretty similar and I started with descendent selectors:
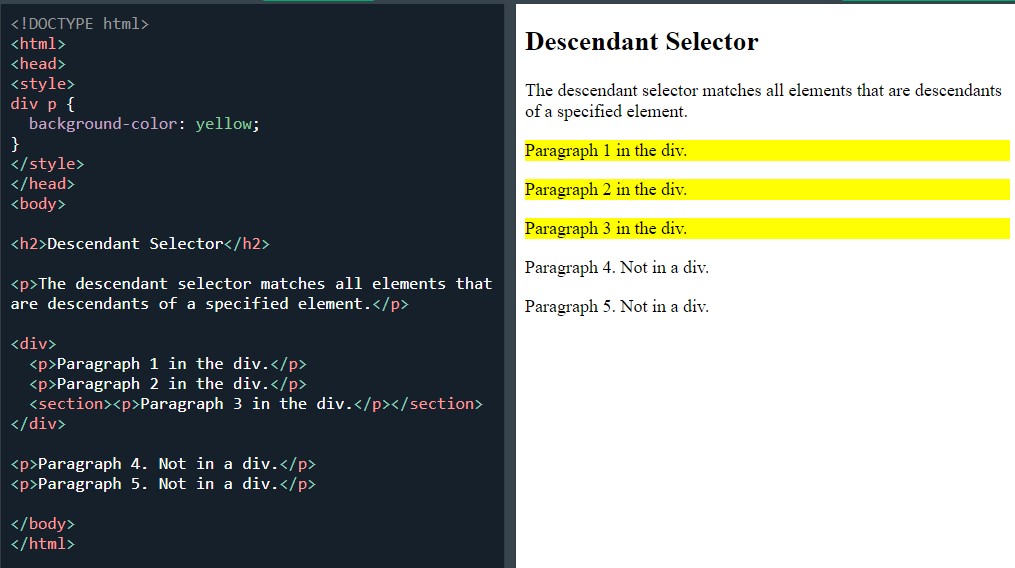 Descendant selector
Then child selectors ( > ):
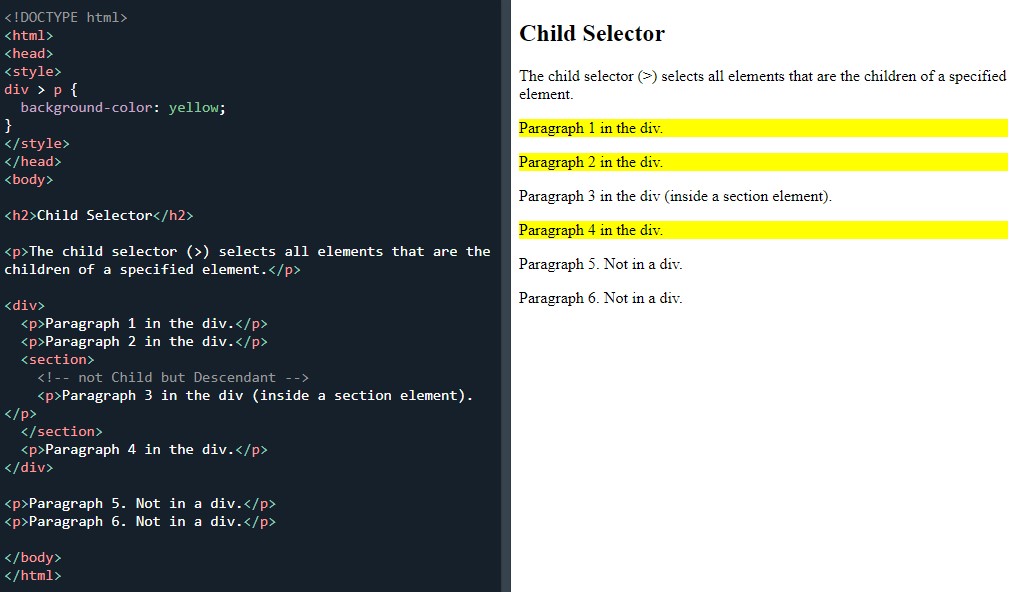 Child selector
Adjacent sibling selector ( + ):
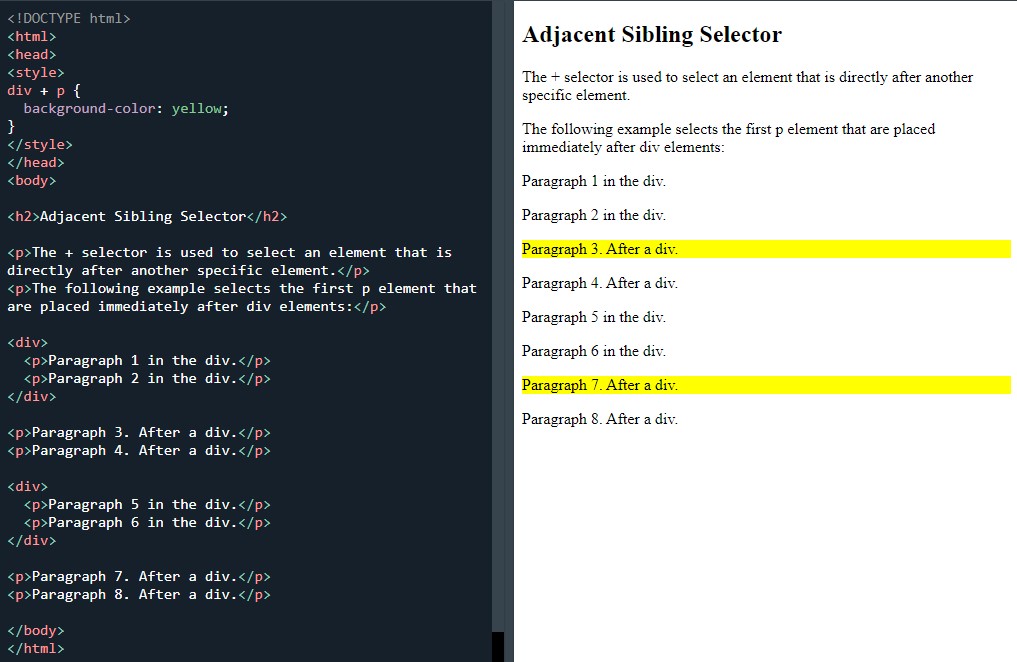 Adjacent sibling selector
The last part of this page was the ‘test yourself with exercises’. As everything was still so fresh in my head, I aced it.
The next page was opacity which had some good looking stuff on it and I was looking forward to this section.
First was the transparent image:
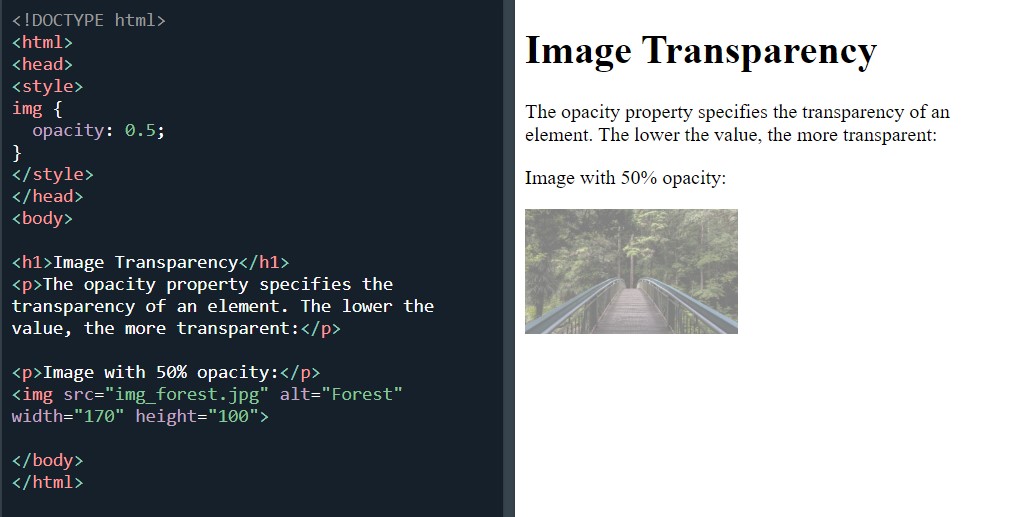 Image with opacity
Then the next two exercises were awesome with nice effects and both titled 'transparent hover effect':
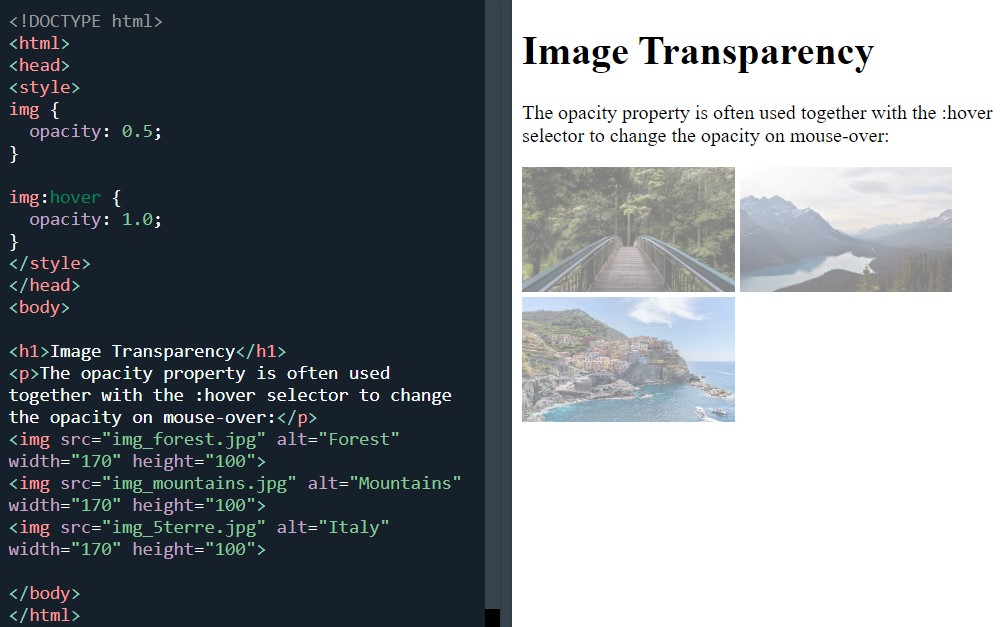 Change the hover on opacity
And:
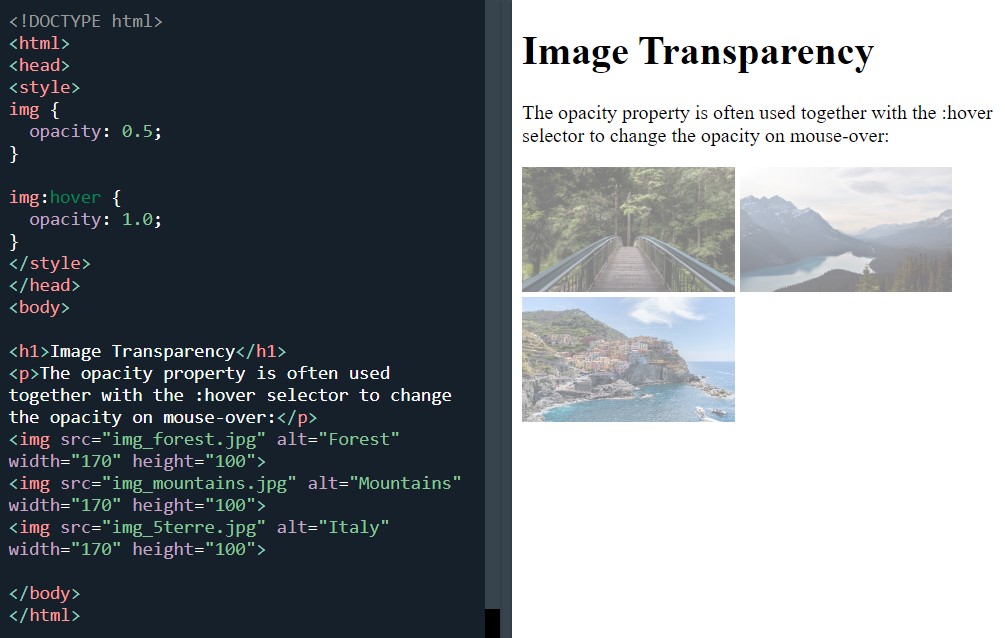 Change the hover on opacity
Next were a few that are not too dissimilar, starting with transparent box:
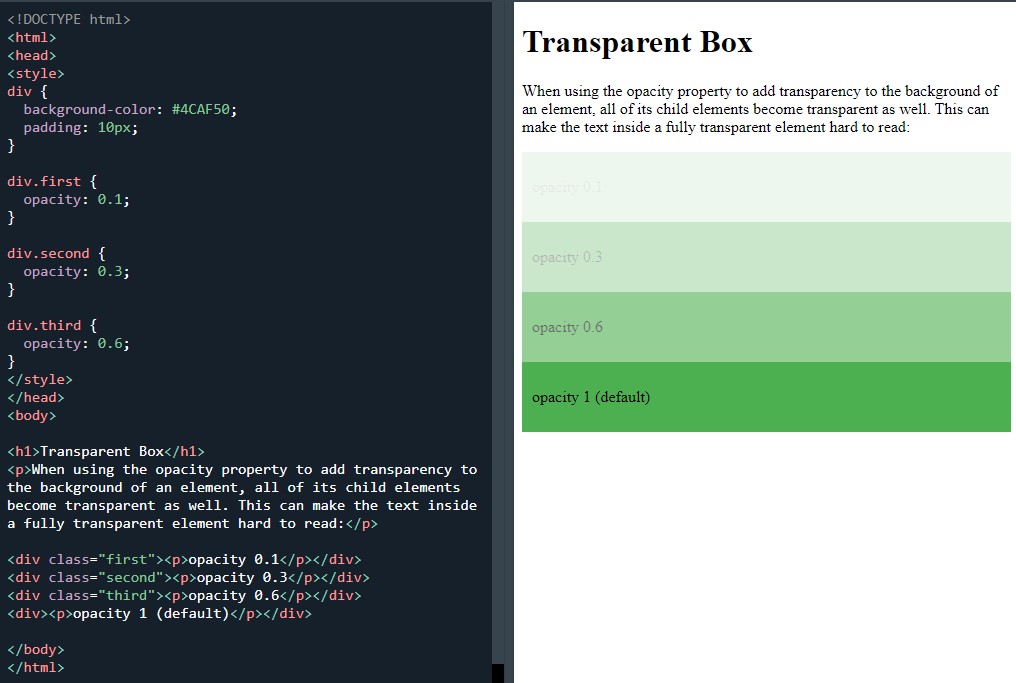 Transparent box
Transparency using RGBA:
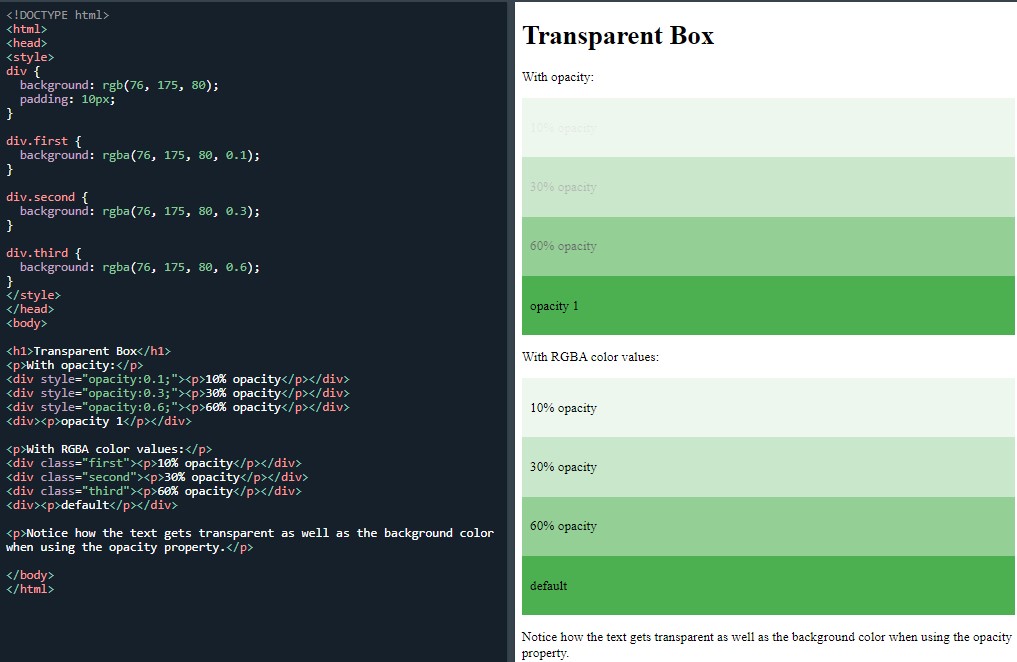 Transparency using RGBA
Which was enjoyable to memorise. I am understanding the opacity but I am still way off understanding the numbers on the RGBA colors.
Finally, was 'text in transparent box':
 Text in transparent box
And I finished off with the ‘test yourself exercise’.
I got through quite a bit today. I’m happy I was able to make further progress through the course, but I'm still a bit worried that I may be going through the course too quickly now.
Day total: 2 hours 13 minutes
Monday 20th December /
Not in the groove
No warm up today. I decided to go in cold. A new page introducing the navigation bar.
I’m not sure if skipping the warming up was a mistake. I again didn’t feel very focused and struggled to concentrate.
Looking forward to this section and to see if there is anything new from previous encounters with navbars. First up were two exercise which were similarly titled ‘navigation bar = list of links’:
 HTML code for navbar
 Add CSS code for navbar
Next there were two exercises titled ‘vertical navigation bar’:
 The code to build a vertical navbar
 The code to build a vertical navbar
I called it a night after these last few. I didn’t have the umph in me to focus and I kept getting distracted which meant that I didn’t settle into my usual study groove.
Day total: 0 hours 33 minutes
Tuesday 21st December 2021 / *
More time at the navbar
I reverted back to old habits and a short warm up today. My warm up exercise of choice was the last of yesterday’s vertical navigation bar examples.
I then began on the rest of the vertical navigation bars:
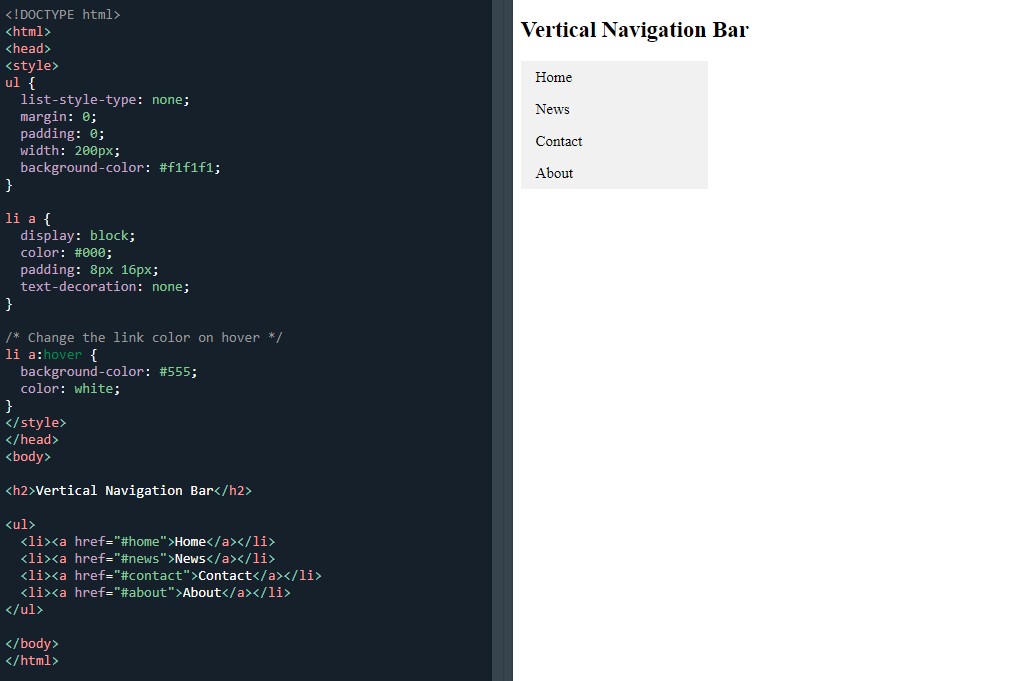 Vertical navigation bar
Active/current navigation link:
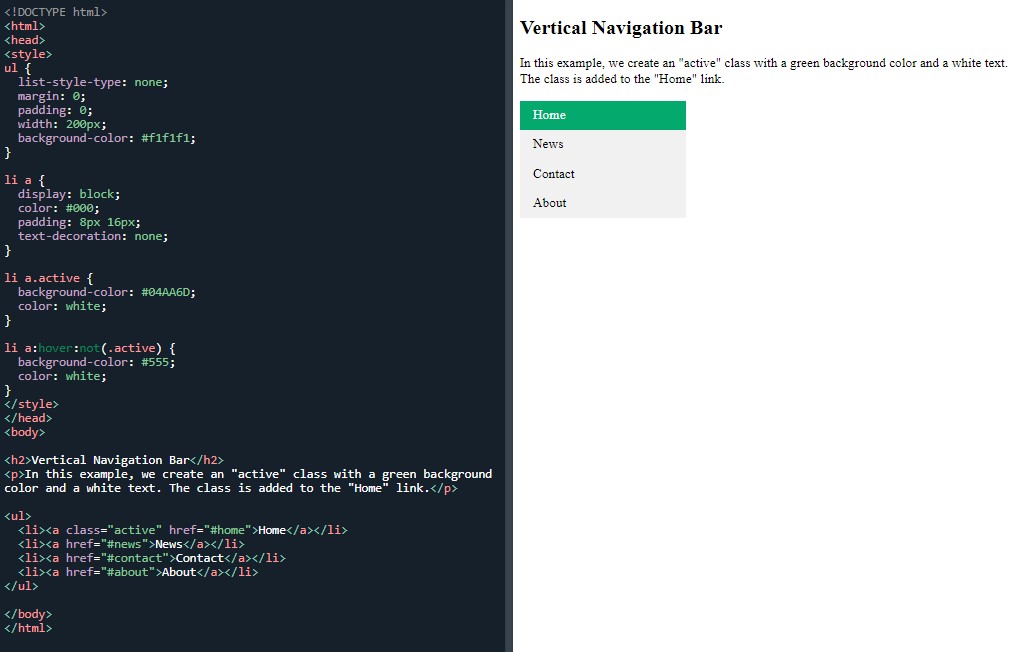 Vertical navigation bar with an 'active' class
Centre links and add border:
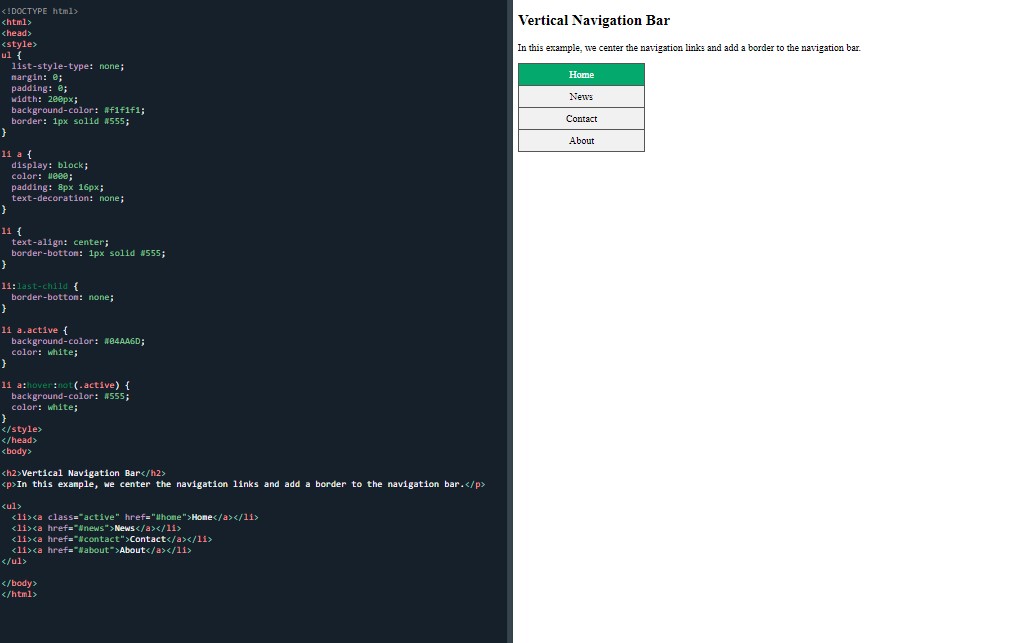 Center links and add borders navbar
Full height and fixed vertical navbar:
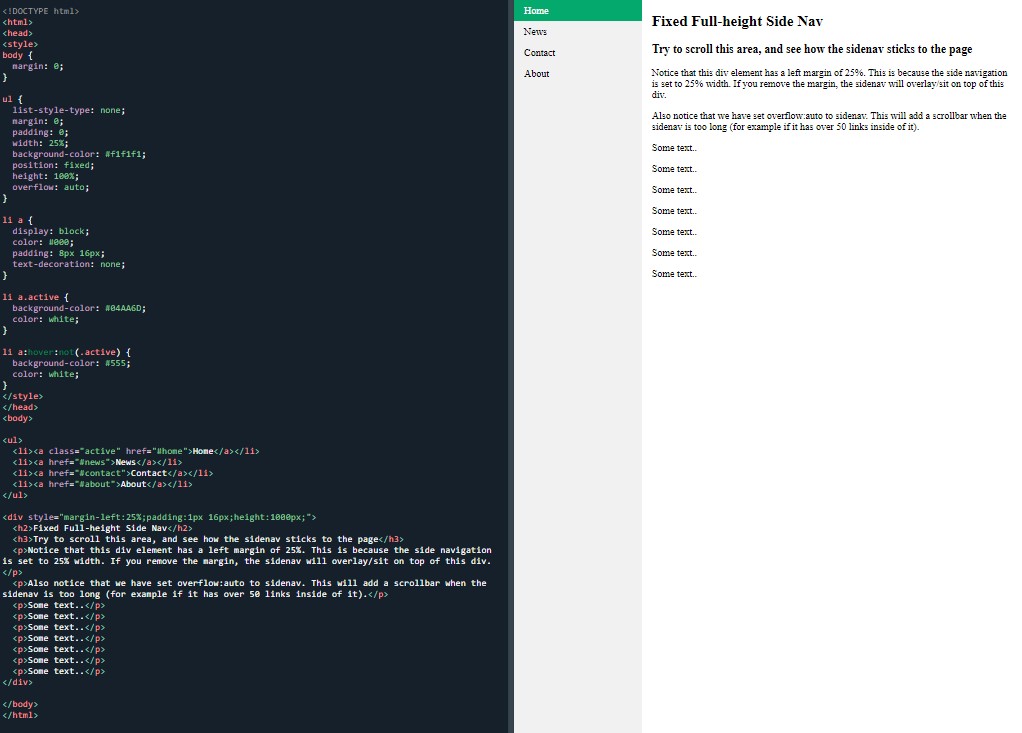 Full-height vertical navbar
Horizontal navigation bar:
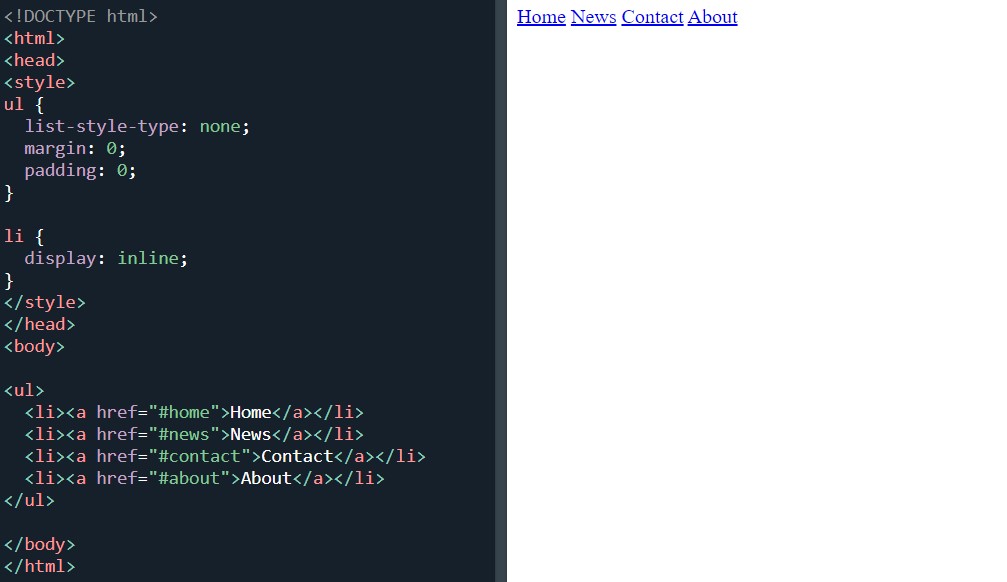 Horizontal navbar
Two floating list items:
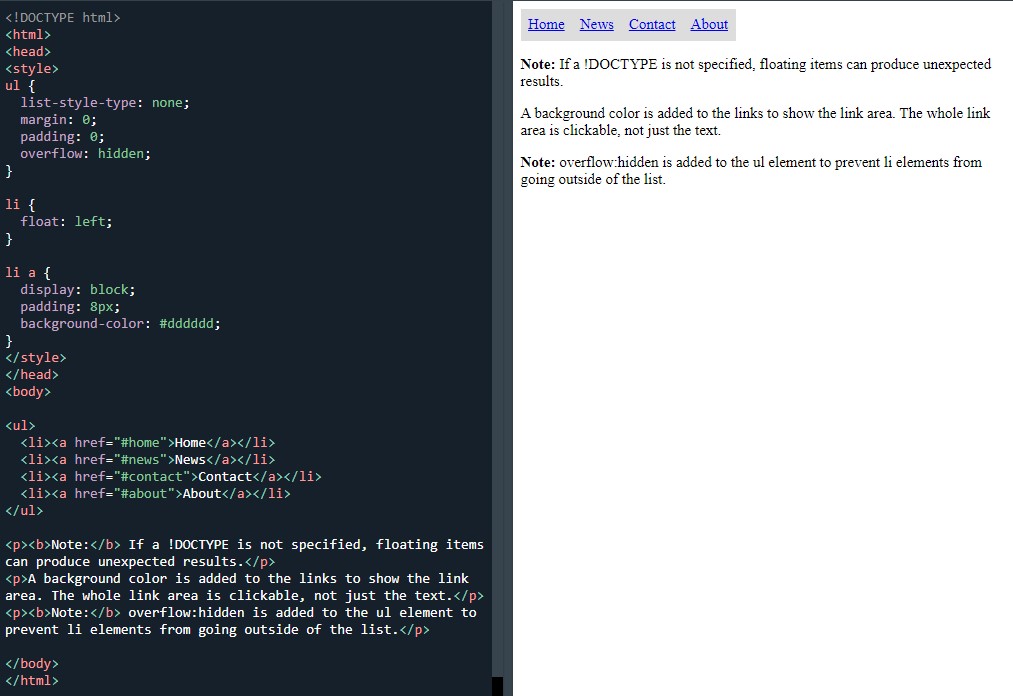 Horizontal navbar with float
And another:
 Horizontal navbar with float
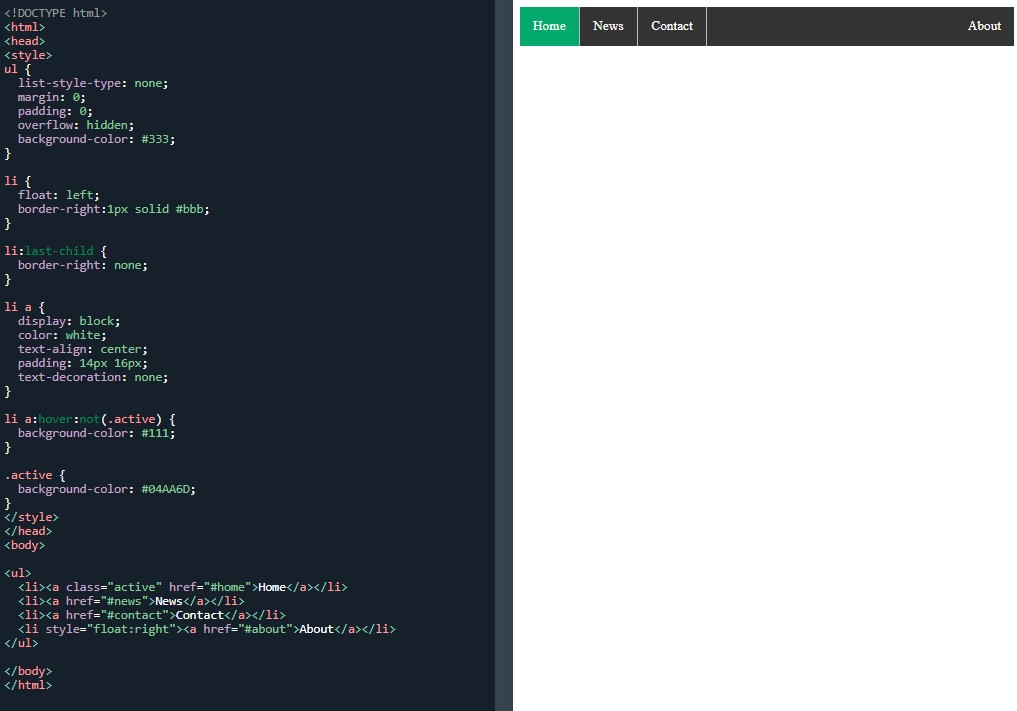
Another horizontal navigation bar example:
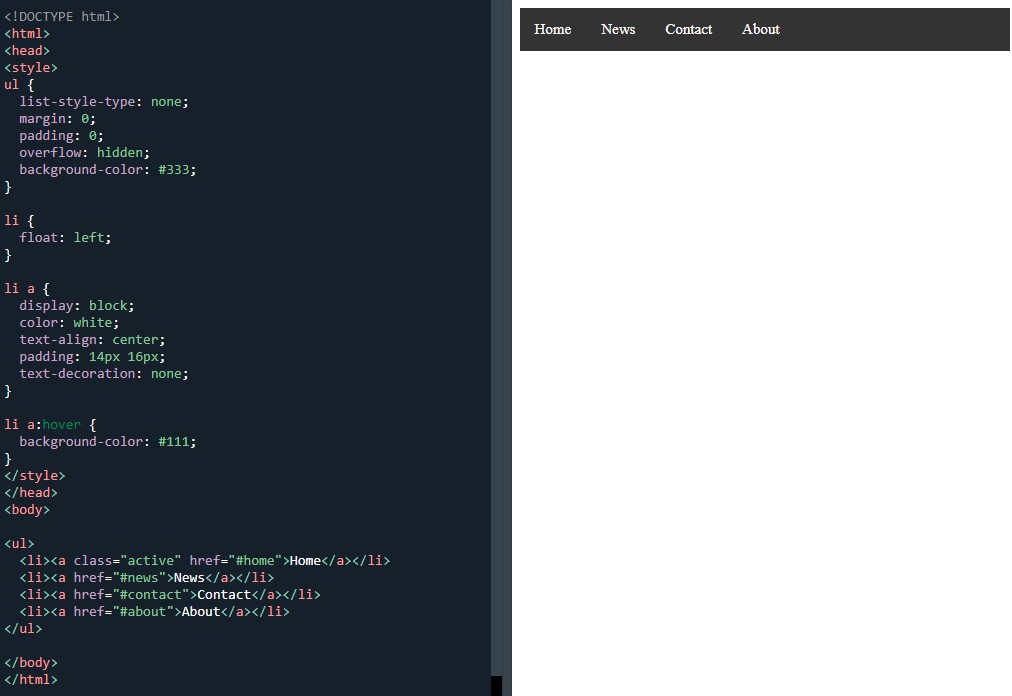 Horizontal navbar with a black background
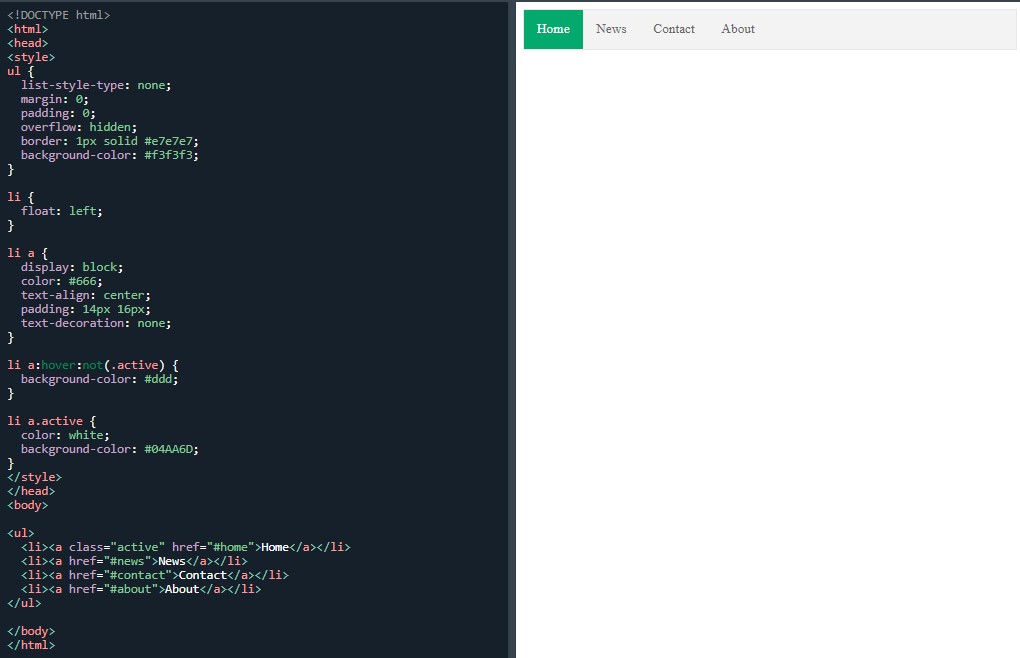
Followed by another active/current navigation link:
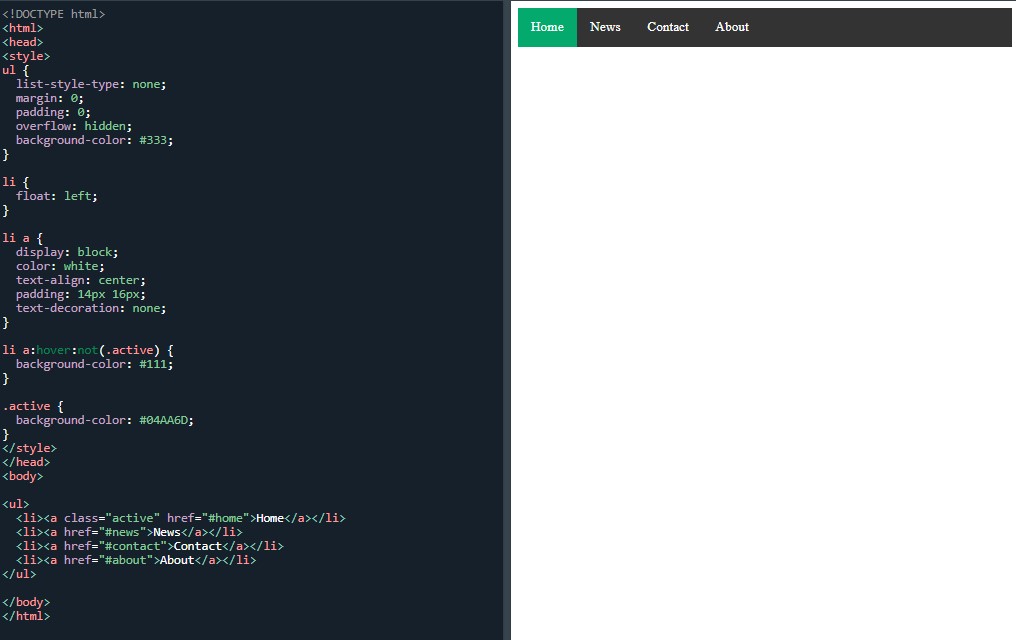 Horizontal navbar with an "active" class
Right-align links:
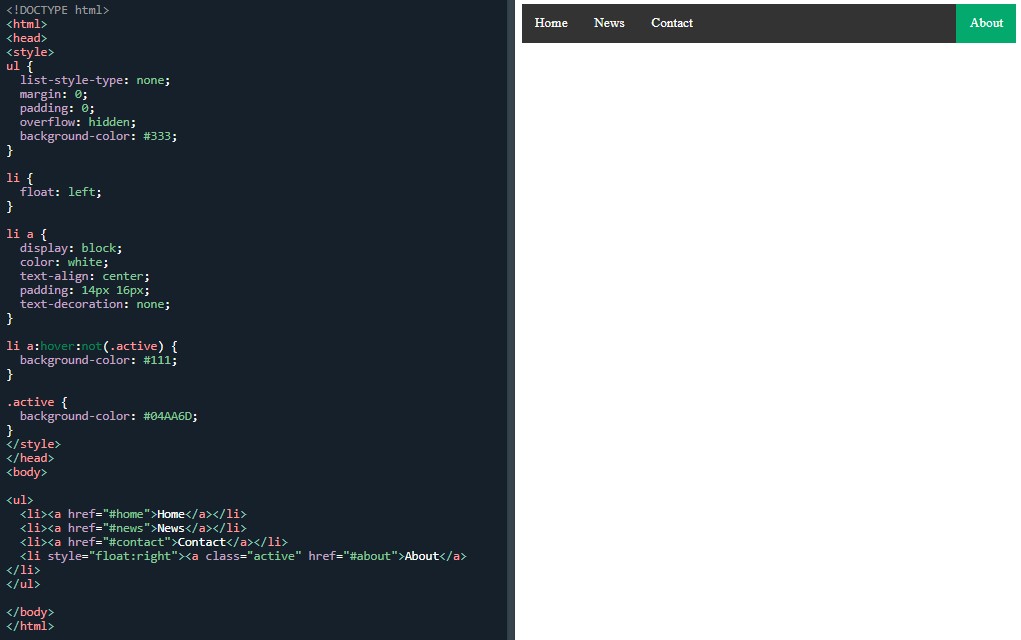 Right-align links
Border dividers
 Horizontal navbar with link dividers
The next two examples were fixed navbars top and bottom:
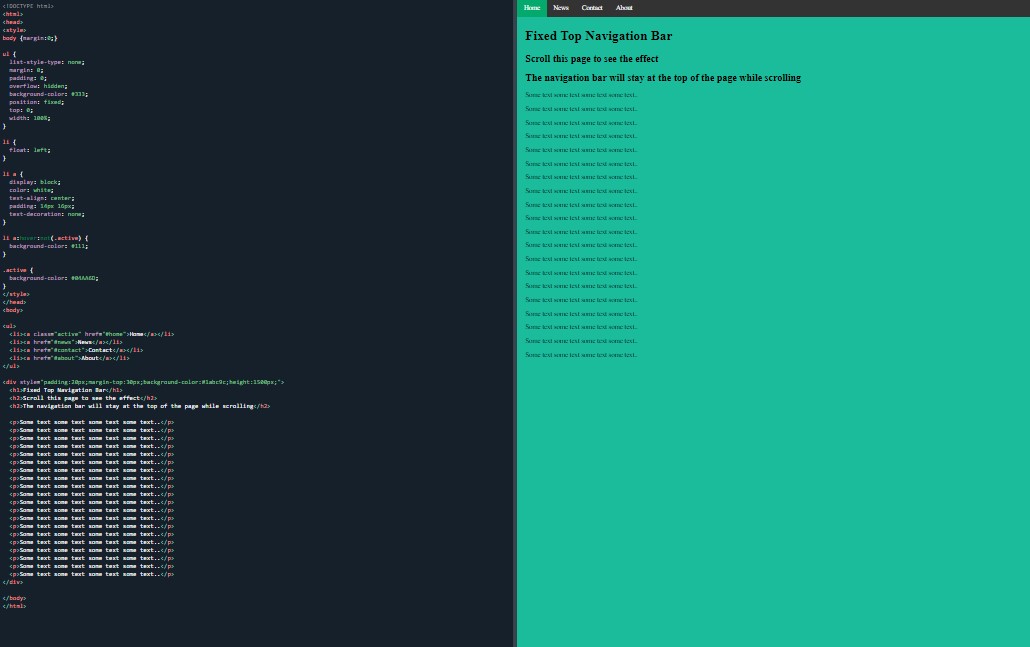 Fixed navigation bar
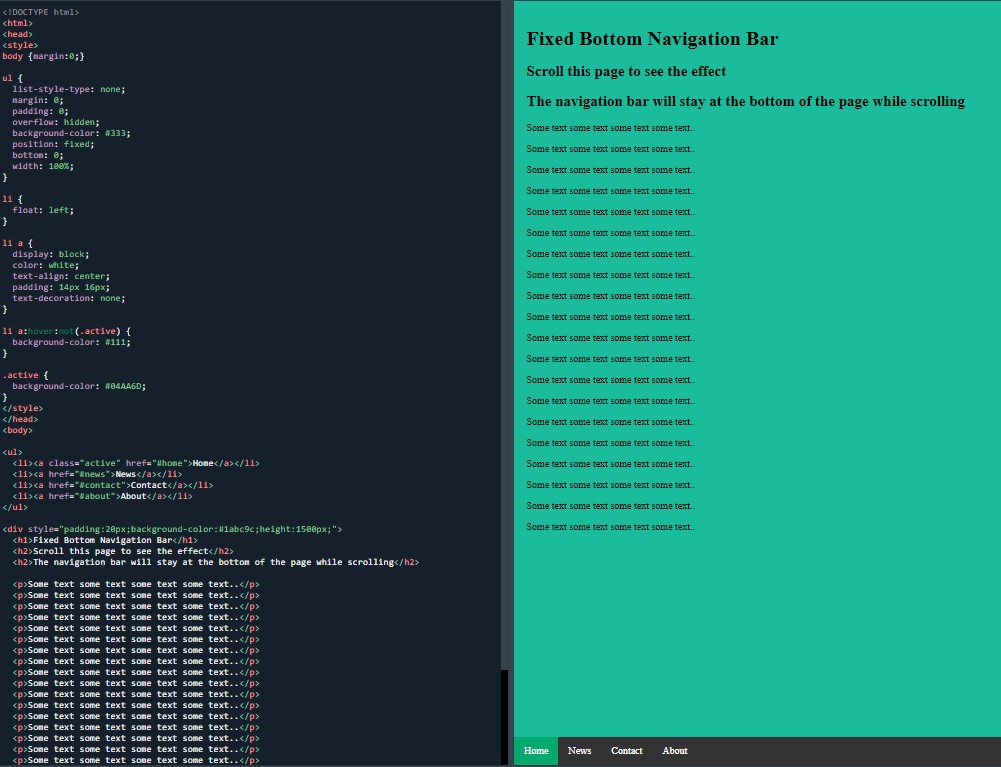 Fixed navigation bar
I made up for last night’s lack of hours by doing a bit more tonight. I’m really liking all the navbar material.
Day total: 1 hour 46 minutes
Wednesday 22nd December 2021 *
Short navbar time
Started by diving straight into the grey horizontal navbar to get me in the mood. It didn’t really work. Had to push through the unfocused feeling and keep going. Eventually, I got in the groove as I was really looking forward to the next few upcoming tasks.
Grey horizontal navbar:
 Gray horizontal navbar
Next was the sticky navbar which seemed to take ages:
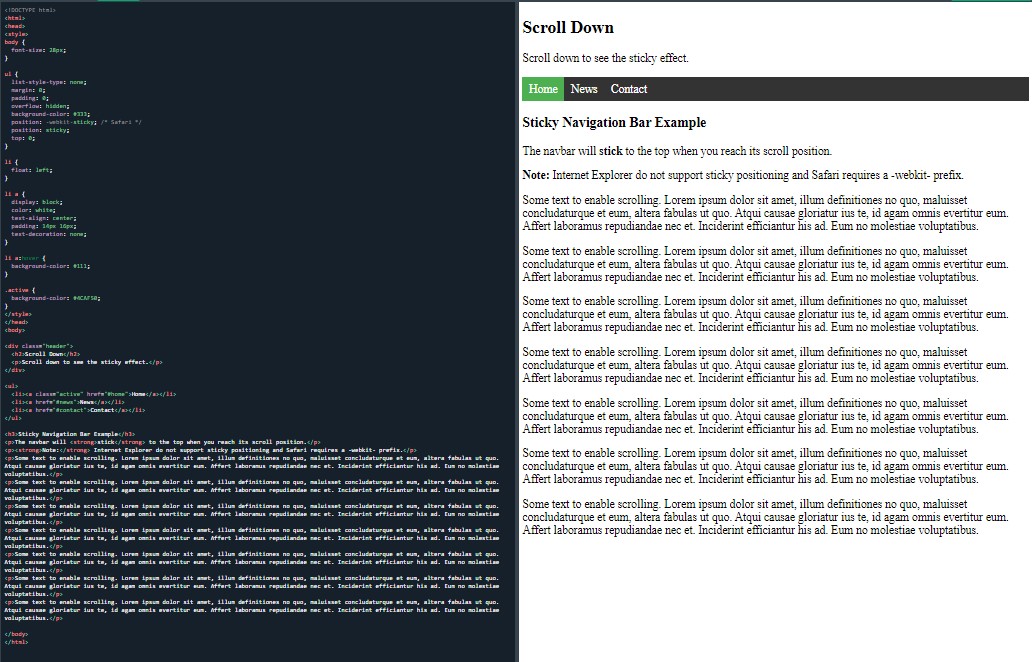 A sticky horizontal navbar
Then I made a start on the responsive topnav and media queries. I got the first section completed but it was painstaking.
Feeling tired and fighting a losing battle against an unfocused mind, I called it a night and will set about completing the task tomorrow.
Day total: 1 hour 01 minute
Thursday 23rd December 2021 / *
Navbars all the way
I won’t lie. I found these few navbar examples tough going. I am happy to be able to build them but there are a lot of lines involved and at the moment, I don't understand what they all mean and their roles but I am sure that with more exposure, that will change.
I made plenty of mistakes and it took ages to go through the lines and see where I went wrong. At the end of the day and with sore tired eyes, this was slow going. At times, it bordered on really slow going/ uphill with a headwind slow going. It seems the complexity of lines have increased by a notch.
I have marked the start of this entry with a review. Yesterday, I did start the responsive topnav but I didn’t complete it. So, today, I started again on this task with the aim of completing it.
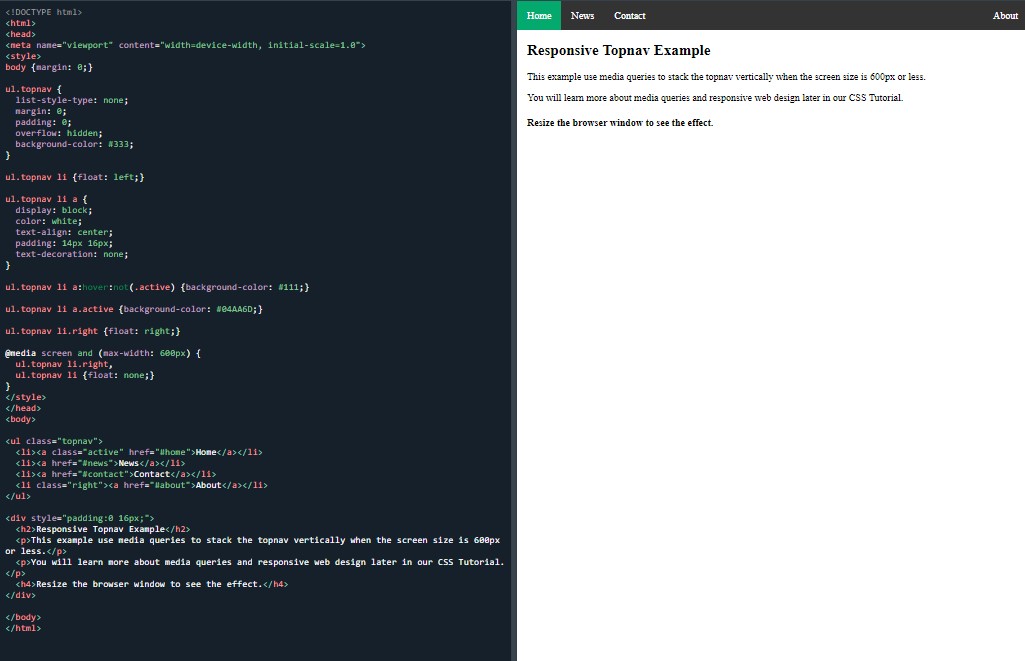 Responsive topnav response
I certainly did not breeze through this one. Next was not too dissimilar. It was the responsive sidenav:
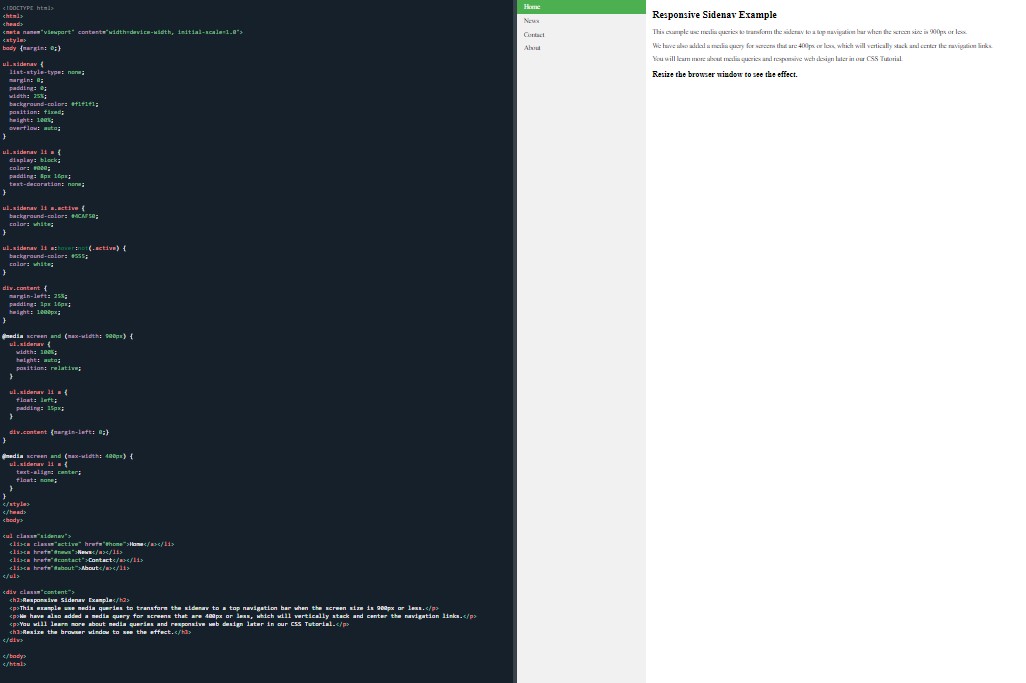 Responsive sidenav response
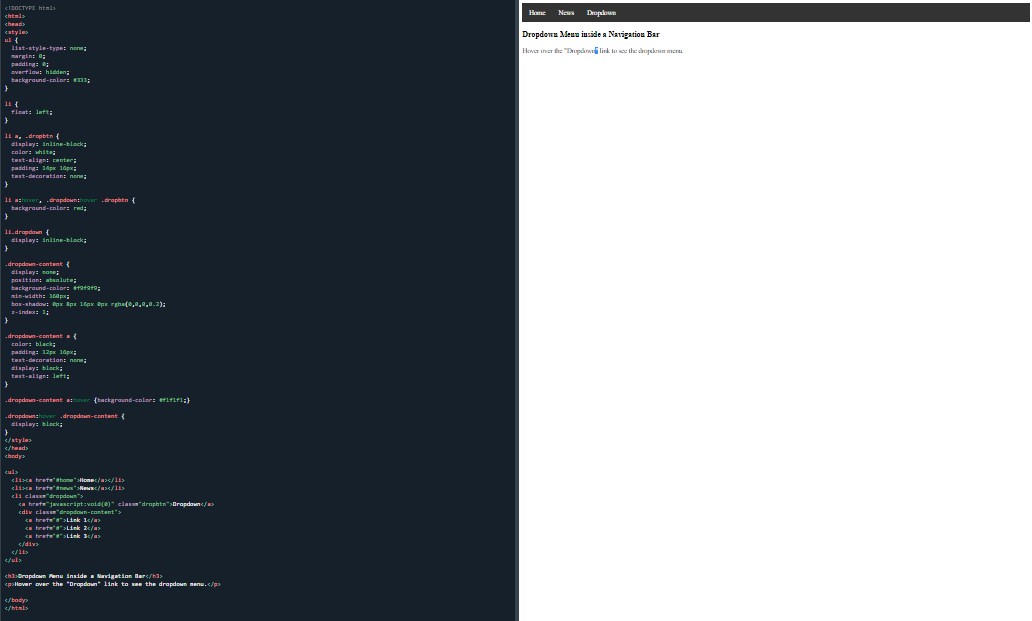
Dropdown navbar:
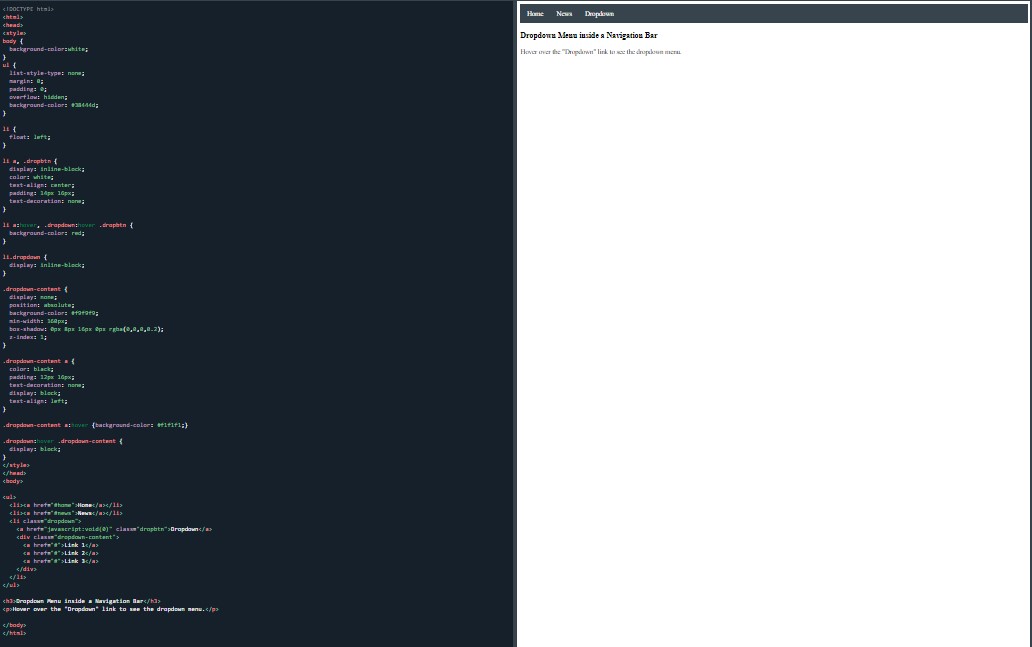 Dropdown menu inside a navigation bar
Again, it was slow going. Especially when I had to find the mistakes. It may be a taste of things to come.
That is all I managed today and my pace has definitely slowed down and I ground through this.
Day total: 0 hours 50 minutes
Friday 24th December 2021 /
Notes are helpful
No warm up or review today because I didn’t not feel like going over the tasks from yesterday again and I want to get stuck in and plough through the tasks today.
It’s the first time that I have felt a task to be less enjoyable than usual and a grind. I think it has something to do with the amount of classes and the fact that I do not understand them properly yet.
I made a start on the next page, which was about dropdowns. First example was the basic dropdown:
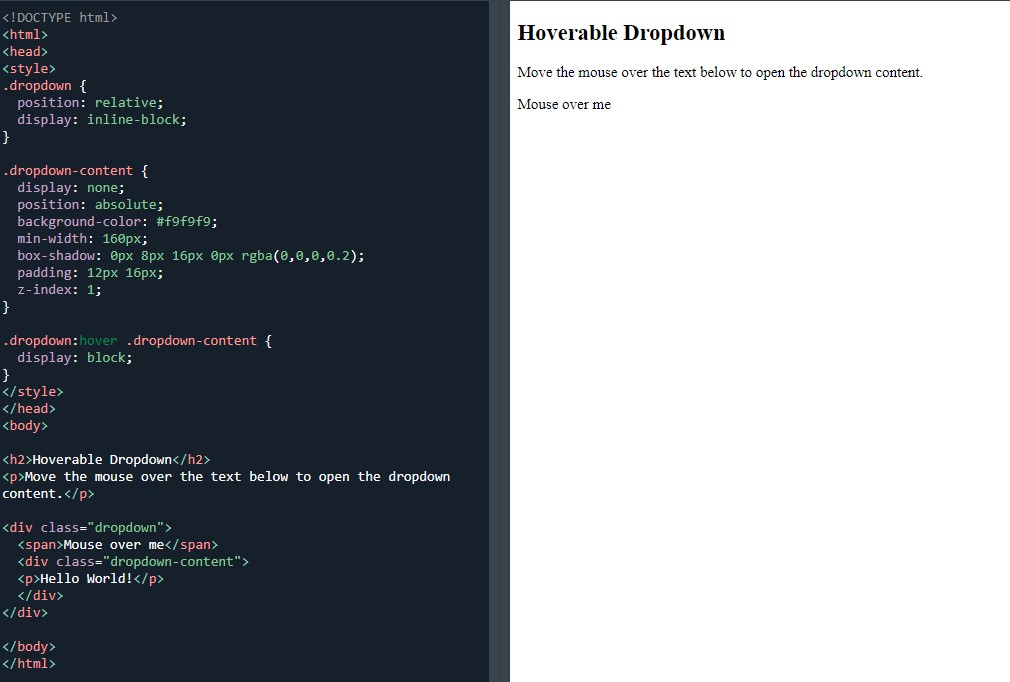 A hoverable dropdown
Then my understanding grew with the help of some explanation text before the next example. Furthermore, the next example was the ‘dropdown menu’ which had some comments explaining what each class and section does:
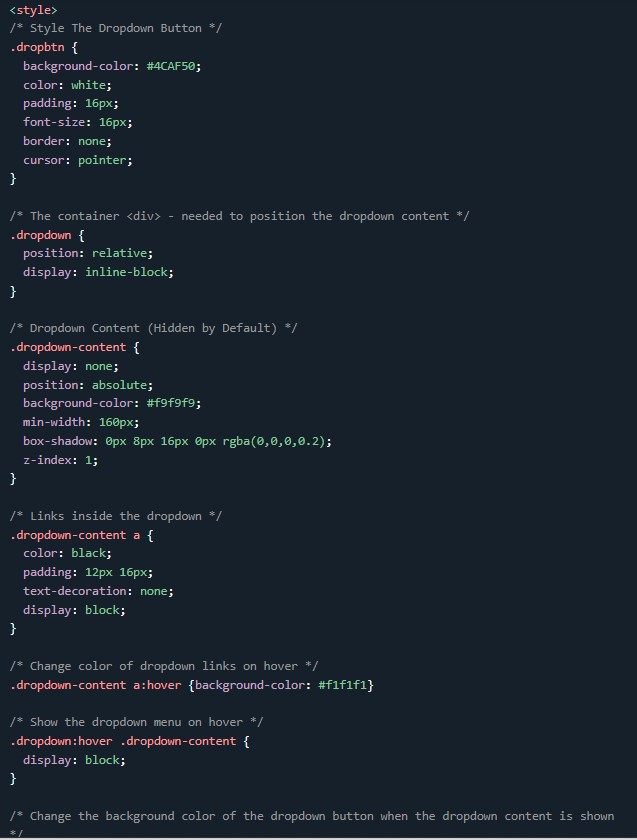 A close up of some of the helpful comments
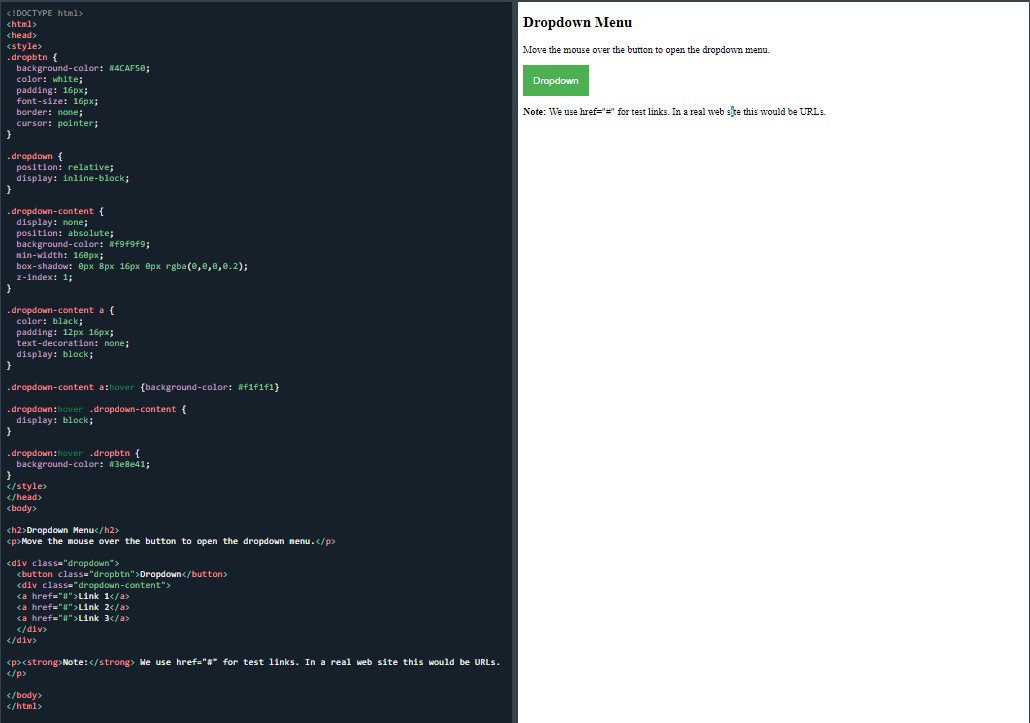 A dropdown menu
This was super helpful in allowing me to get my head around all these lines and what they specifically do.
I called it a night after this.
Day total: 0 hours 47 minutes
Saturday 25th December 2021 /
My head is in the right place
Today I felt different about the unfamiliar lines that I have struggled with the last few days.
After constantly repeating the lines numerous times over the last few days, I have realised that they are very similar and use all the same commands. I have also realised that they are finally feeling familiar and I am beginning to get comfortable with them.
It is amazing how time, repetition and the recent explanation have shifted my head into a place where it understands the lines and commands better.
Anyway, I warmed up with ‘dropdown menu’ then I went straight into the new stuff, starting with ‘right-aligned dropdown content’:
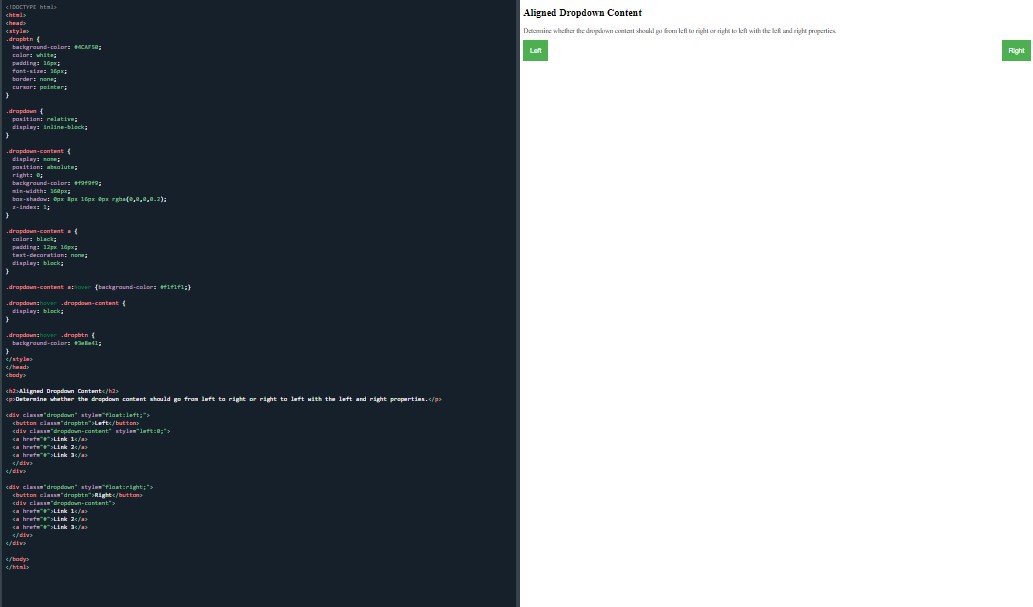 Aligned dropdown content
With this example, I typed notes above all the classes from the ‘dropdown menu’ to remind me what each selector’s role is.
I then practised this again and again. Finally moving on to ‘drop down images’:
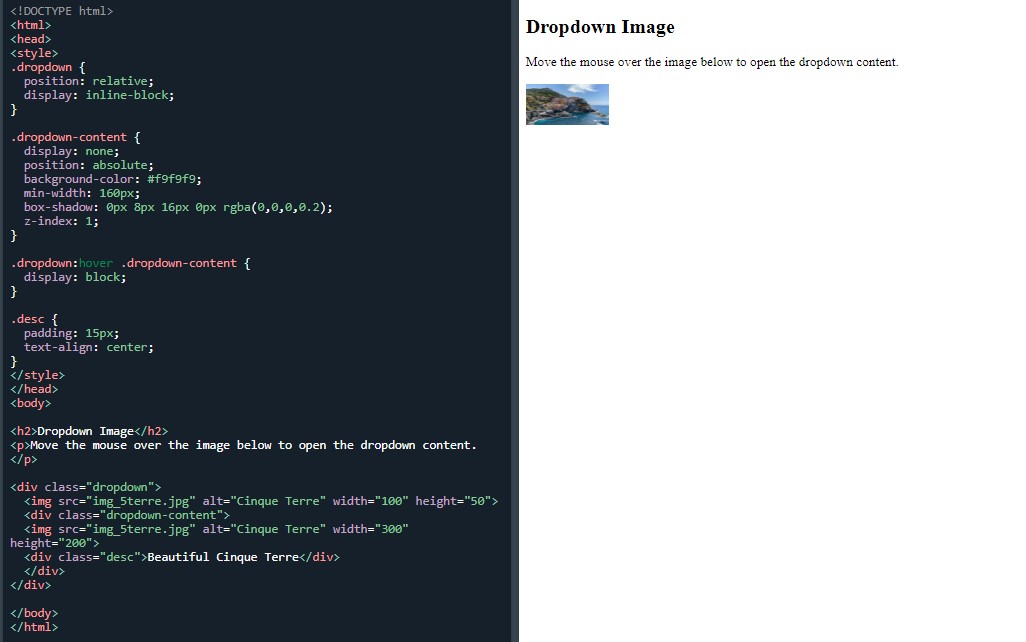 Dropdown image
Day total: 0 hours 51 minutes
Sunday 26th December 2021 *
Awesome images
No warm up. I went in cold and straight into the new stuff with the ‘dropdown navbar’:
 Dropdown image
I spent a bit of time on this one by messing around with the colors and sizes to see what effect it has.
And then it was onto the the image gallery page and the first example:
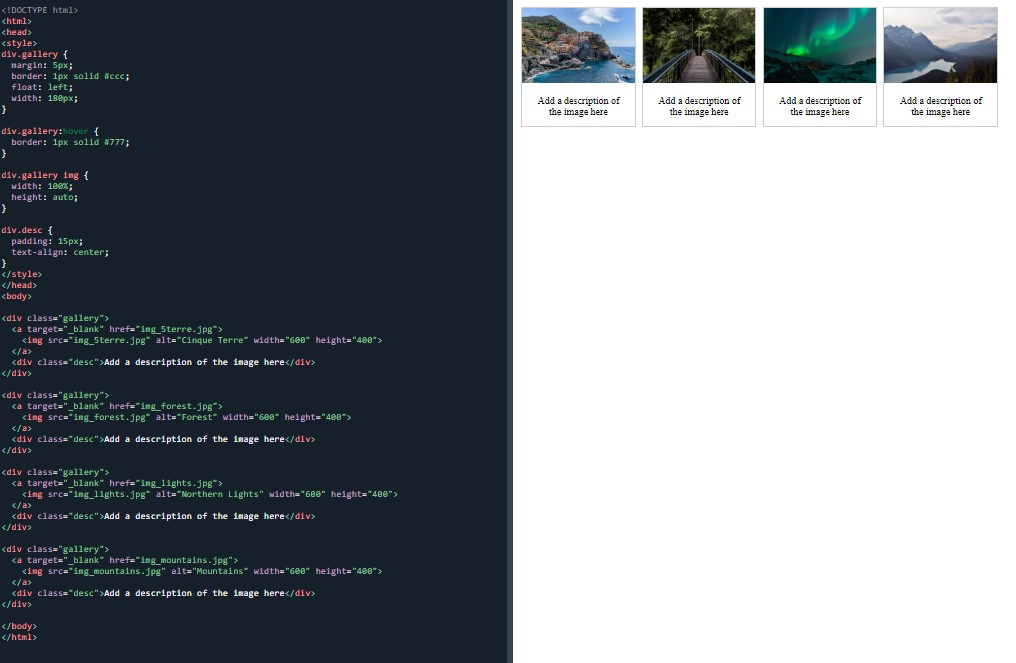 Image gallery example
I used my saved jpg testpics for this task but they were all different sizes. Instead, I saved a selection of social media icons and used them.
I had an issue with the social media icons because they were slightly wider than the border. I had to go back and change some of the code to make it fit.
I added an overflow:auto to the div.gallery img selector but that did nothing. I then tried changing the width in the div.gallery from 200px to 180px and it worked perfectly.
Did I make the adjustments in the correct way or could I have used something like box-sizing: border box?
Please comment as this may help myself or others in the future.
Furthermore, I practised the section between the < body > tags to get a better understanding of things.
Next exercise was the ‘responsive image gallery’:
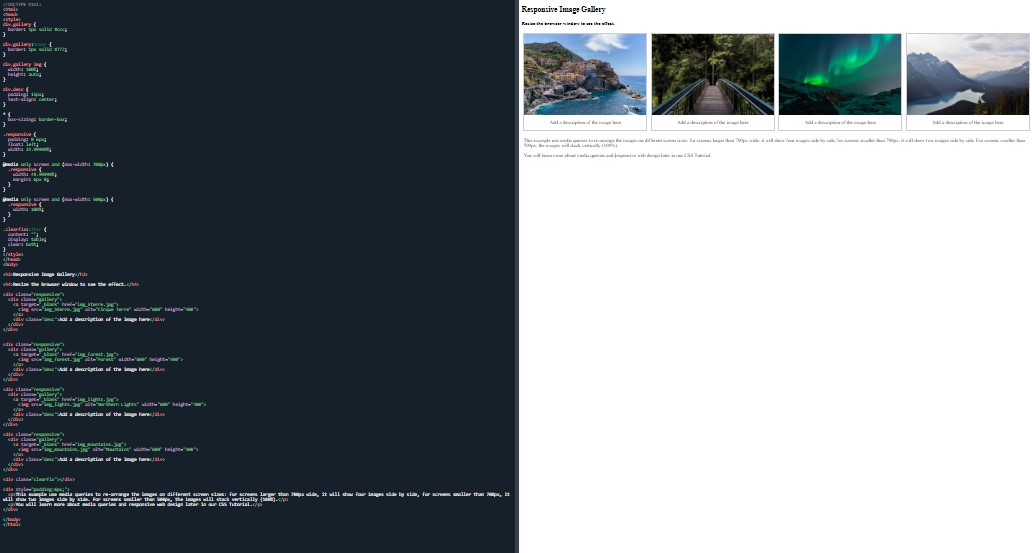 Responsive image gallery example
Again I used my social media icon images. I narrowedthe browser as much as I could but I couldn’t get it narrow enough for the images to stack vertically.
I have the two images side by side and the four images side by side but even with some tinkering of the values, I was still unable to achieve it.
The next page is the image sprites. I knew the .gif image wouldn’t work so I used my social media icons.
I completed this example:
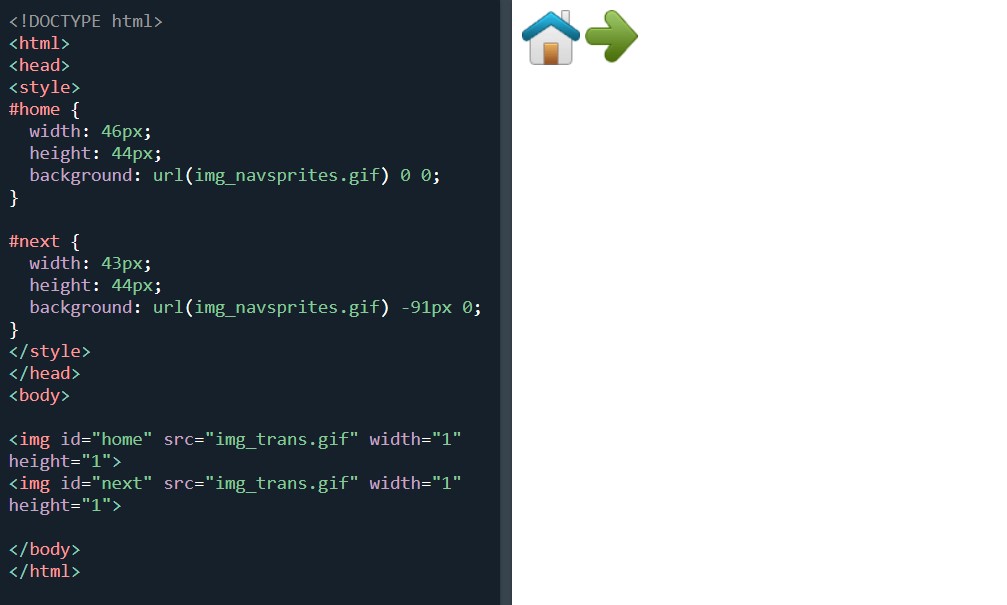 Image sprites
Which my icons worked perfectly on. I then moved on to this image sprite named ‘creating a navigation list’:
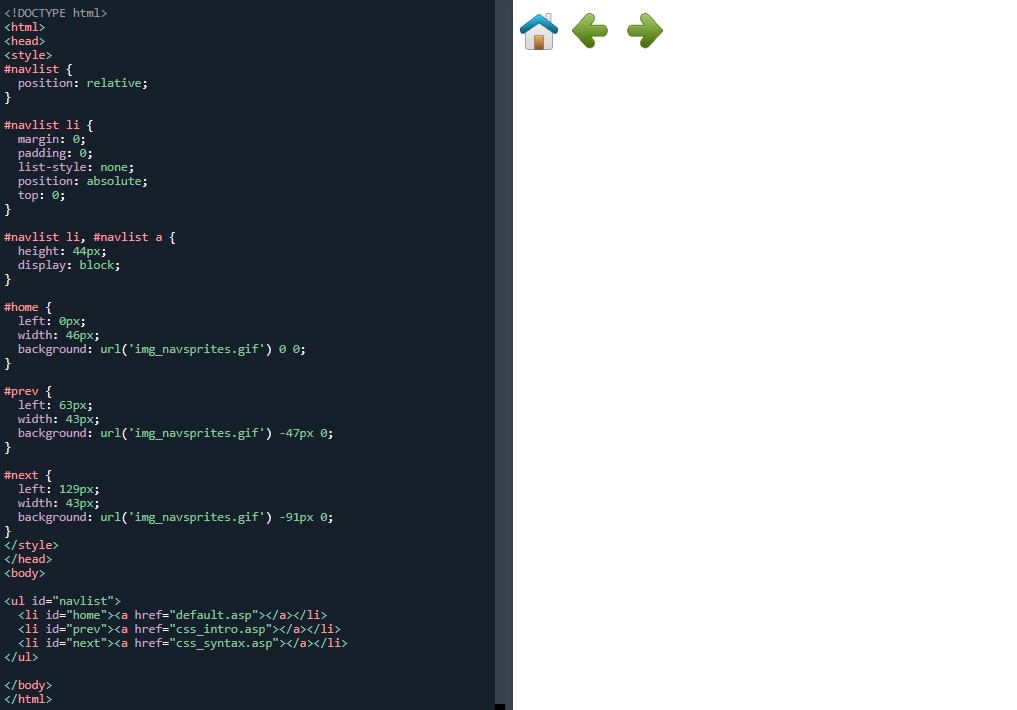 Image sprites- Create a navigation list
It didn’t work. I knew it wouldn’t work but had a go anyway. I ended up copying and pasting it into my VS Code and it still didn’t work.
After this, I made no attempt to do any of the other examples on the page and moved on to the next page instead.
The next page was the attribute selectors
which will give me a chance to brush up on my understanding and use of selectors, attributes and values.
It may be obvious from reading some of my blog entries that I may misname and mistitle things. Please forgive me as I’m still new to this and don’t know all the correct names for things.
The first example to try on the page was the [attribute] Selector’:
![The [attribute] selector](december126.jpg) The [attribute] selector
The [attribute] selector
[attribute="value"] Selector:
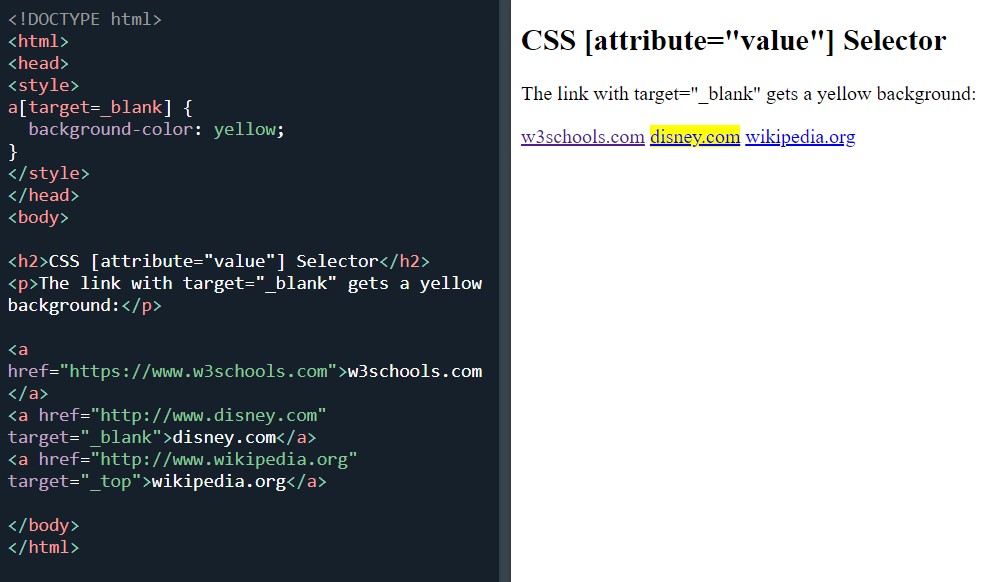 The [attribute="value"] selector
CSS [attribute~="value"] Selector:
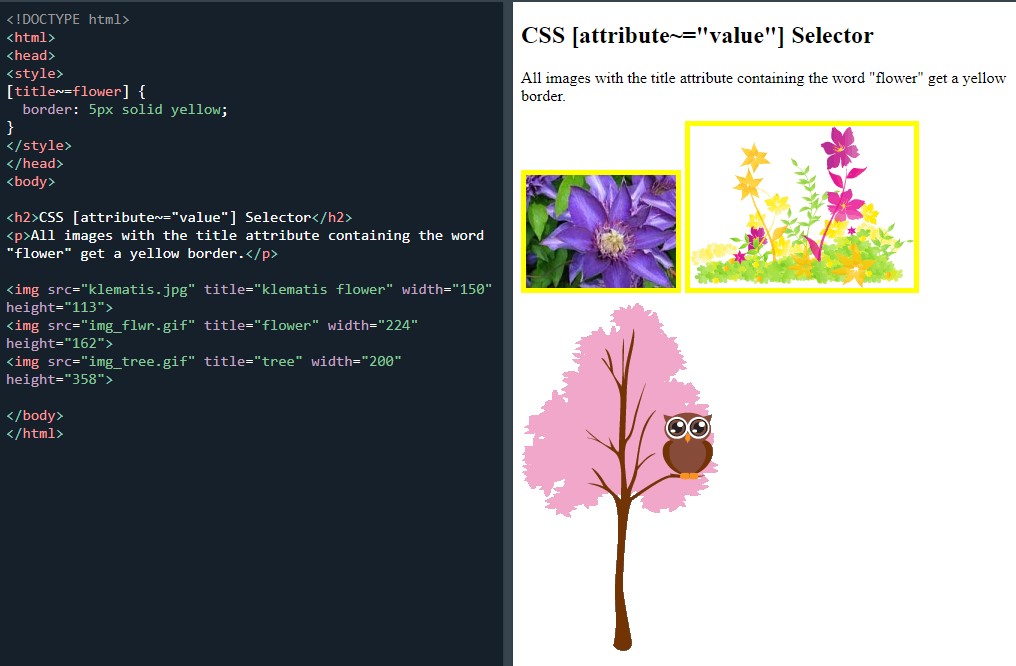 The [attribute~="value"] selector
Then the [attribute|="value"] Selector:
The [attribute|="value"] Selector
And the [attribute^="value"] Selector:
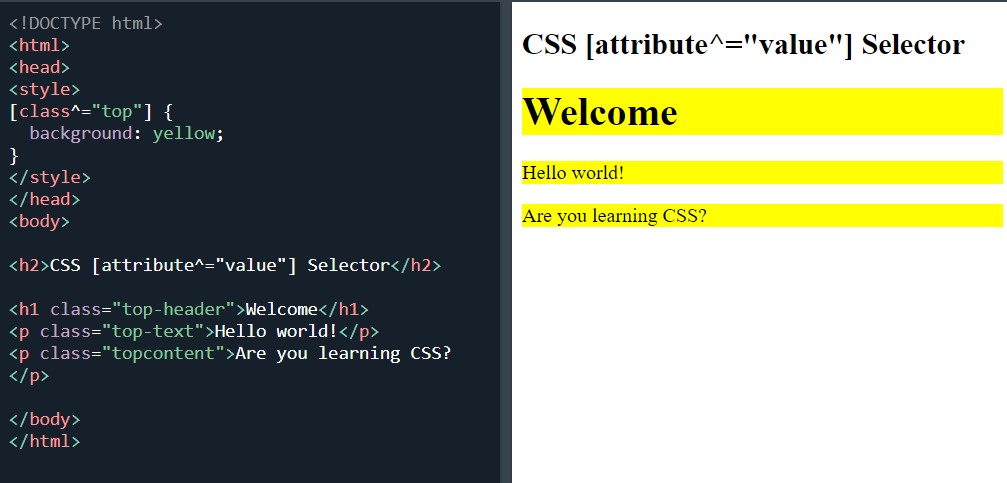 The [attribute^="value"] Selector
And the [attribute$="value"] selector:
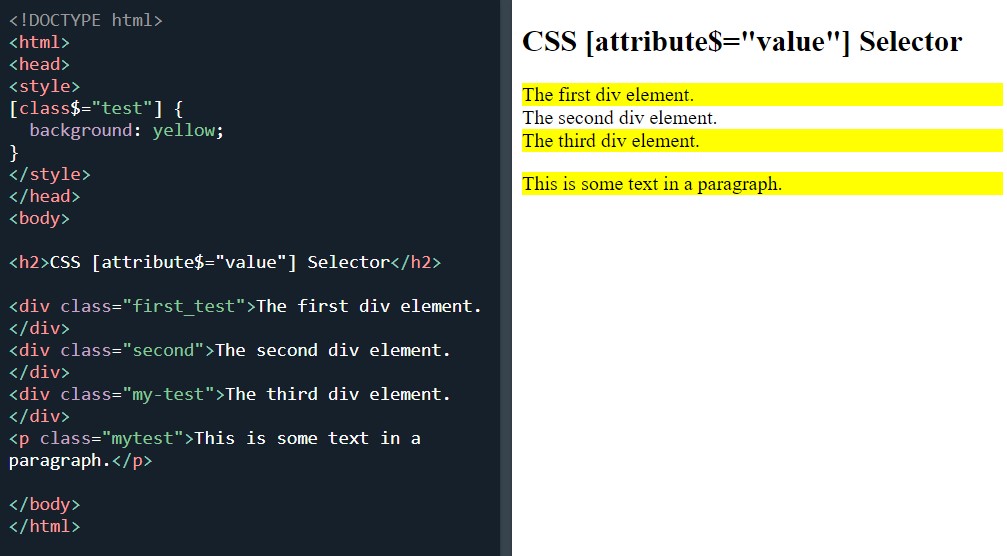 The [attribute$="value"] selector
And the [attribute*="value"] selector:
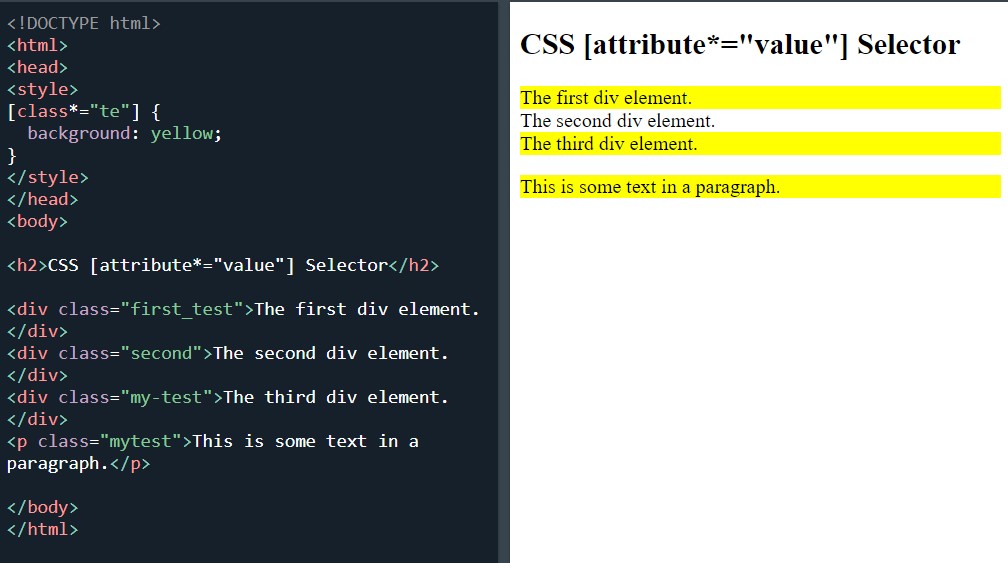 The [attribute*="value"] selector
Finally ending with styling forms with attribute selector
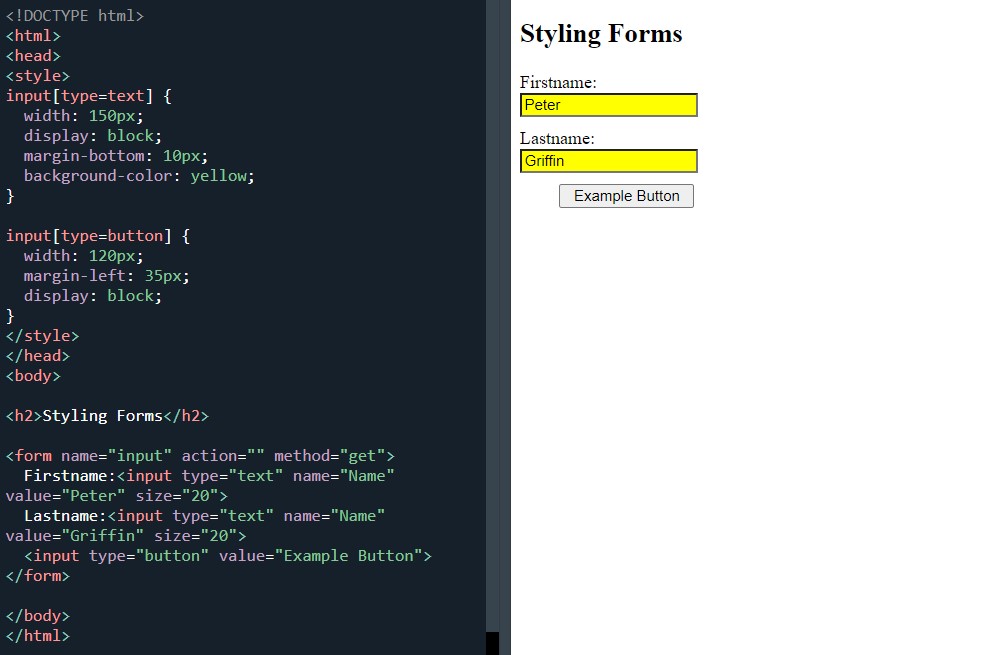 Styling form with attribute selector
I ended the day with the ‘test yourself with exercises' which I didn’t do too well at. This was perhaps evidence that I zoomed through this section a bit too quickly and I didn’t retain the information.
I had to go back and find the answers for four of the six.
I am making a mad dash for the line at the moment. The end of the month and that natural break between the two three month sections of my learning plan is now only five days away.
I do not know if I will be able to complete the W3Schools site before the break but I am giving it a good go. Even if I do not make the date, I shouldn’t be too far away.
Day total: 2 hours 29 minutes
Monday 27th December 2021 /
The end is in sight
Went on another study marathon today. I made some progress and edged closer to my target. I also reached the website layout section which I am really happy to have finally reached. After all, my actual goal in learning HTML and CSS is to be able to build a website.
I didn’t do any warm up today as the first example uses some of the lines that were in last night’s final example.
I started on forms page forms page and the first example:
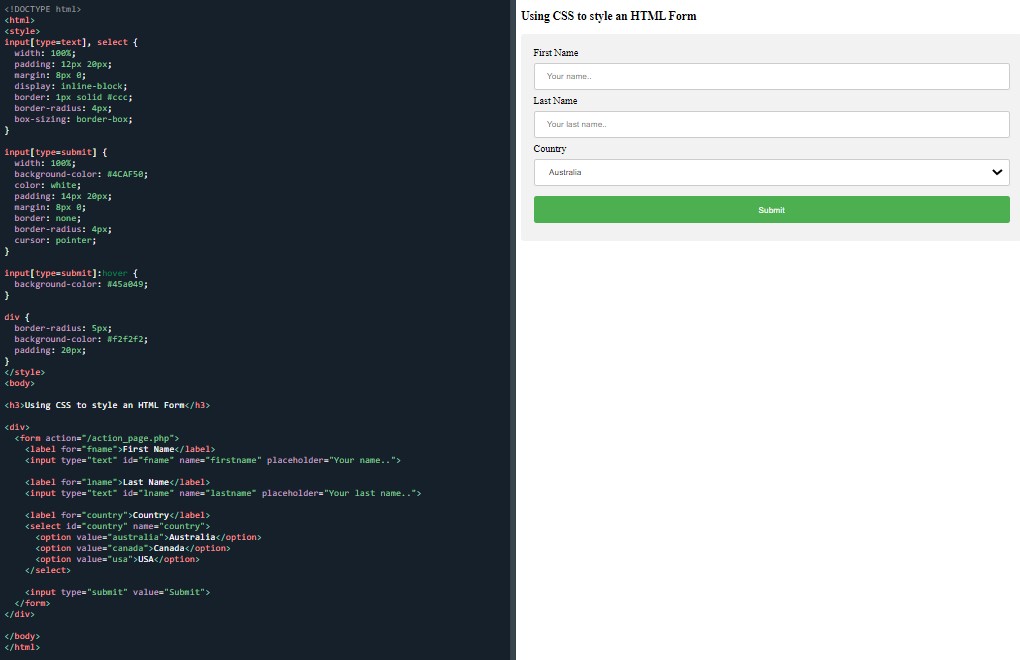 An HTML form styled with CSS
These forms are different to the HTML forms I did right back in October. Using CSS, they are slightly more complex than I've encountered before.
A few days ago I mentioned that I didn’t feel too comfortable with the lines and language I was doing because I wasn’t familiar with it. Well, I’m back in that place.
Styling input fields:
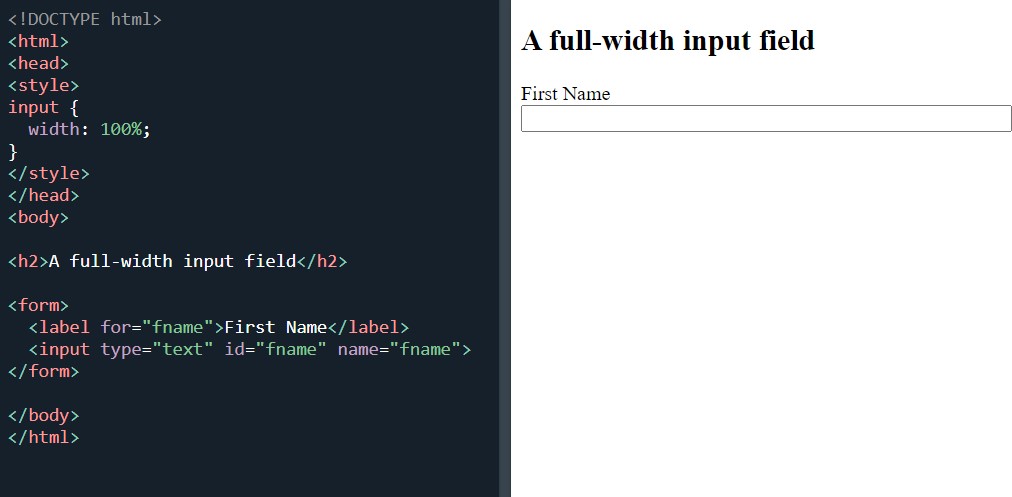 Create a full-width input field
Padding inputs:
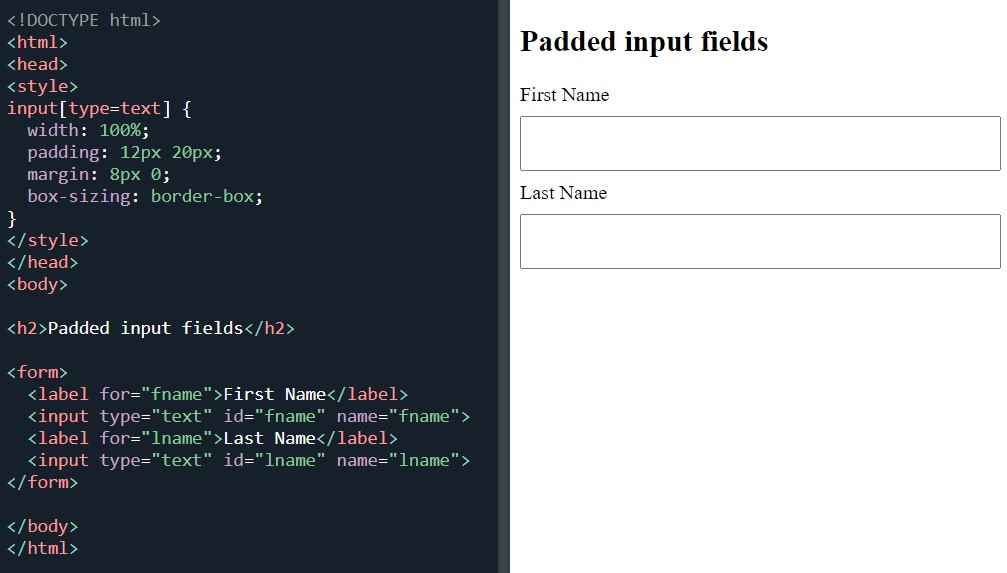 Create input fields with padding
Bordered inputs:
 Create input fields with border
Bottom border inputs:
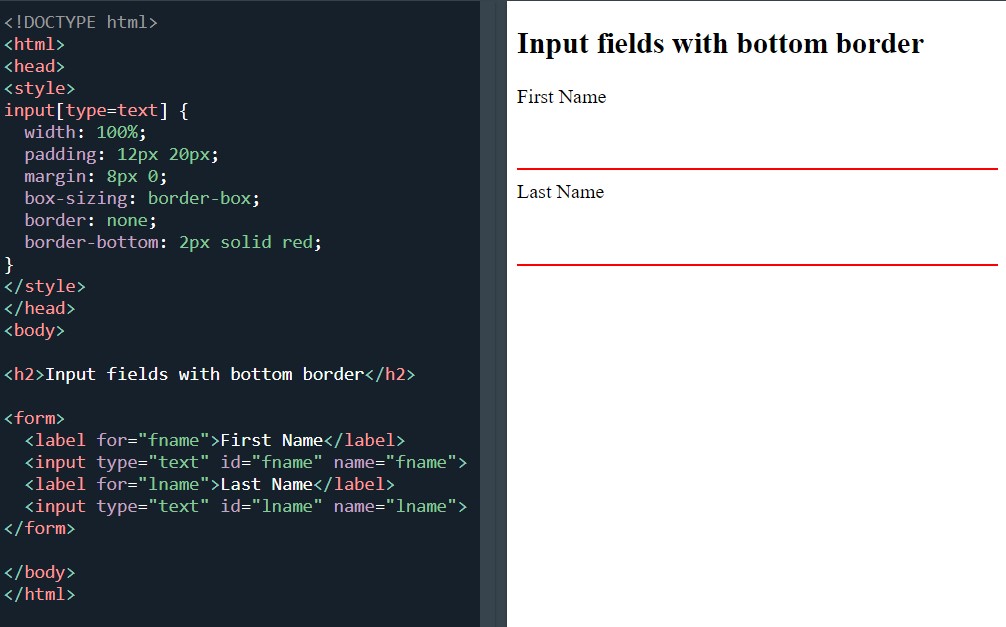 Create input fields with bottom border
Coloured inputs:
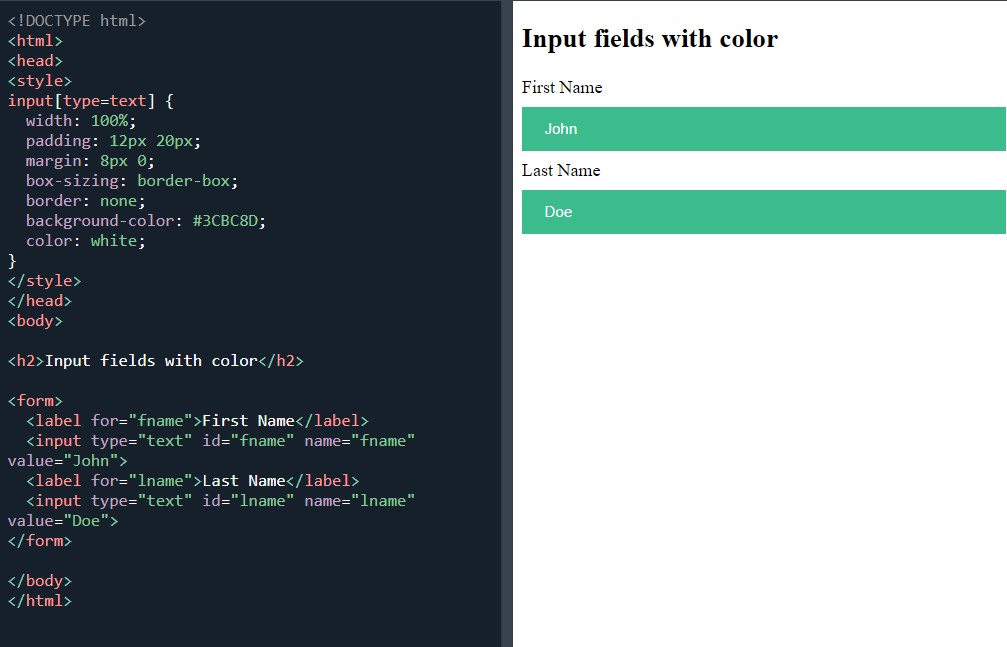 Create input fields with colour
Then two focused inputs:
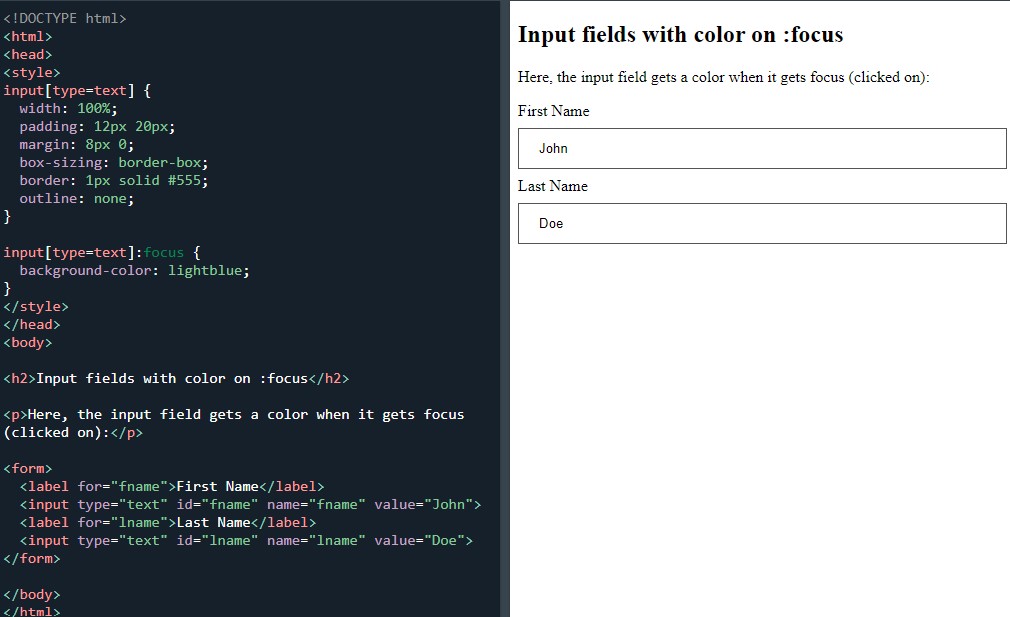 Create input fields with color on focus
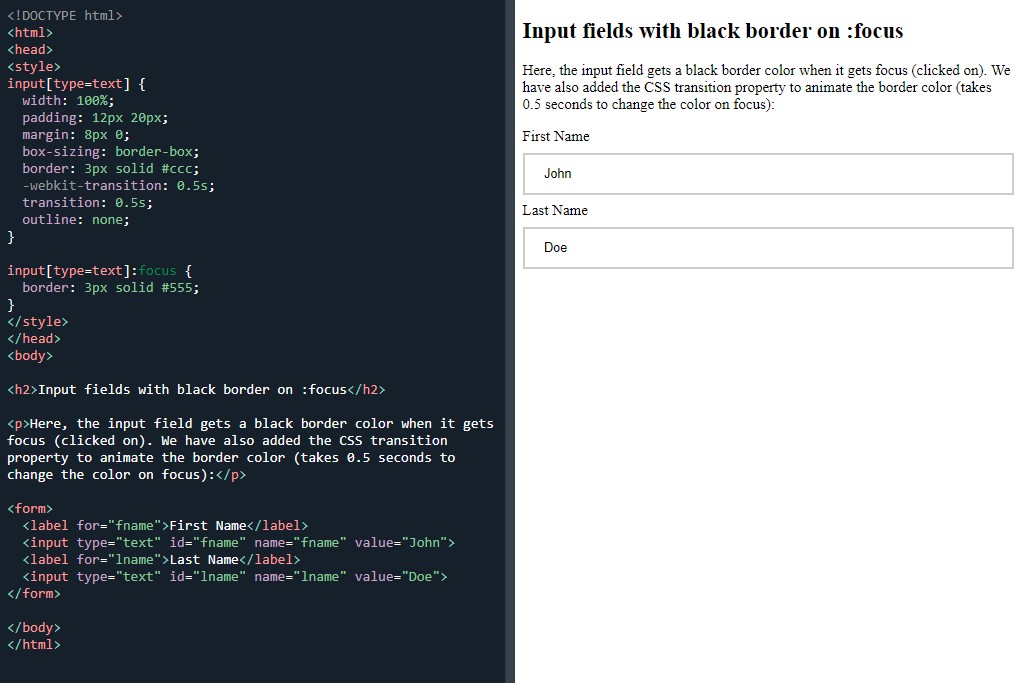 Create input fields with black border color on focus
Input with icon/image:
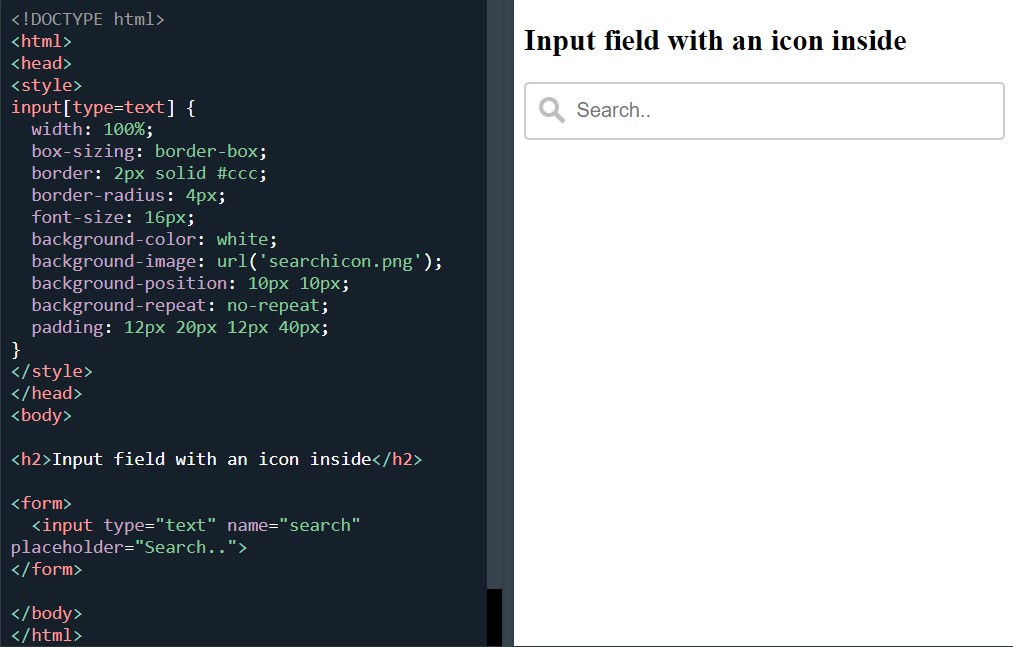 Create input field with an icon inside
Animated search input:
 Animate the width of the search input field
All of the above were awesome to learn.
Next was styling textareas:
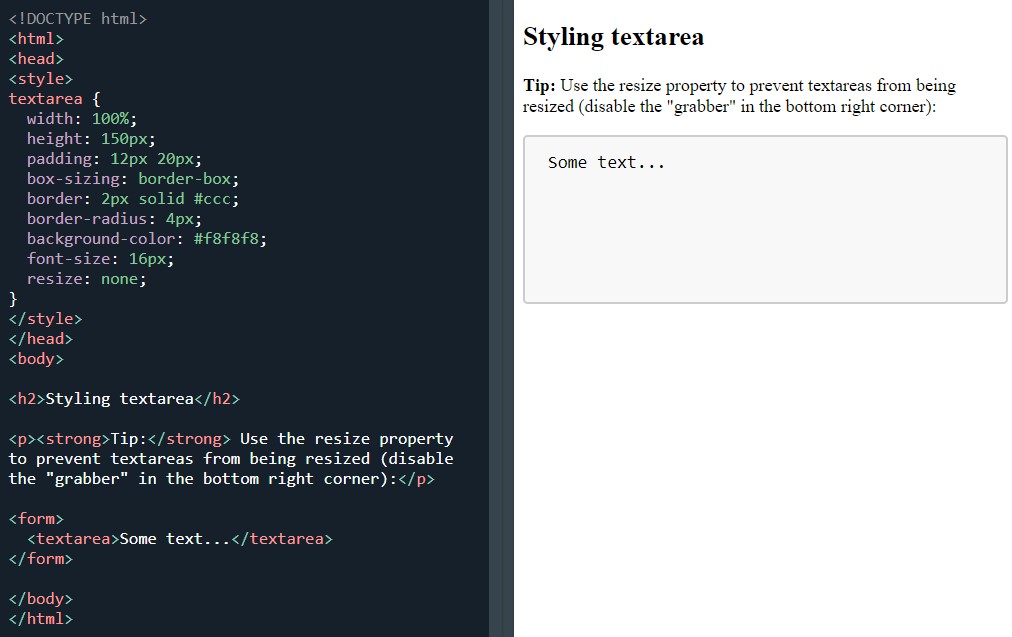 Styling textarea
Styling select menus:
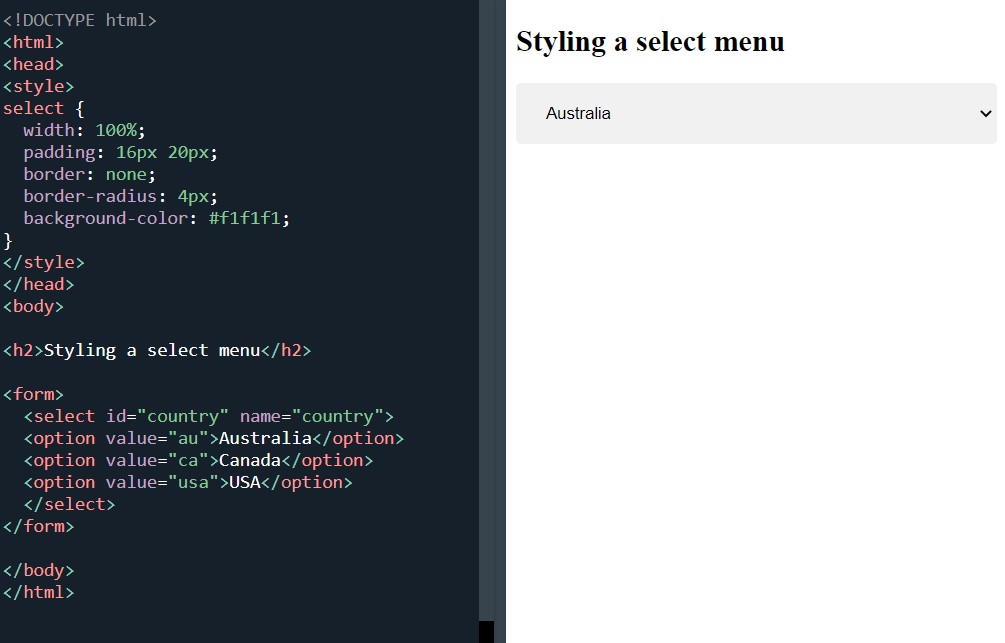 Styling select menu
Styling input buttons:
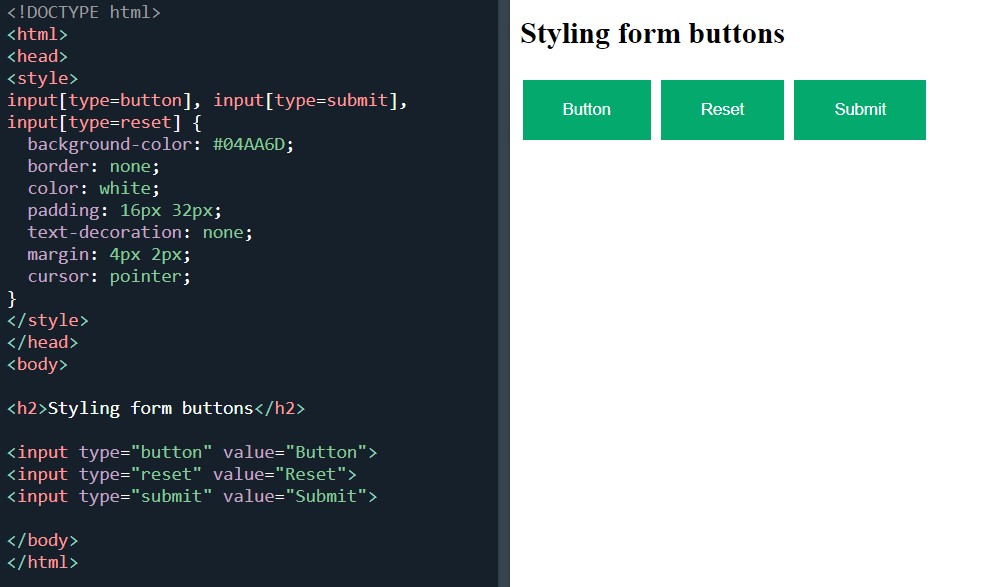 Styling form buttons
And man, I reached the last example on the page which was responsive form:
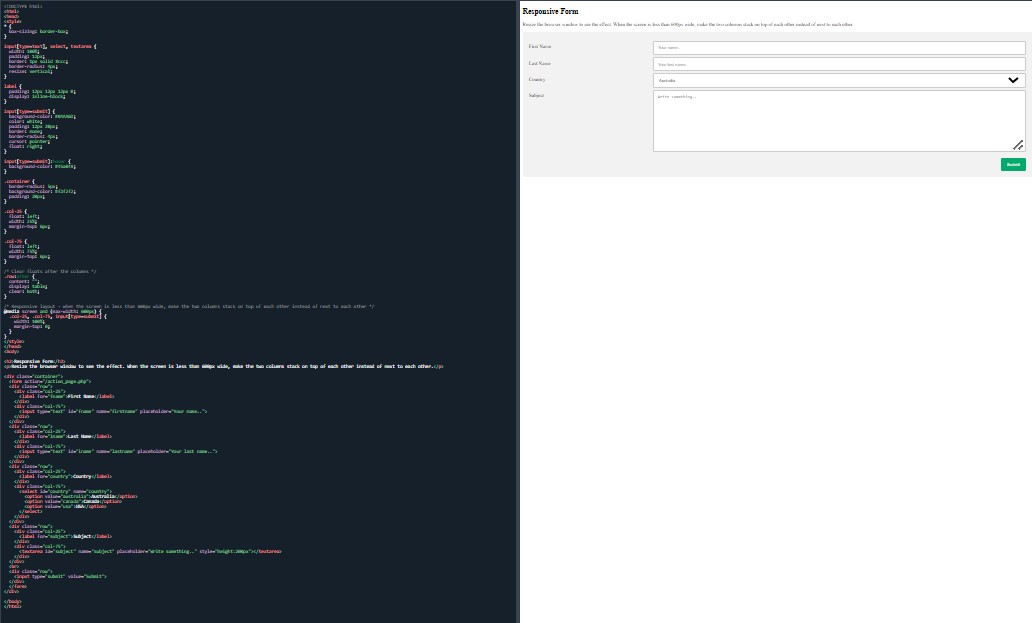 Responsive form
No major issues with the forms except that I’m not familiar with some of the lines. By having a good look at the code as I make my way through the lines gives me a better understanding. I would say that I am some way off getting my head fully around some of the properties and attribute selectors but the more time I spend on them the clearer things become.
Counters was the title of the next section.
At a glance, counters seem useful and I get it, but I will have to spend more time on this if I’m ever going to get skilled enough to be able to use it in a project.
First up was automatic numbering with counters:
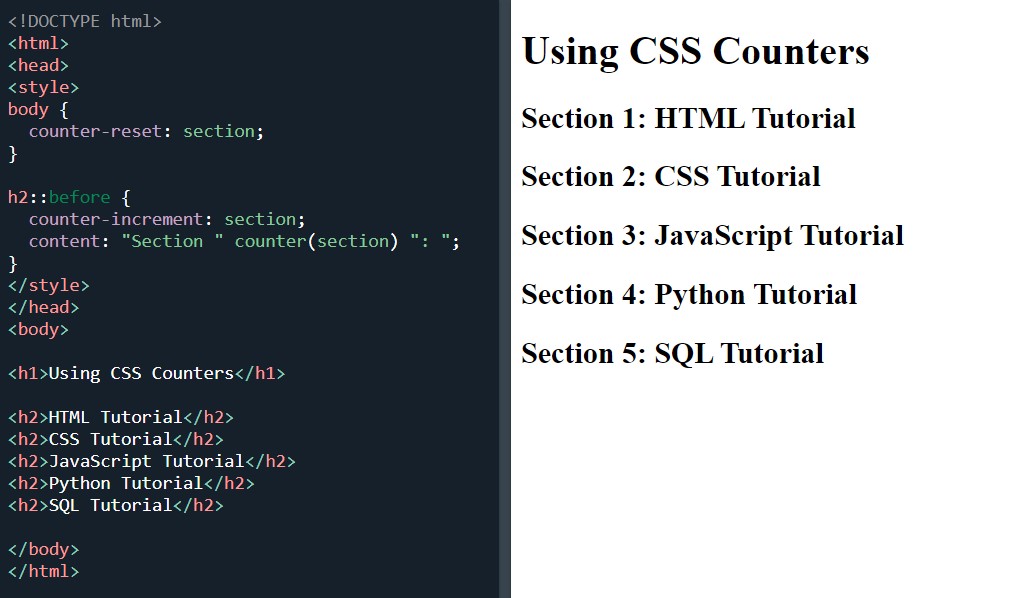 Automatic numbering with counters
Two nesting counter examples:
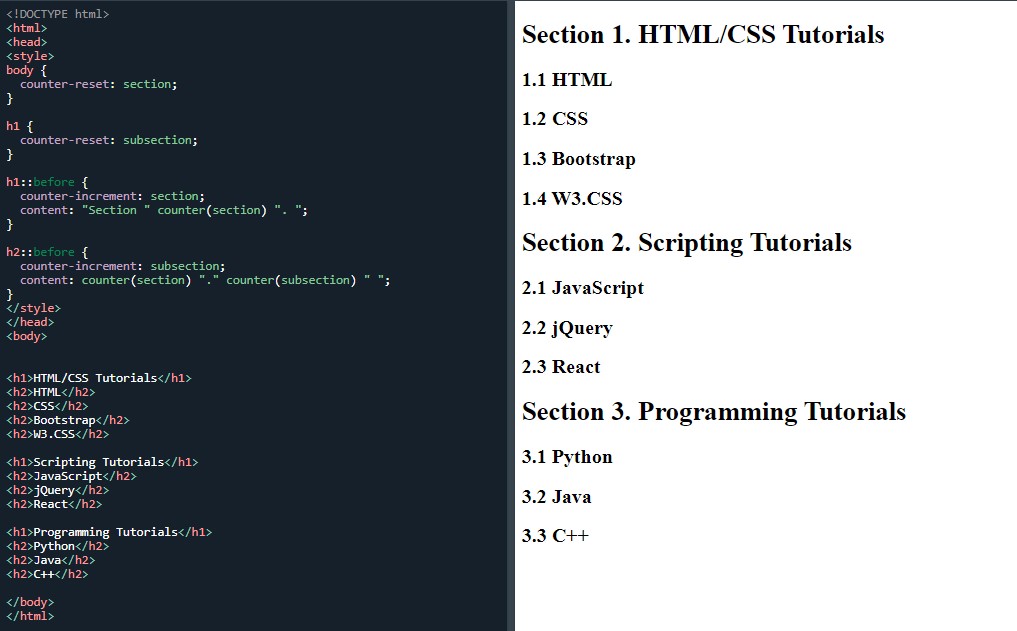 Nesting counters
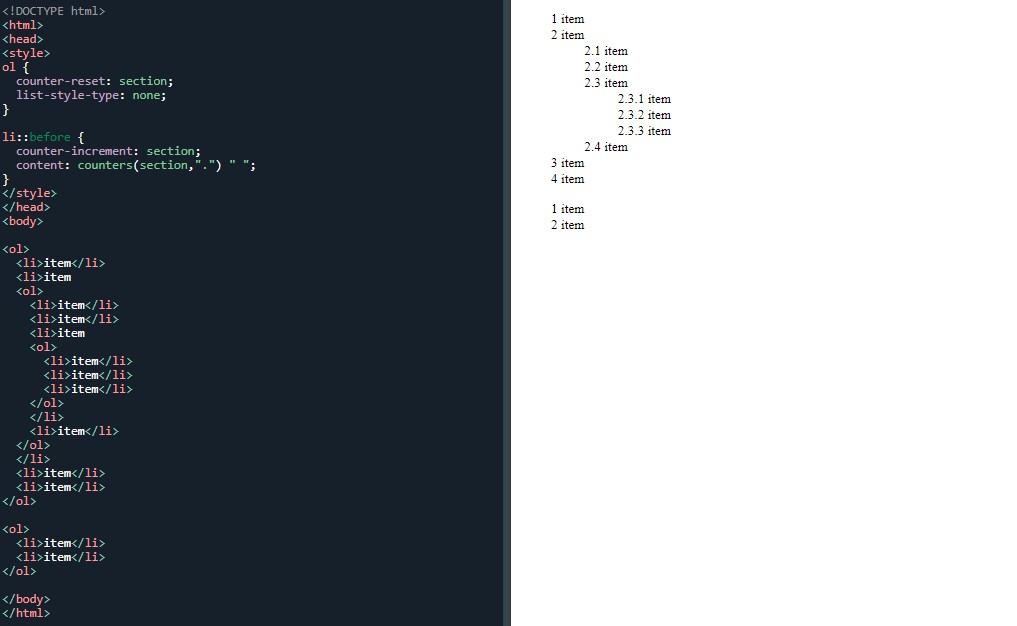 Insert a string between different levels of nested counters
I’m spending slightly less time on individual examples. Instead, I am trying to get through the course by doing all the examples in half the time, in the hope I complete the everything by the end of the month.
Next was the page I am really glad to have reached. Not only am I happy to have reached the milestone of one of the last few sections but because it is the lesson for building websites- the website layout.
Starting at the top with the 'header':
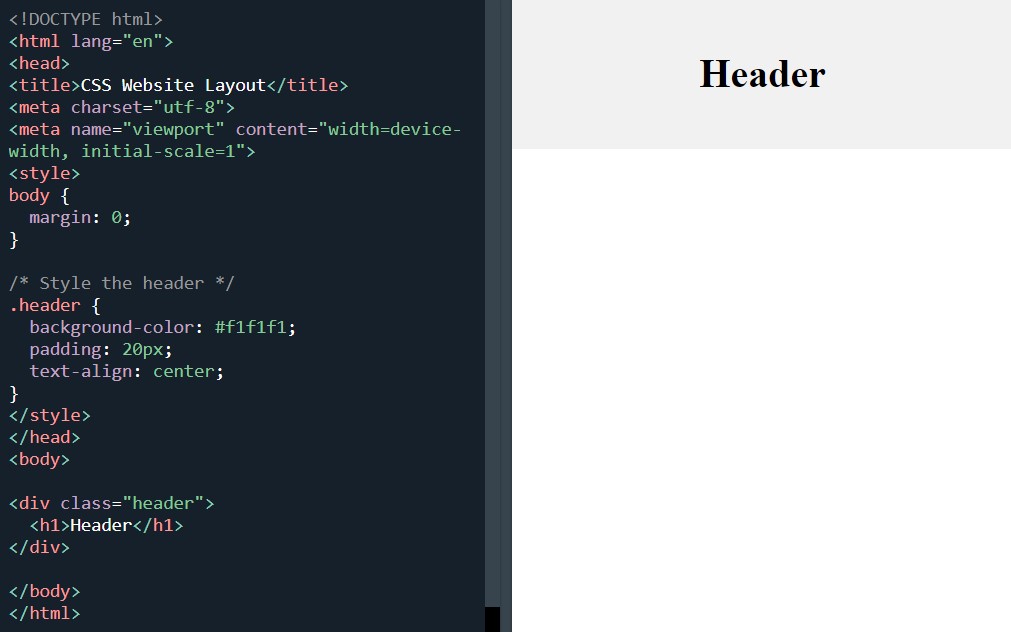 Style the header
Then the navbar:
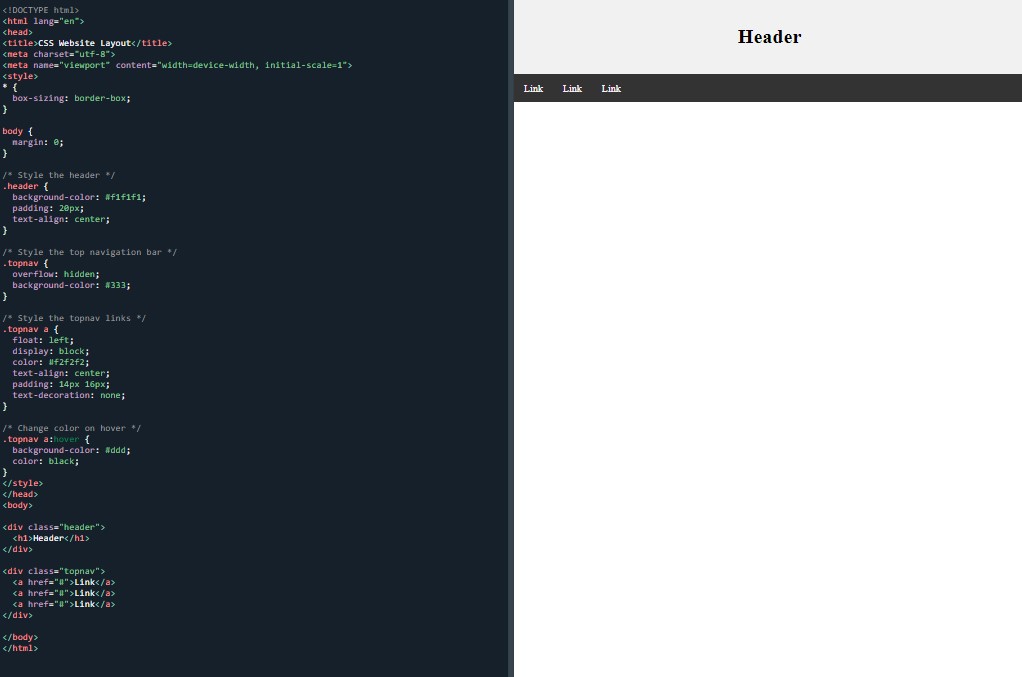 Style the navbar
Content:
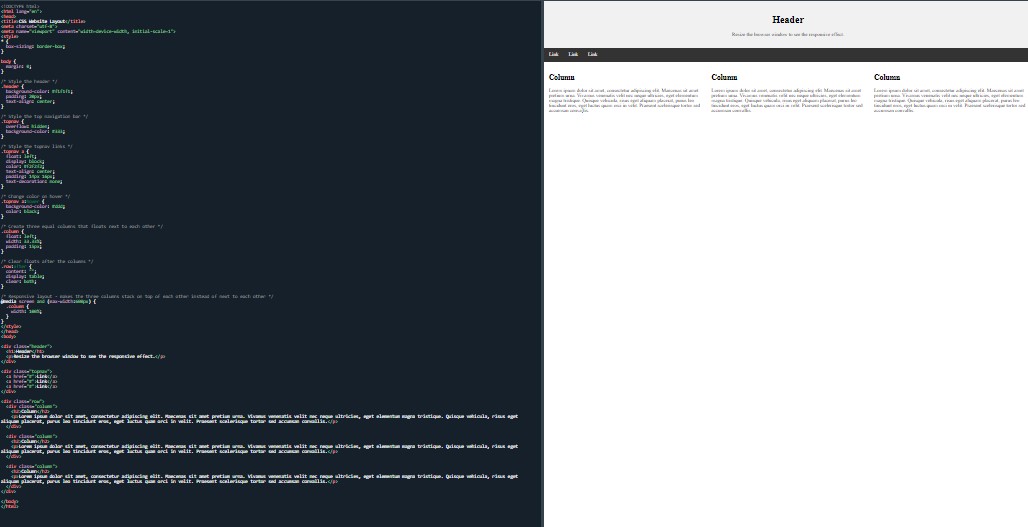 A 3-column layout that changes to a 1-column layout on smaller screens
Unequal columns:
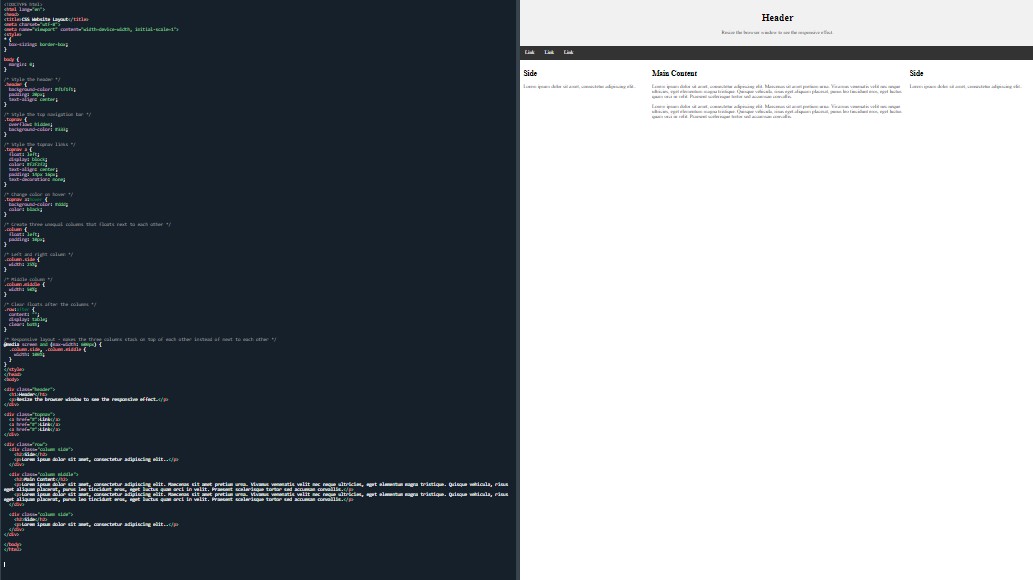 A 3-column layout that changes to a 1-column layout on smaller screens
Footer:
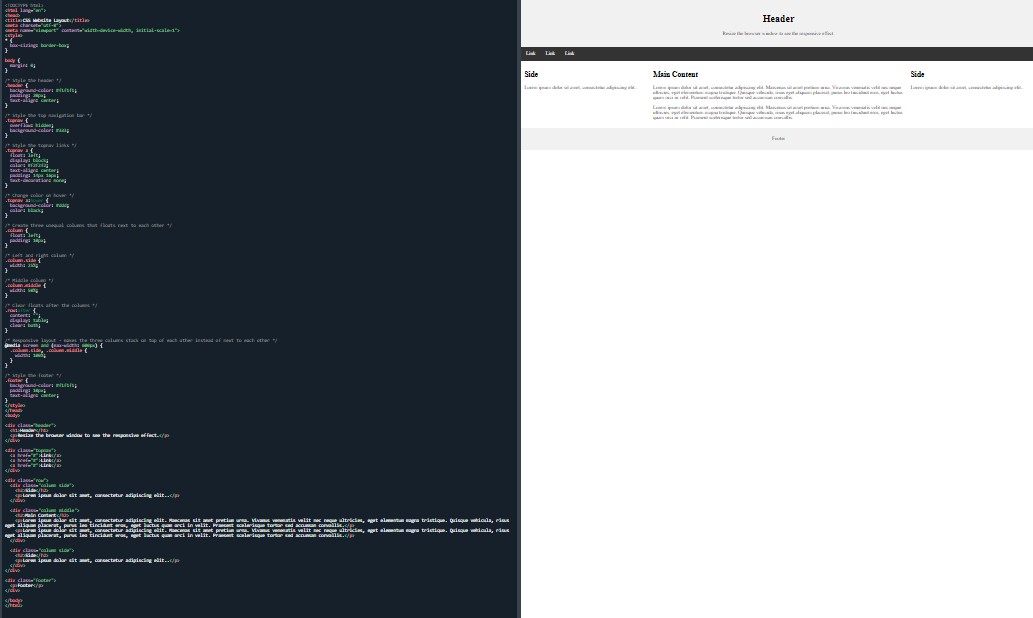 Style the footer
And the awesome 'responsive website layout':
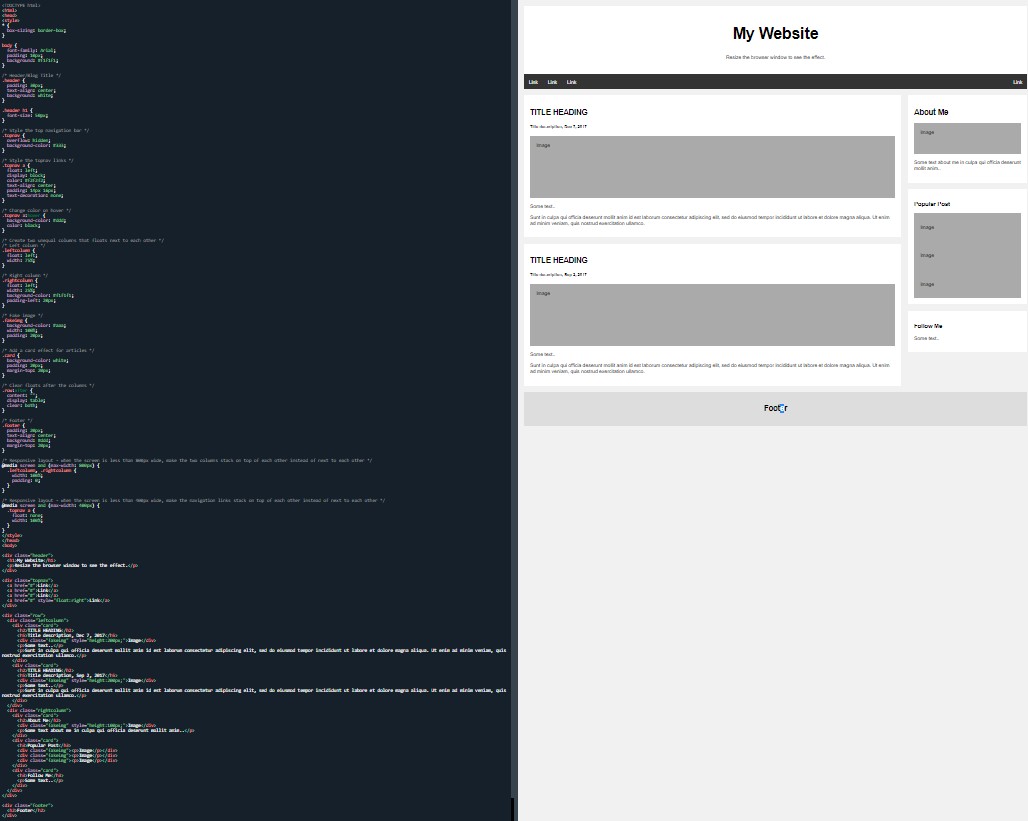 Responsive website layout
I ended the session with the ‘responsive website layout’ and then I called it a day. Admittedly, I just got through today’s examples and especially the final one without spending the usual amount of time on them.
There are many sections to learn, to practise and to get more familiar with regarding the websites, but I am sure over the next few months, I will be exposed to and reunited with them again.
Looking at what I have done in the past few months has been leading to this momment where it's time to bring it all together for the ‘responsive website design’. All of the lessons have been helpful and useful but I have a feeling that I will not be using all the skills and the techniques at once.
Perhaps it would have been better to glance over some of the lessons and spend more time on this responsive website.
Hindsight is a wonderful thing. This is partly why I have started this blog. I am doing something with an idea and no plan. I have nothing to compare it to or anyone to ask their opinion of advise. I hope anyone reading this will use it to better tailor their learning plan and make it more efficient and streamline based on what I did (either badly or well).
Final thoughts. By repeating the lines, this gave me some good practise because barring a few variations, they were essentially repeated throughout. I also liked that there were notes above the classes and this continued through all the examples.
Really pumped and really happy.
Day total: 2 hours 56 minutes
Tuesday 28th December 2021 /
Nearly there
Today I begain with the units page and the first unit example:
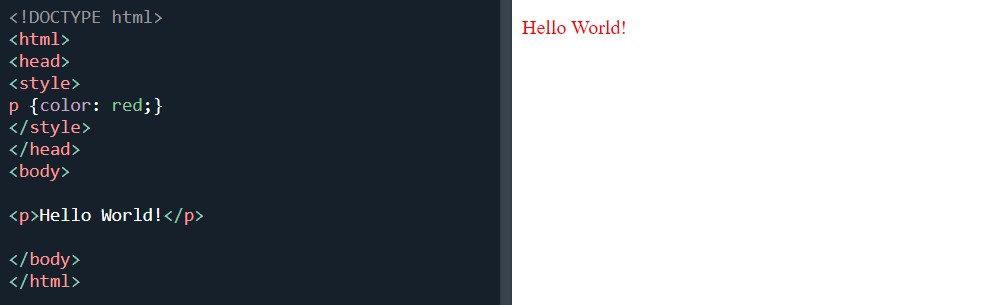
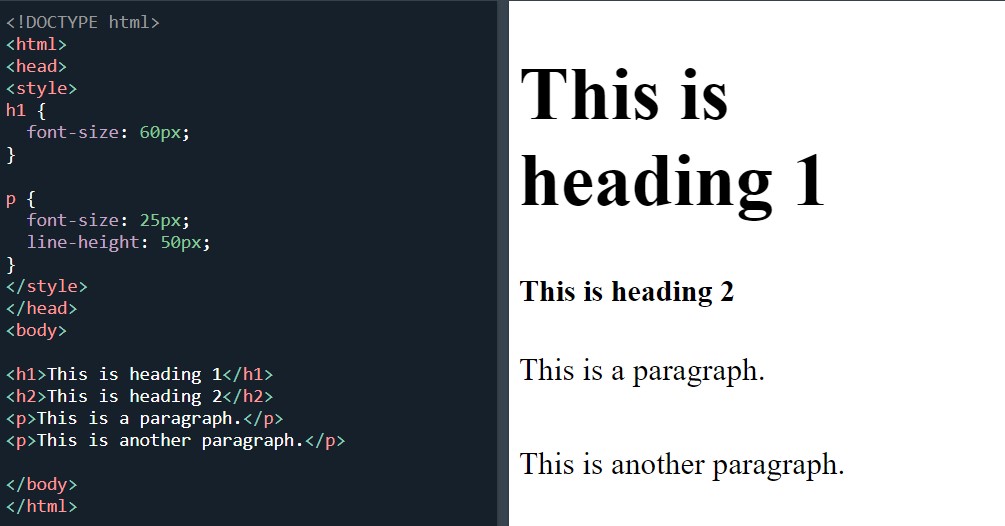 Unit pixels
Next were the sections titled 'absolute lengths' and 'relative lengths'. I opened up a few examples to have a look but I didn’t attempt any:
'absolute lengths':
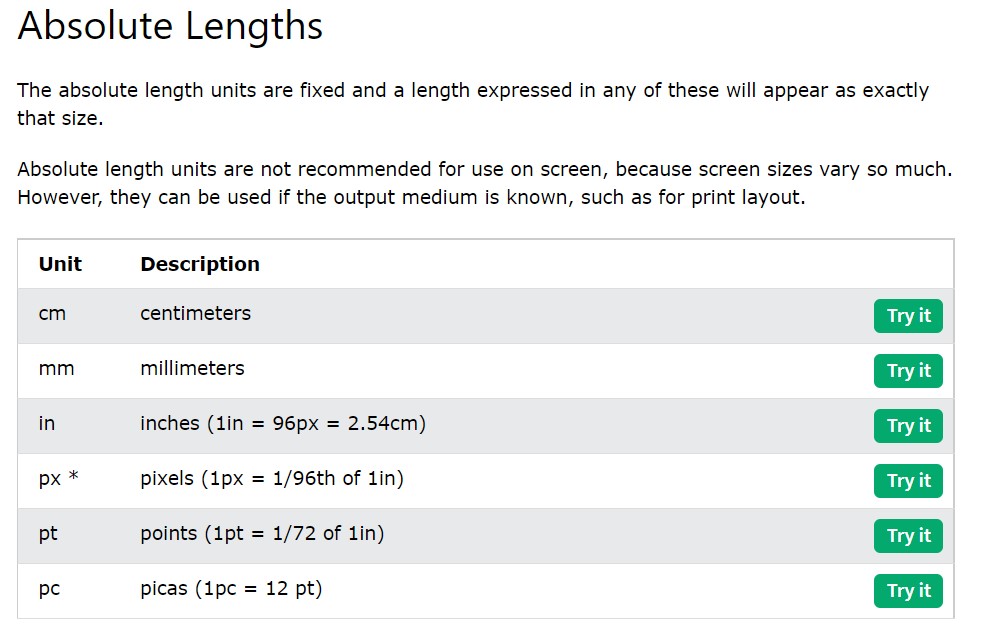 absolute length units
'Relative lengths':
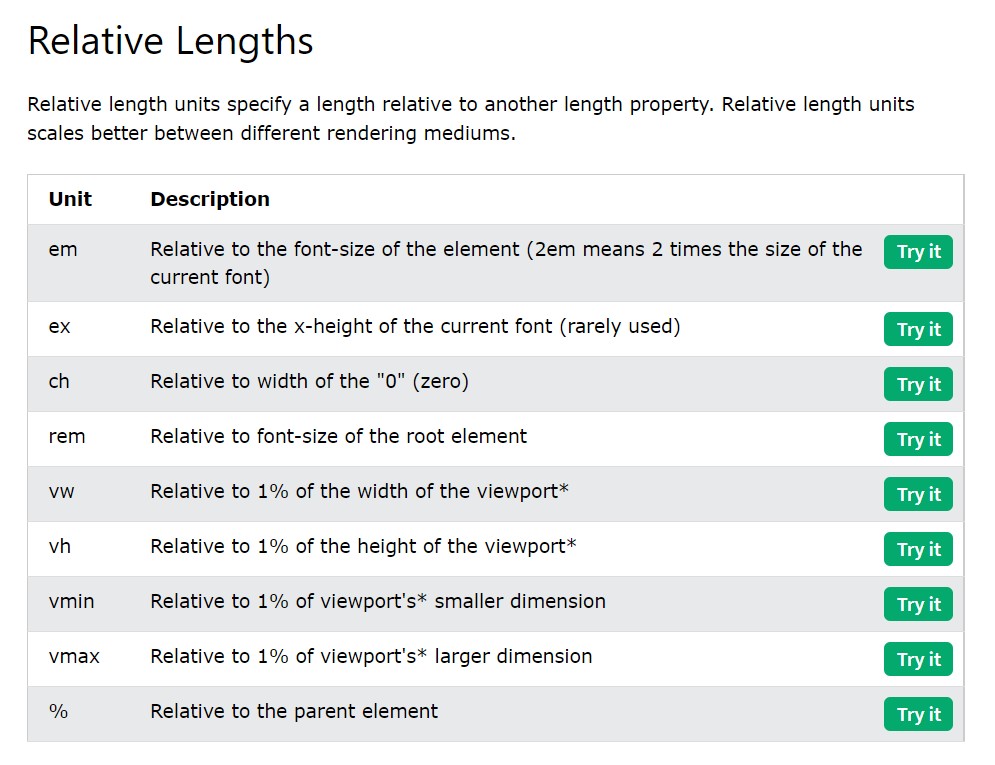 Relative length units
And the browser support info:
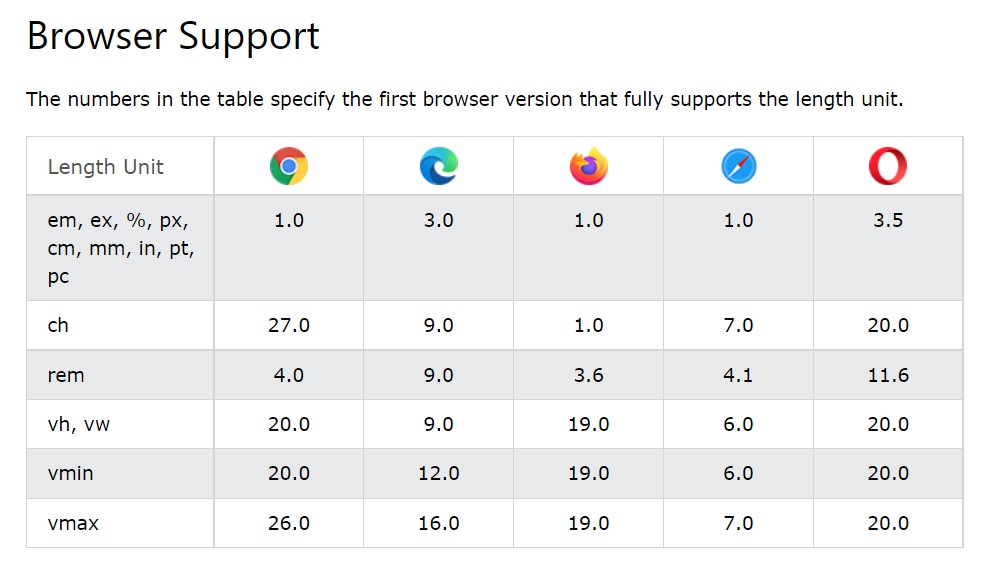 Browser support info
And that page was done.
Next was the specificity page (Wes Bos). After a short explanation, I started on the first example:
 Illustrating the specificity rules
And:
 Illustrating the specificity rules
And that was done.
Next was the ‘!important rule’ and the first example which is ‘what is !important’:
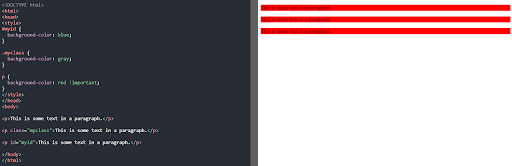 !important rule
 !important again
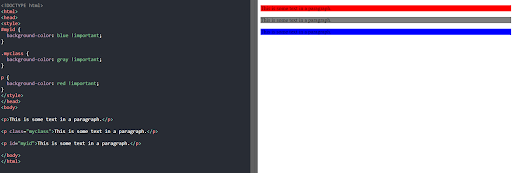
Three examples of ‘maybe one or two fair uses of !important’:
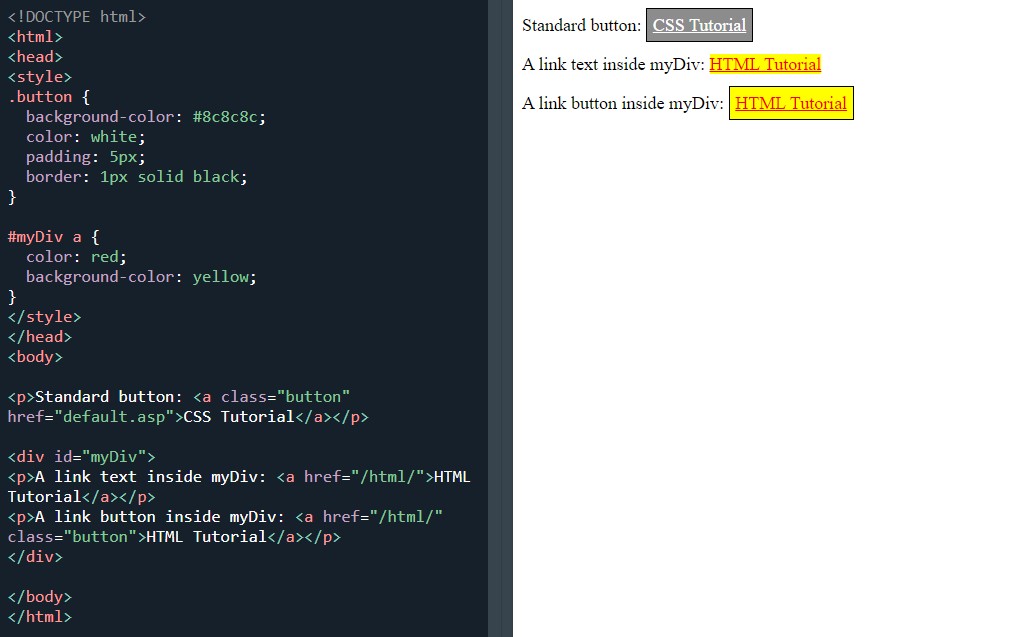
 An example of !important use
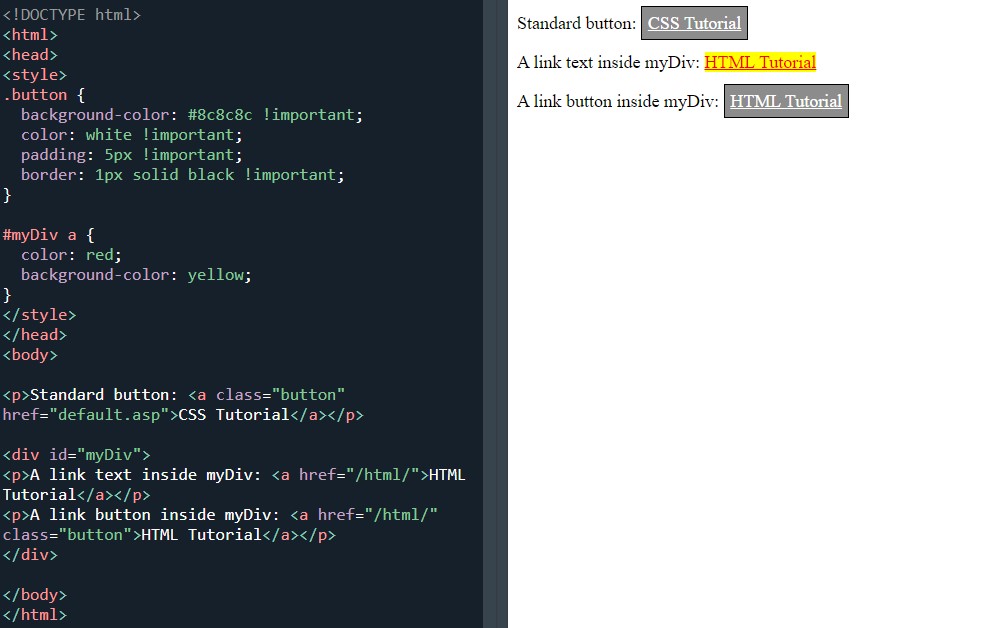
 An example of !important use
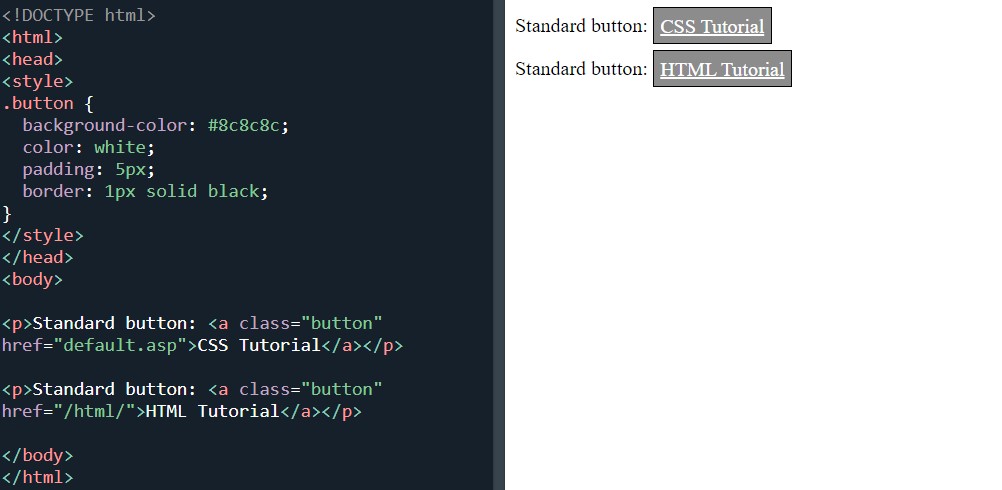
 Force all buttons to have the same look with !important
Moving on to the final section titled ‘math functions’ and the three examples, starting with ‘the calc() function’:
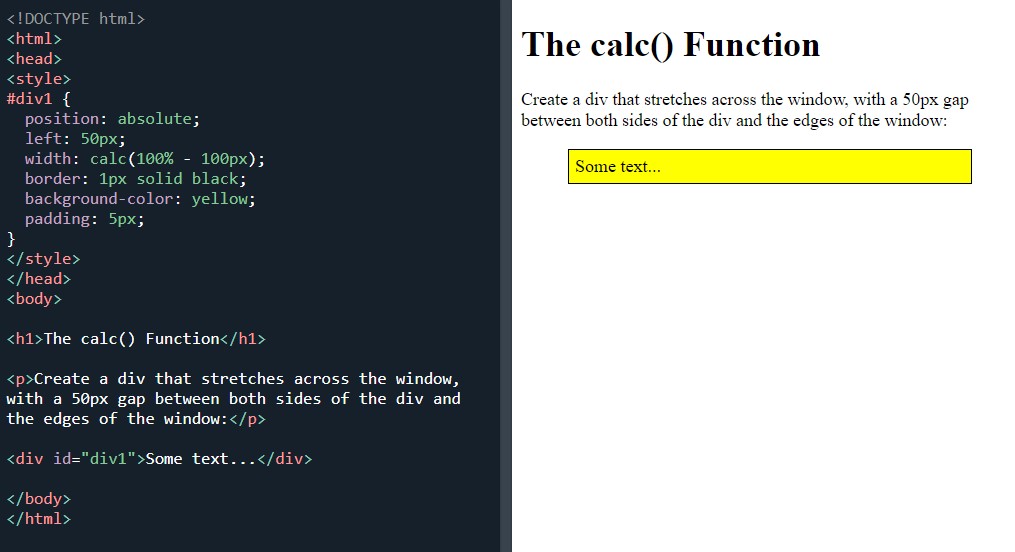 Using the calc() function
I noticed that my yellow box didn’t stretch as far as the online version. I discovered the issue to be my typing and specifically, a space sensitive issue. I hadn’t left a gap between characters in order for it to work correctly.
The max() Function:
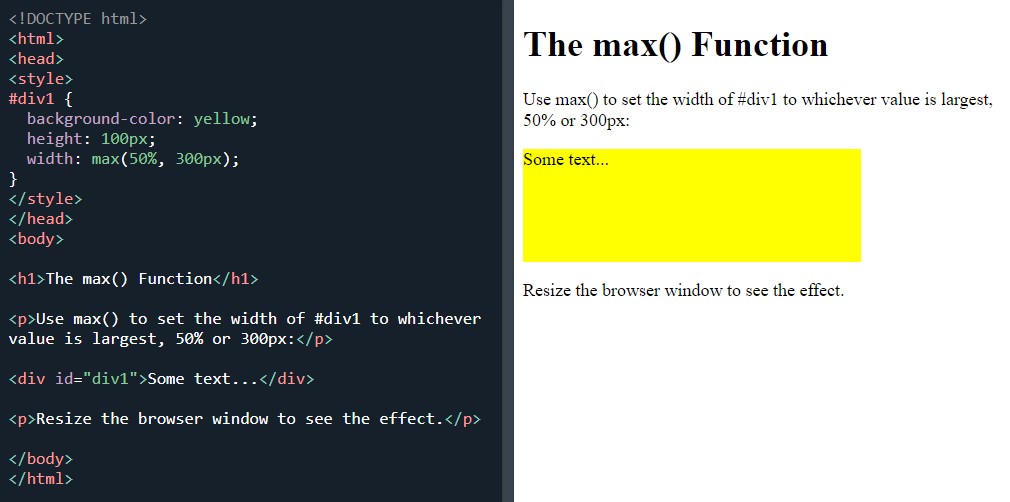 Using the max() function
The ‘min() Function’:
Using the max() function
And it was all the CSS tutorials complete. I spent the rest of the time trying to build a website from the ‘responsive website layout’ from last night.
Day total: 1 hour 02 minutes
Wednesday 29th December 2021 *
Fresh material
In the last week I’ve signed up for freeCodeCamp and I’ve been scanning the courses and seeing what they are about.
Today I made a start on my first freeCodeCamp course which is titled 'responsive web design'
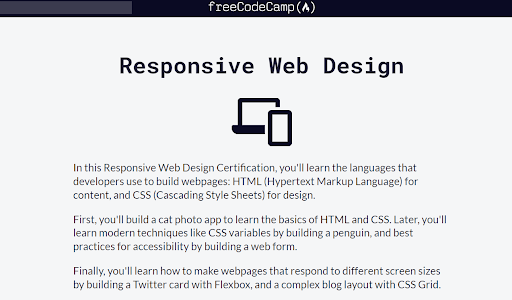 The home page of freeCodeCamp responsive web design
During the day I had a quick nose through their courses to find out a little more on what they offer and to find a place to start as soon as I get home and open the laptop.
It has nine courses to work through and I’ve found out that I have covered a lot of the stuff already. I decided to head back to W3Schools and browse what they had to offer.
My first goal is to be able to build a website. I looked at both sites and decided to give the freeCodeCamp a go.
It is different and I made a start on the flexbox section:
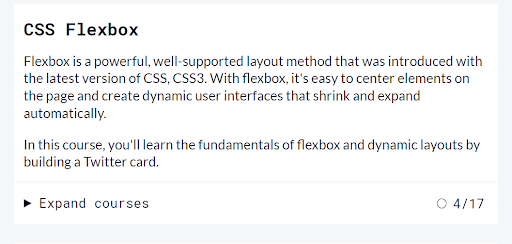 The freeCodeCamp CSS course
I got through it in 30 minutes and decided to switch back to W3Schools and their flexbox.
There is absolutely nothing wrong with freeCodeCamp. It’s just that I am so comfortable with the feel of the W3Schools website and their style and explanations. If I am to use freeCodeCamp, then I am going to have to get used to it.
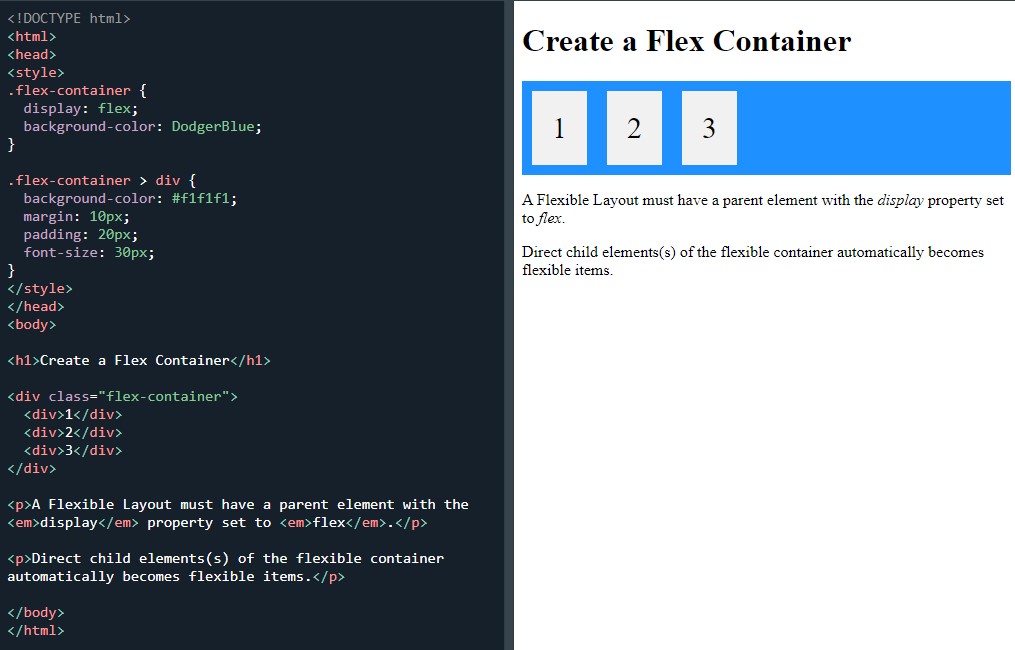
I started on their flexbox page:
 CSS flexbox container
Flexbox elements:
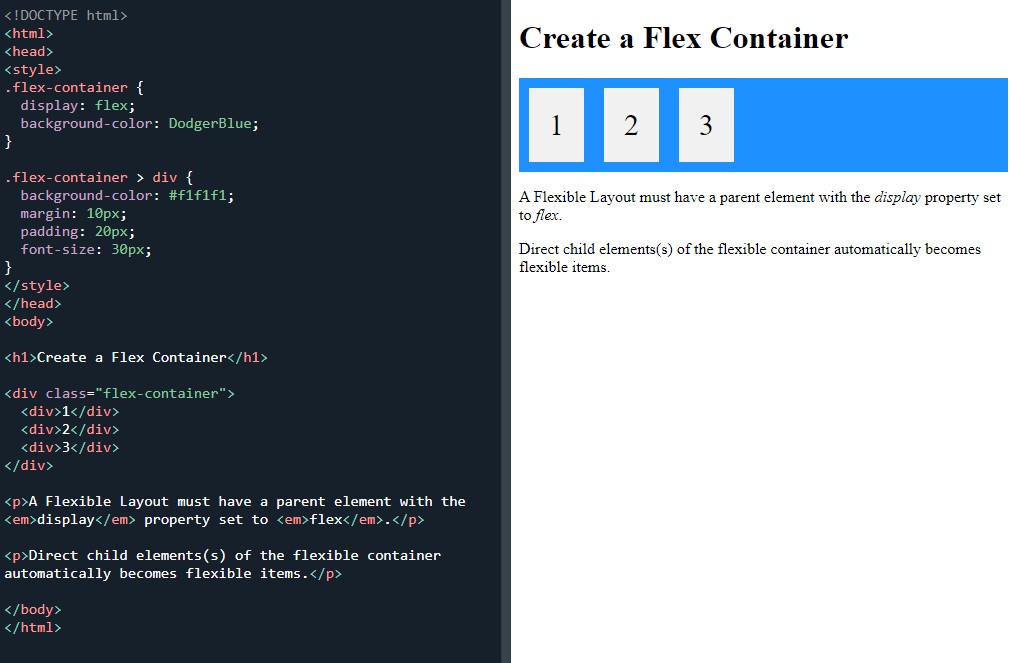 Define a flex container
The ‘Parent element (container)’ which is identical as far as I can tell to the previous example:
 Define a flex container
I’m thinking that by jumping between the two sites I’ll be able to use the best of both to suits my needs. I will stick with W3Schools for the moment and use their flexbox, media queries, grid and their website templates just to see what I can pick up. FreeCodeCamp has a project that I’d like to get stuck into when I feel like a change or a fresh challenge.
The recent mad dash for the line has left me a bit burnt out. I have a no-man’s-land feeling at the moment because I have left the structure of a course behind me. At present, I don’t have a clear plan of what I am going to learn and where I am going to learn it.
I’m not a tutorial watching person. I find them useful to help with an issue but listening to and watching a screen while typing along is a struggle. I like to read instructions on a static site and type along at my pace.
Day total: 0 hours 51 minutes
Thursday 30th December 2021 / *
Flex time
Last night I watched a Youtube video about grid and flexbox. I know they are great tools but I really wanted to know what they are used for and the difference between the two. I am able to write the code to do things like change boxes but before the vid, I still didn’t really know on what tasks they are useful for.
After the video, I now understand what they are and what they do. It's also clear that I will need to get good at them both in order to use them effectively and assist me with website building.
I did a warm up of the previous night's 'flex container' example. I'm not going to screen capture all the examples I did but instead I will just say that I completed the page about flex container
The tasks are roughly the same with a few variations. I then went on to complete the next page which is the flex items.
My goal today was to get through the flexbox section then head over to freeCodeCamp and complete the flexbox section there, but there was too much stuff to get through in one day.
I did look at the next page which is about flexbox responsive and it answered those questions again regarding; what is flexbox?
The flexbox responsive looks amazing with the pictures in different shapes and sizes. As it looks awesome, I’m going to save it for when I’m fresh tomorrow.
Day total: 1 hours 34 minutes
Friday 31st December 2021 *
The end
Recently, all the study and being able to start building stuff has made me feel good. I’ve had this idea that I am getting somewhere and my knowledge and ability is increasing. Last night I sat down and watched a few Youtube videos about flexbox and when I went to bed, It got me thinking. I had the daunting realisation that I don’t know very much about coding and there's is still so much more to learn. Man, this brought me down to Earth again and immediately took away my feelings of grandeur.
When I woke up this morning, it dawned on me that I needed to start building some stuff. I’m just learning lessons and not doing anything with these skills. I could continue on with the lessons but I’d be stuck in this forever cycle of lessons without learning to go solo or learn the skills to be independent.
I need to take the plunge and get stuck into full scale and hands on website building. After all, practise makes perfect.
The next page on the flexbox section is titled ‘flex responsive’ and it has a picture gallery and a website. I going to focus on this and just start building a website and develop those skills.
The first example today was ‘responsive flexbox’:
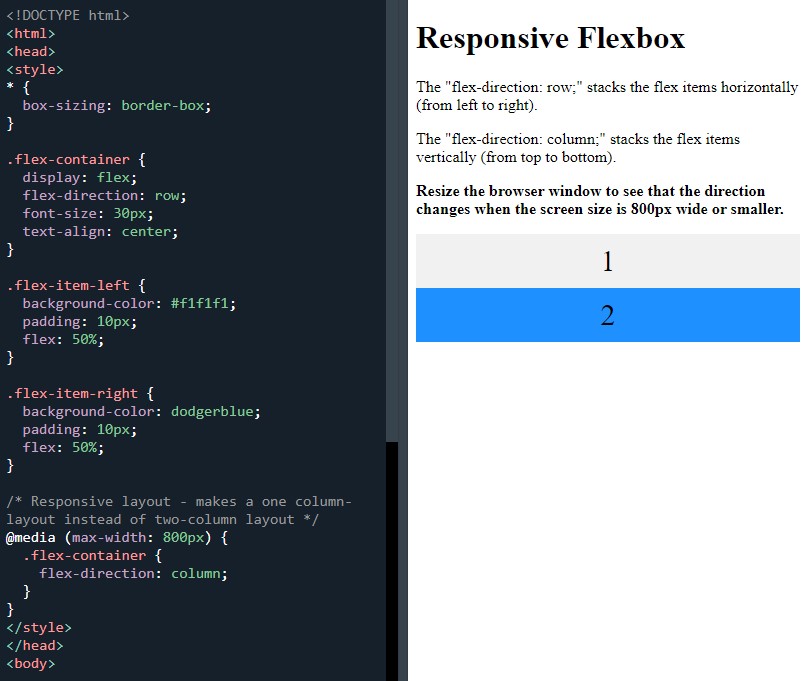 Responsive flexbox
It was then on to the ‘responsive image gallery using flexbox’:
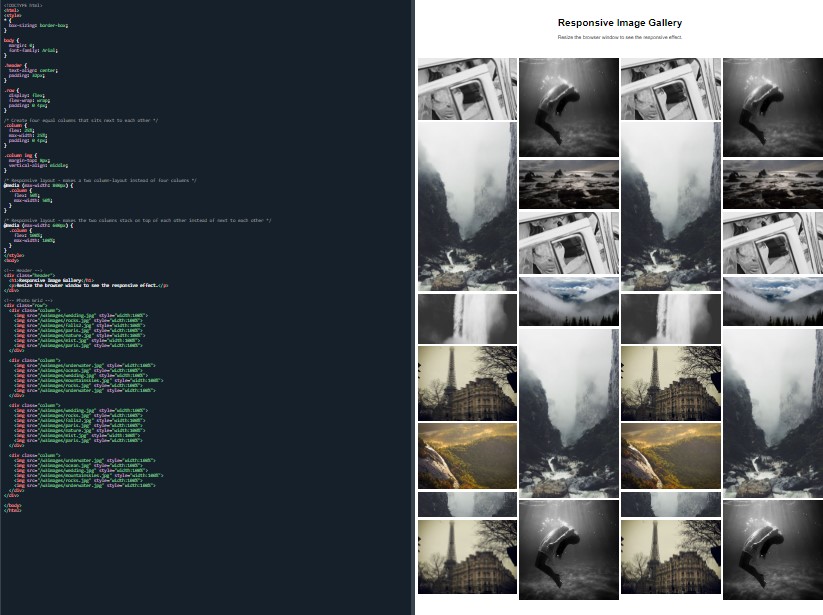 Responsive image gallery using flexbox
This one was El Dorado to me. I stayed on this example for a while and I was totally focused on it. I wanted to break it down and understand every detail; what does every line ask and what does every line build?
The images didn’t load so I went onto my wife’s shop instagram page where she sells handmade jewellery and I I saved twenty pictures. I had to snapshot them as I couldn’t save them by right click.
I used these images and labelled them 1-20. I placed them in a separate folder in the same file as my testpic images and social media icons.
The images still didn’t load.I removed them and placed them alongside the testpic images.
I tried again and nothing. All there was was the small icons that appear when an image doesn’t load.
Debugging hat on, I set to work scanning the lines. Finally, I saw I had not labelled the src="" with .jpg.
success. They were loaded. My next step was to start changing details like the background colours and font from memory without reverting back to the W3Schools website.
I managed to add colour to the text and a background of the header. I added a footer with copyright 2021 but I wasn’t able to centre it, even though I used the code from the 'responsive website' example which was right underneath the 'responsive image gallery':
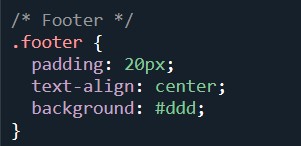 The CSS footer code I copied from the responsive website
While I was on a roll, I used the code from the website example to add a navbar. I was going to add sticky but got stuck instead. I attempted to add the social media links and their icons but I failed at that too.
I ended the session by using media Queries to make it responsive.
There I had it. My first real venture into building a responsive website and I enjoyed it. I enjoyed it so much that I tested myself by trying to remember as much of the code as I could before having to look up the answer.
Day total: 1 hour 49 minutes
Thanks for reading
LTCAF